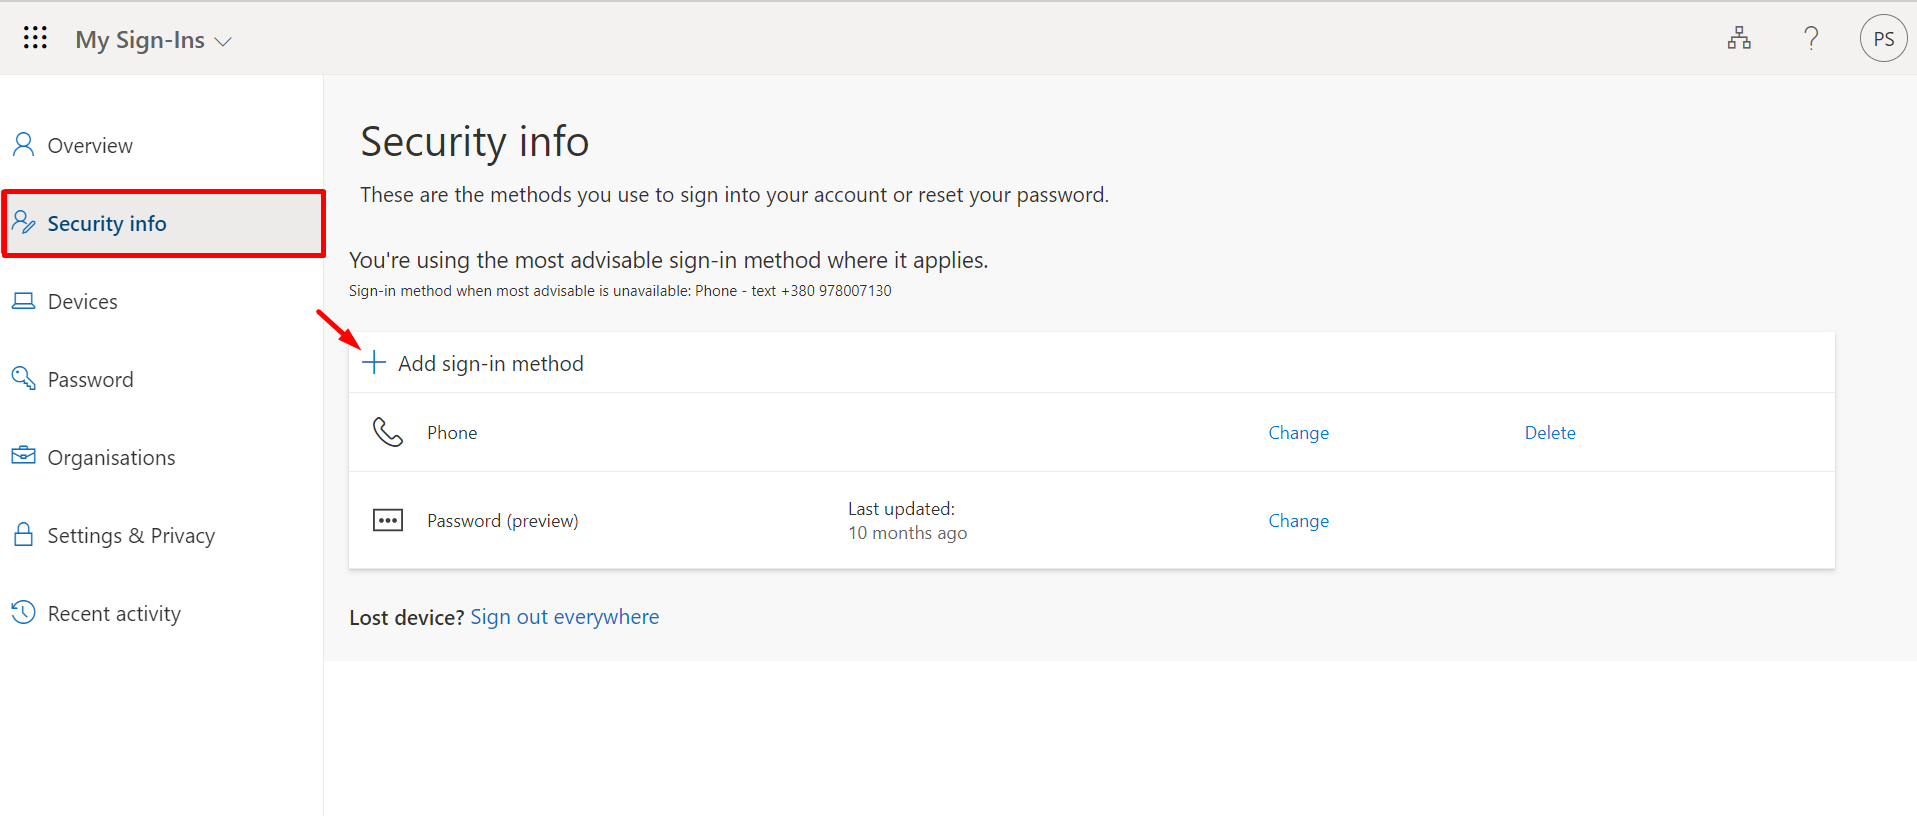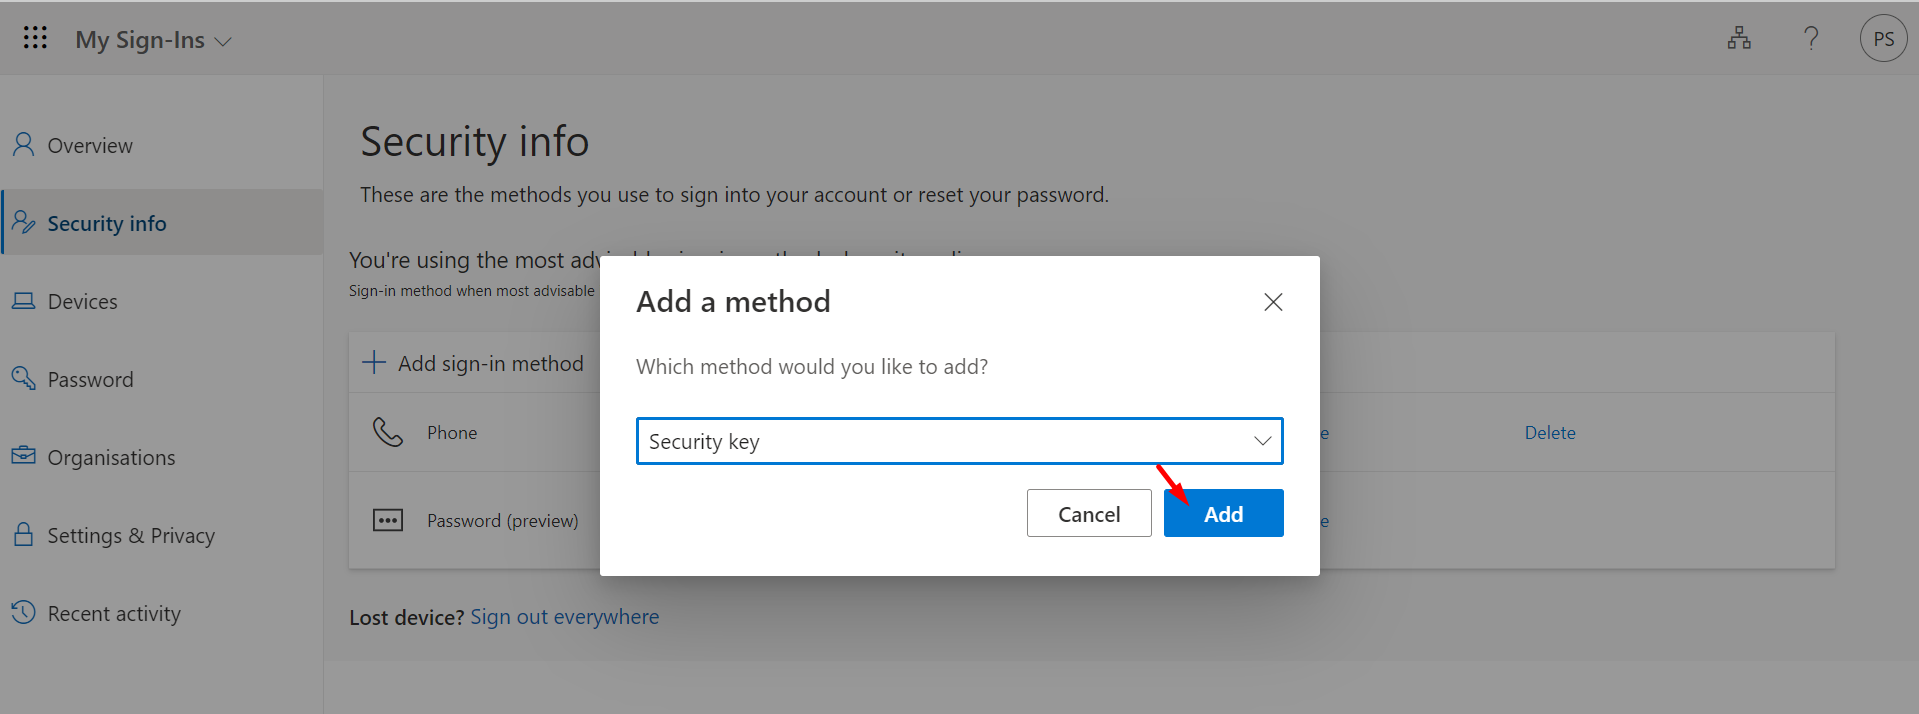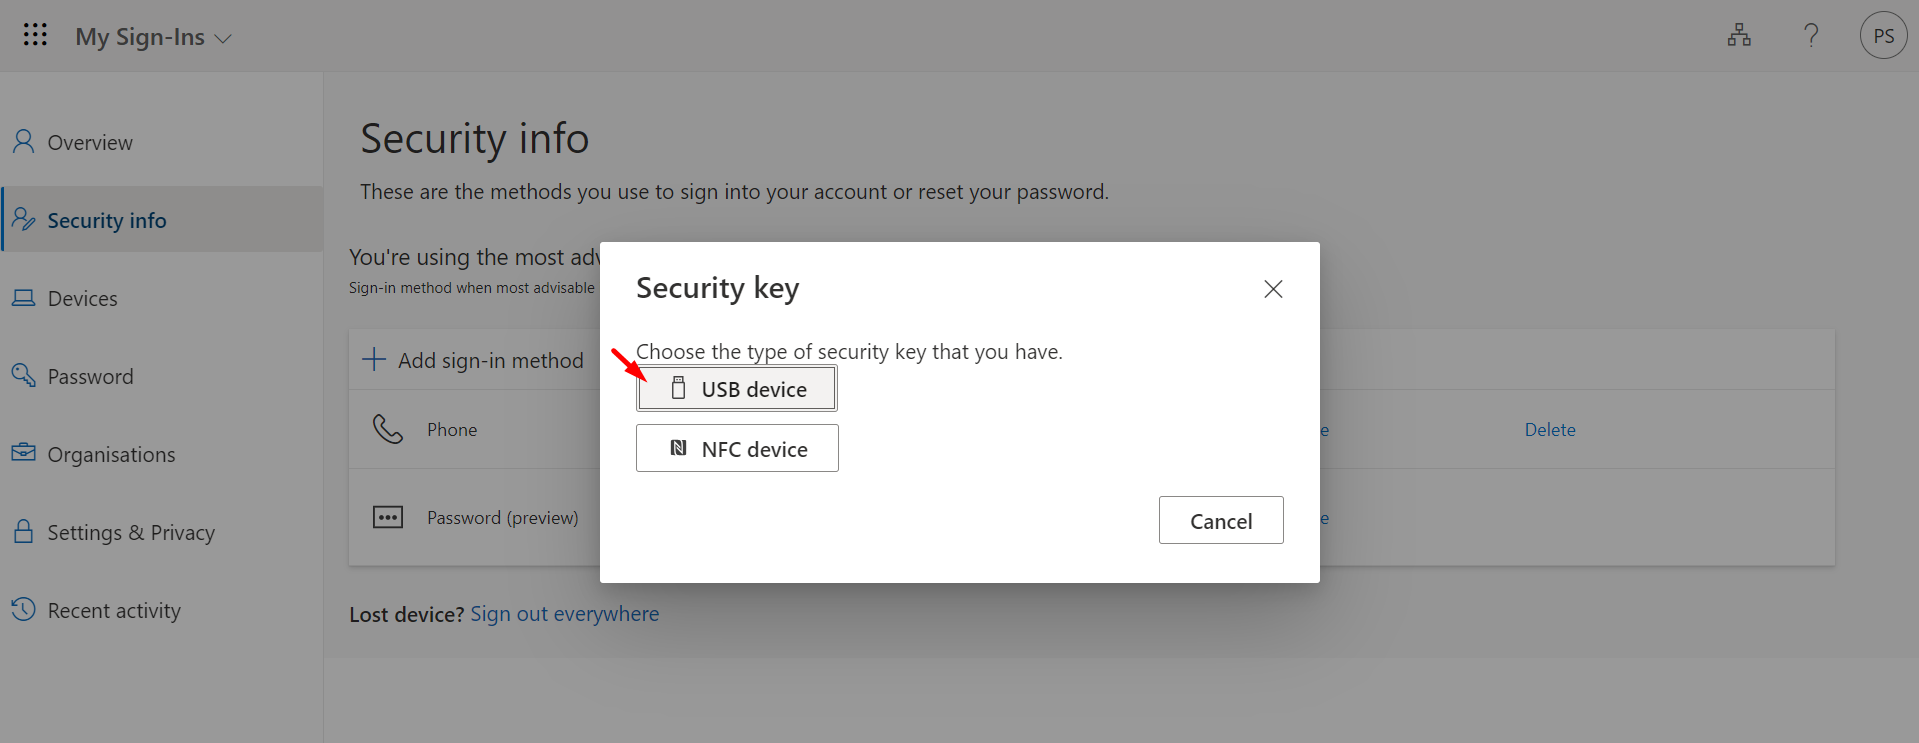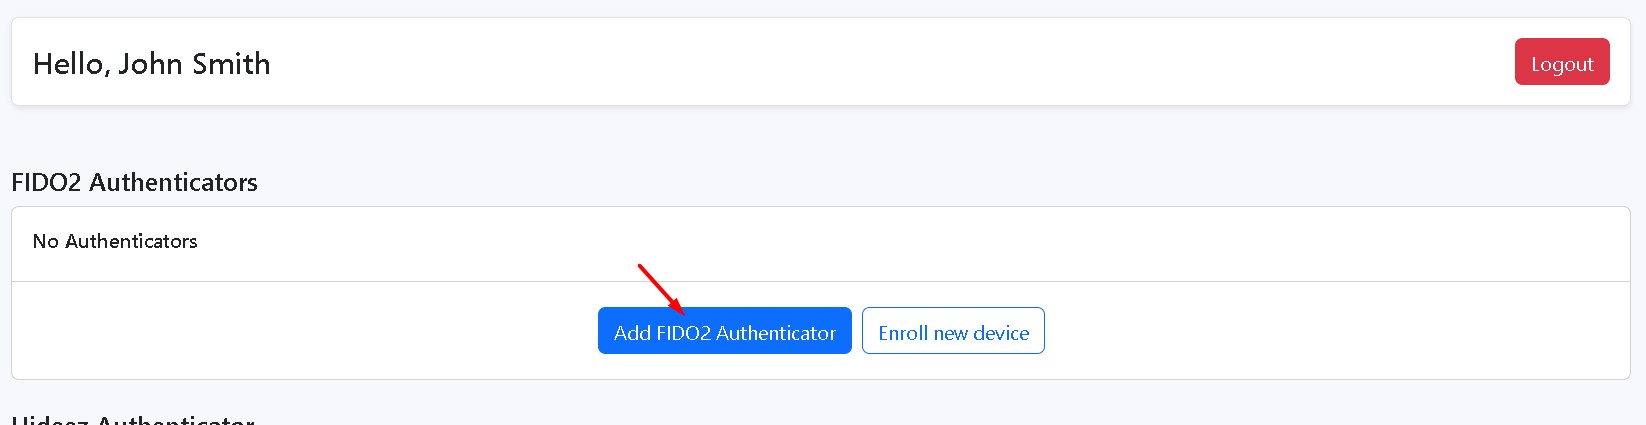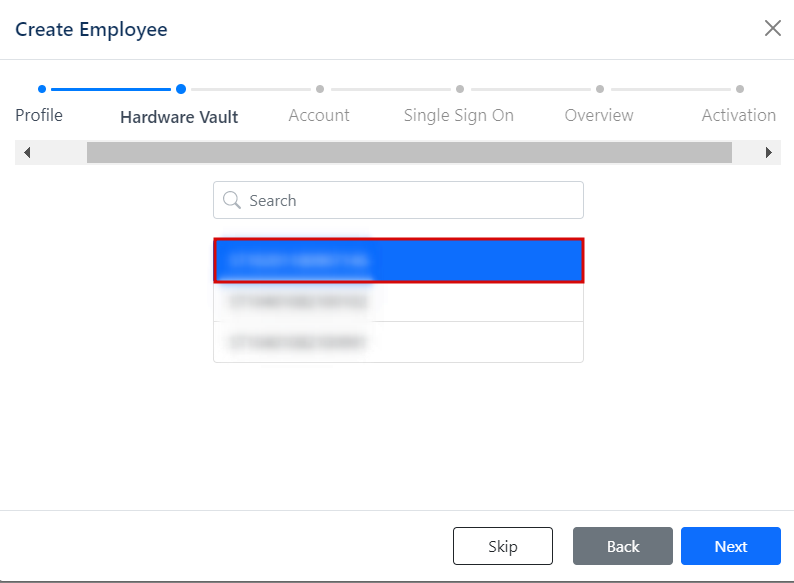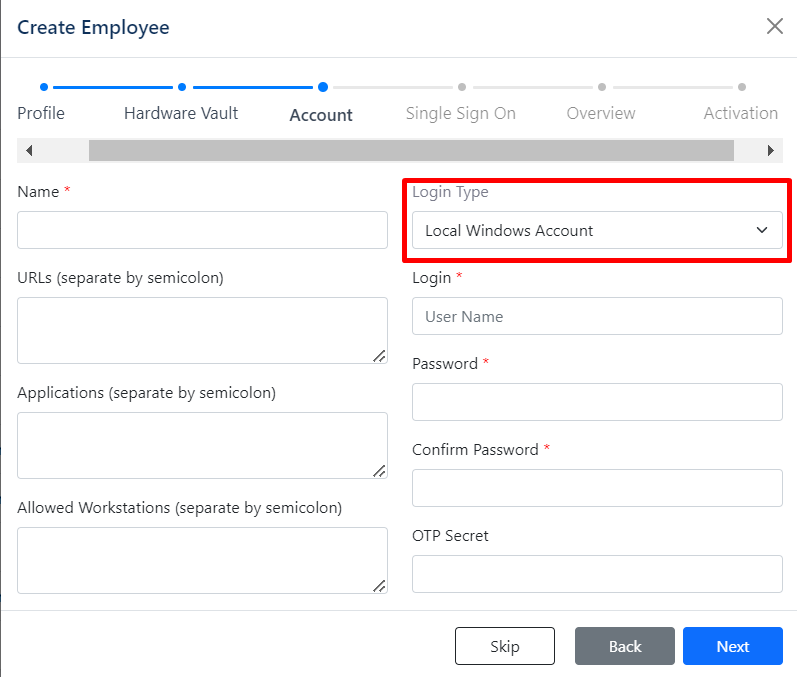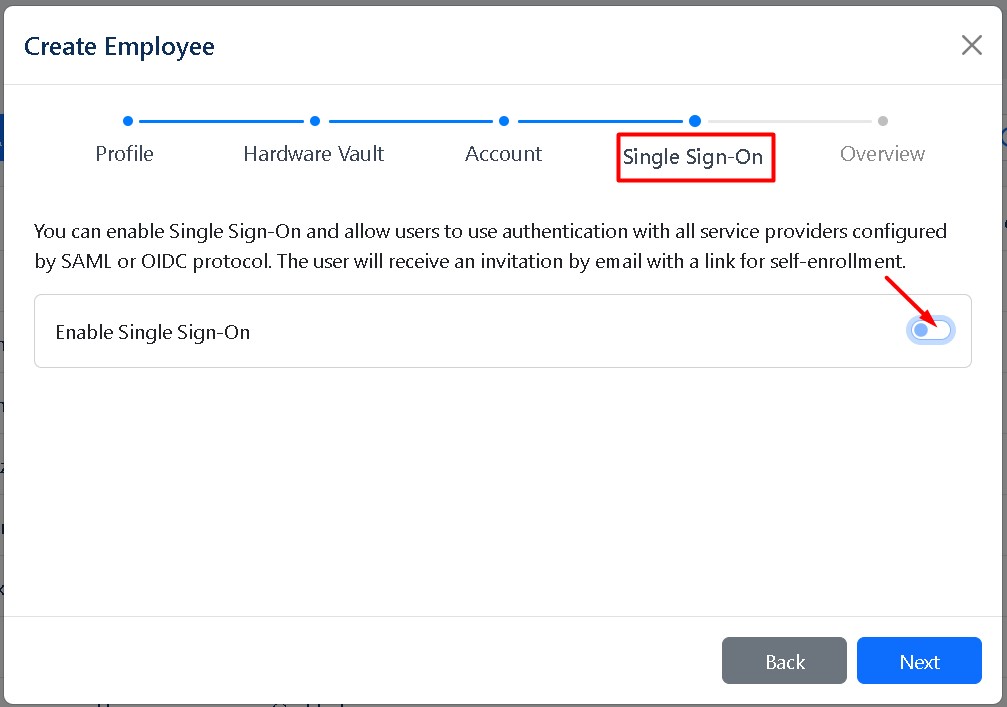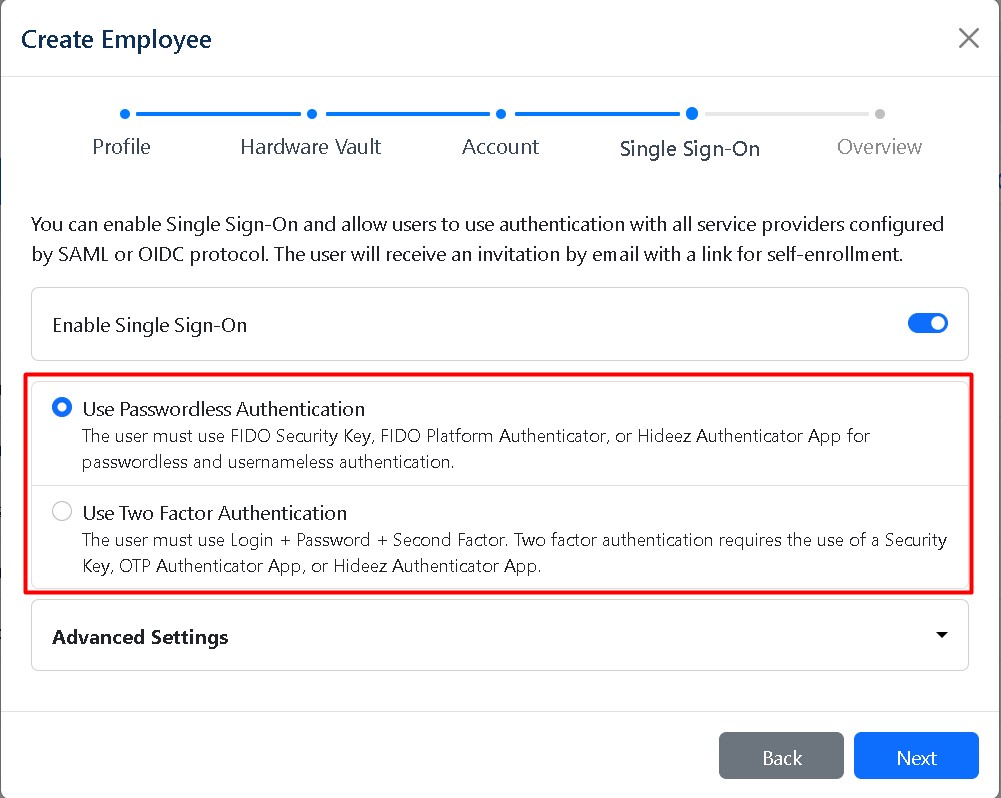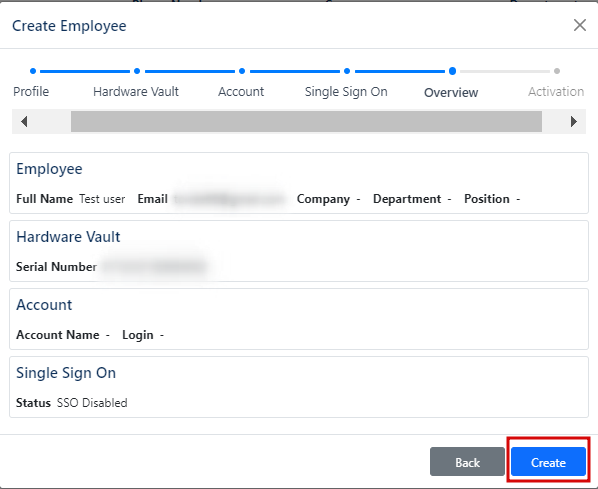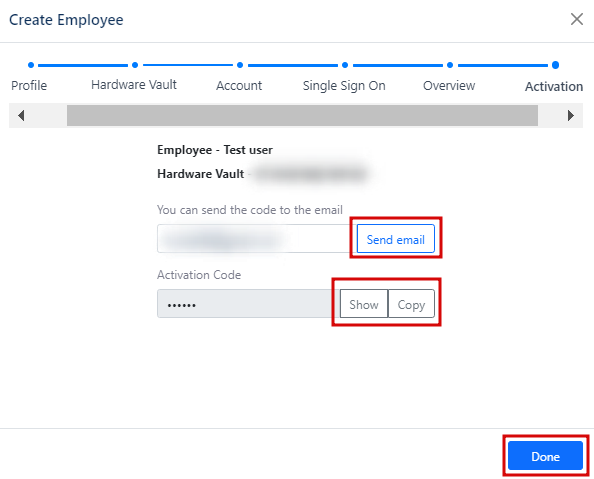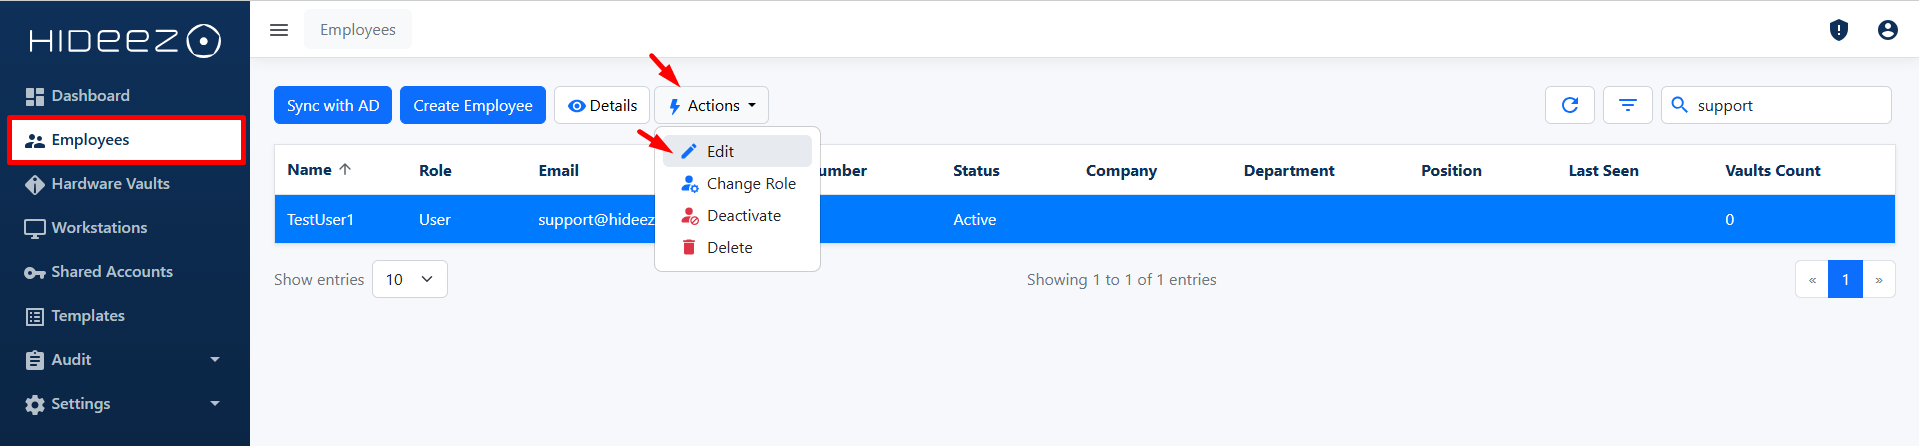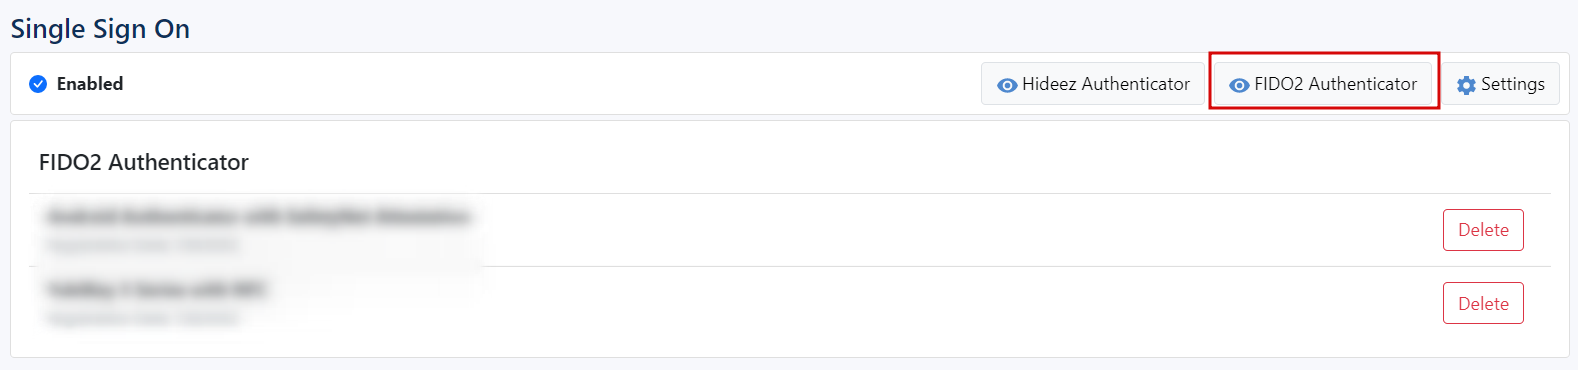
# Hideez Authentication Service for Enterprises

Knowledge base — Hideez Authentication Service

{% hint style="danger" %}
**Important:** This site contains documentation for retired and deprecated products. Documentation for current products is available at the following link: [**Hideez Workforce Identity (v.4)**](https://hideez.gitbook.io/hideez-enterprise-authentication/)
{% endhint %}

### Key features of the Hideez Authentication Service in 5 minutes:

{% content-ref url="/pages/-MfEUgMCq98h3cXVZLwk" %}
[Key features of the Hideez Authentication Service in 5 minutes](/readme/key-features-of-hideez-enterprise-solution-in-5-minutes)
{% endcontent-ref %}

## Quick start guides:&#x20;

### [**Quick start guide for Mobile authenticator**](/quick-start-guides/quick-start-guide-for-subscriptions/hideez-authenticator-guide)

Single Sign On login & PC login via Mobile App

### [**Quick start guide for Hideez Key 3 and 4**](/quick-start-guides/hideez-key-guide)

Hardware Security Key for Proximity lock and unlock PC

### [**Quick start guide for FIDO Security Key**](/quick-start-guides/fido2-and-u2f-authentication-guide)

FIDO Hardware Security Key for SSO login to web services

### [**Quick start guide for Passkey**](/quick-start-guides/passkey-guide)

Single Sign On login to web services

## Use cases

### Hideez Authenticator App use cases

* [PC Login passwordless login](/use-cases/hideez-authenticator-mobile-app/passwordless-pc-login)
* [PC Login password-based login](/use-cases/hideez-authenticator-mobile-app/password-based-pc-login)
* [RDP login by Hideez Authenticator App](/hideez-authenticator-app/user-guide/login-with-hideez-authenticator/pc-login/login-to-the-remote-pc-via-rdp)
* [SSO login to Web services (FIDO2) via mobile app](/use-cases/hideez-authenticator-mobile-app/using-hideez-authenticator-as-your-passwordless-authentication-method-for-sso)

### Hideez Key Use cases

* [Proximity PC lock](/use-cases/hideez-key/lock-pc)
* [Proximity PC unlock](/use-cases/hideez-key/lock-unlock-pc-by-proximity)
* [Automatic RDP login](/use-cases/hideez-key/automatic-rdp-launch-and-logon)
* [Password manager](/use-cases/hideez-key/password-manager-and-otp-generator)
* [OTP manager for two-factor authentication](/use-cases/hideez-key/using-hideez-key-as-otp-security-key-for-your-two-factor-authentication)

### FIDO Security Key Use cases

* [SSO login to Web services (FIDO2) via **SAML** **2.0** or **Open ID** protocols.](/use-cases/fido-security-key/sso-login-to-web-servises-via-hardware-key-fido2)
* [Passwordless PC Login to Entra ID (Azure AD).](/use-cases/fido-security-key/unlock-pc-by-security-key)

### Passkey Authentication

* [SSO login to Web Services (FIDO2) via Passkey and Hideez Server as Identity Provider](/use-cases/passkey/sso-login-to-web-services-fido2-via-passkey-and-hideez-server-as-identity-provider)

### Hideez Enterprise Server Guide

{% content-ref url="/pages/qQVVkSYhJFhW46M617As" %}
[Hideez Enterprise Server](/hideez-enterprise-server/hideez-enterprise-server)
{% endcontent-ref %}

### Hideez Client Application Guide

{% content-ref url="/pages/-M5XKEue8DfCAnZnqrRM" %}
[Installation of the Hideez Client Application](/hideez-client-app/windows-deployment/set-up-hideez-client-app)
{% endcontent-ref %}

### Hideez Key Guide

{% content-ref url="/pages/jl4LxbEkq9aOmpTJQejP" %}
[Hideez Key (Enterprise Edition)](/hideez-key-enterprise-edition/hideez-key-enterprise-edition)
{% endcontent-ref %}

### Product Updates

{% content-ref url="/pages/-M8kf0t8al0qAp1dgOdP" %}
[Product updates](/product-updates/product-updates)
{% endcontent-ref %}

### API

{% content-ref url="/pages/-M5v0z1fWxJpBIrghERi" %}
[Hideez Enterprise Server web API](/api/hideez-enterprise-server-web-api)
{% endcontent-ref %}

{% hint style="info" %}
The Ukrainian version of this guide can be found [here.](https://enterprise-ua.hideez.com/)
{% endhint %}


# Release notes

### New Features:

* **Employee Account Disabling:** Ability to disable an employee's account for improved security and management.
* **License Host Check:** A new feature for validating the license host to ensure compliance.
* **Multi-Account Support for Hideez Authenticator Mobile App:** Users can now manage multiple accounts within the mobile application, either on a single Hideez Server or across different Hideez Servers.
* &#x20;Hideez Server as an **External Authentication Method** for Microsoft Entra ID via OIDC.
* Entra ID passwordless PC login implementation.
* Saving the last sign-in method.

### Updates:

* **Software Vault Authentication/Registration:** Enhanced security and functionality for vault authentication and registration processes.
* **LDAP Filter Update:** Improved filtering for LDAP queries, ensuring more accurate and efficient directory lookups.
* Updated **OIDC usability.**
* Updated **SAML usability**
* Added integration **WS-Federation**
* A new type of **license key** for employees.
* Added behavior when removing the user from the domain sync group.


# Key features of the Hideez Authentication Service in 5 minutes

Hideez Authentication Service – Key features

#### Experience True Passwordless SSO

Regardless of how many Identity Providers you have, Hideez can assist you in getting rid of passwords. By expanding your investment in SSO and making it passwordless, you can attain the highest level of assurance for all of your applications. With Hideez, the possibilities for authentication are endless!

#### Remote Login Solutions

With Hideez, you can equip your team with speedy and straightforward passwordless security that works on all their devices, applications, networks, and more. By using Hideez, you can streamline and consolidate logins for desktops, RDP and VDI, which can boost your team's efficiency no matter where they are working from.

#### Proximity-based PC Login and Unattended Logout

Our hardware security vaults store up to 2,000 passwords per device. With automatic proximity lock/unlock for PCs, you can ensure that access to your desktop computers is always secure. Our solution also provides the ability for remote user logout, allowing you to end user sessions remotely.

#### Admin Console for Managing Users and Access Rights

Our user access management tools allow you to manage authentication methods and access rights of all employees, with the ability to revoke or delete users from a central admin console. With customizable solutions, easy deployment, and support, you can manage user access with ease!

#### Internet Connection Is Not Required for End Users

Stay connected to your corporate resources even without an internet connection. Our passwordless authentication solution allows employees to access apps and log in to workstations offline. With our mobile app, employees can using one-time access codes, while Hideez Keys offer a one-touch login with a PIN code.

### **Hideez Authentication Service Components**

#### [**1. Hideez Enterprise Server**](/hideez-enterprise-server/deployment)

Virtual Server in the Cloud for Centralized Identity Management

A centralized user management dashboard facilitates employee onboarding and offboarding, ensuring that only authorized personnel have access to medical resources. IT administrators can add onsite and remote workstations, users, and their authenticators. On-premise deployment is available upon request.

#### 2. Authentication Tools

Variety of Authentication Methods for Different Use Cases

1. [**Passkeys**](/use-cases/passkey/sso-login-to-web-services-fido2-via-passkey-and-hideez-server-as-identity-provider) (fingerprint scan, facial recognition or PIN) for passwordless sign-in and MFA;
2. [**Mobile Authenticator**](/hideez-client-app/mobile-authenticator) for passwordless sign-in to accounts and passwordless desktop login;
3. [**Hideez Key**](/hideez-key-enterprise-edition/hideez-key-enterprise-edition) for password-based or passwordless sign-in to accounts, MFA, Tap\&Go desktop login, and automatic logout when the user leaves the workstation.

#### [**3. Hideez Client**](/hideez-client-app/windows-deployment)&#x20;

Desktop Client app for Windows workstations

Hideez Client securely connects Windows workstations to the Hideez Server. In the event that Hideez Keys are used as the primary authentication method, the desktop client enables Tap\&Go login and unattended logout for employees, as well as traditional password management.


# Hideez Authenticator Mobile app guide

Passwordless SSO and PC logon with Mobile App

{% hint style="info" %}
**The application also supports multi-accounts, allowing you to add multiple accounts for users registered on the Hideez Enterprise Server within a single domain, as well as accounts from different Hideez servers in various domains. This is particularly convenient if you have multiple Hideez servers or multiple accounts on one server.**
{% endhint %}

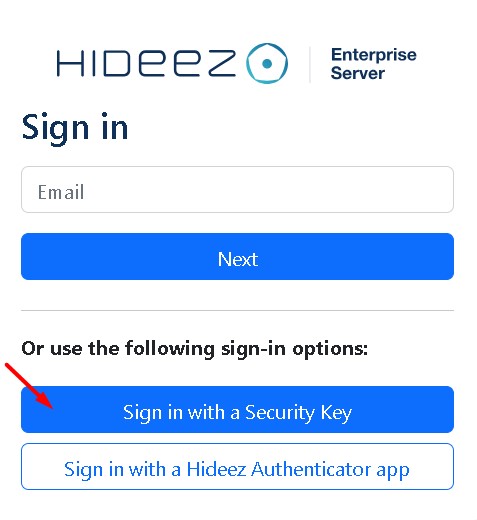
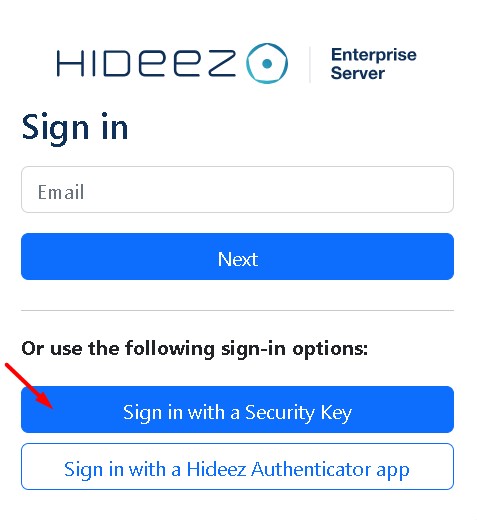
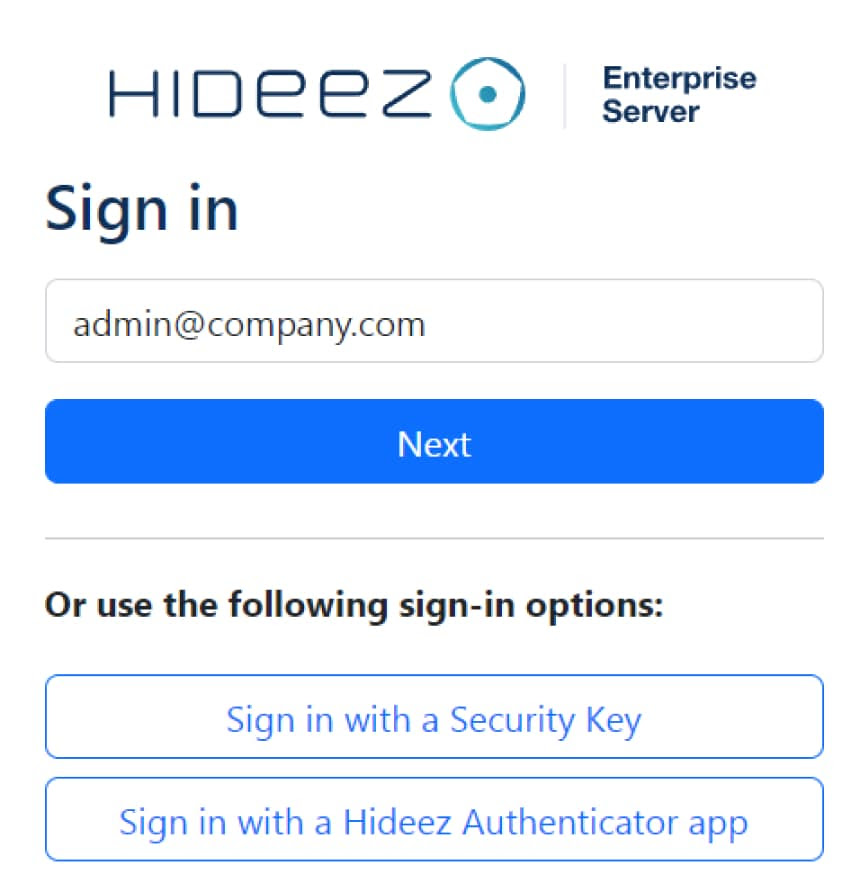
### &#x31;**.** Sign in to your Hideez server using your email and password

<figure><img src="https://content.gitbook.com/content/RdTysrljwe610dPFG7tE/blobs/CIUc57UN3PqYfd3YcvVW/image.png" alt="" width="375"><figcaption></figcaption></figure>

### **2. Install the Hideez Authenticator app on your smartphone:**

<div><figure><img src="https://content.gitbook.com/content/RdTysrljwe610dPFG7tE/blobs/zQjbBrFpQrqAxh9VoSNn/Screenshot_6.jpg" alt=""><figcaption></figcaption></figure> <figure><img src="https://content.gitbook.com/content/RdTysrljwe610dPFG7tE/blobs/33cZESRpFdpej4ZzB7F3/Screenshot_3.jpg" alt=""><figcaption></figcaption></figure></div>

* Select your operating system (Android or iOS), scan the QR code, and proceed to download and install the application.
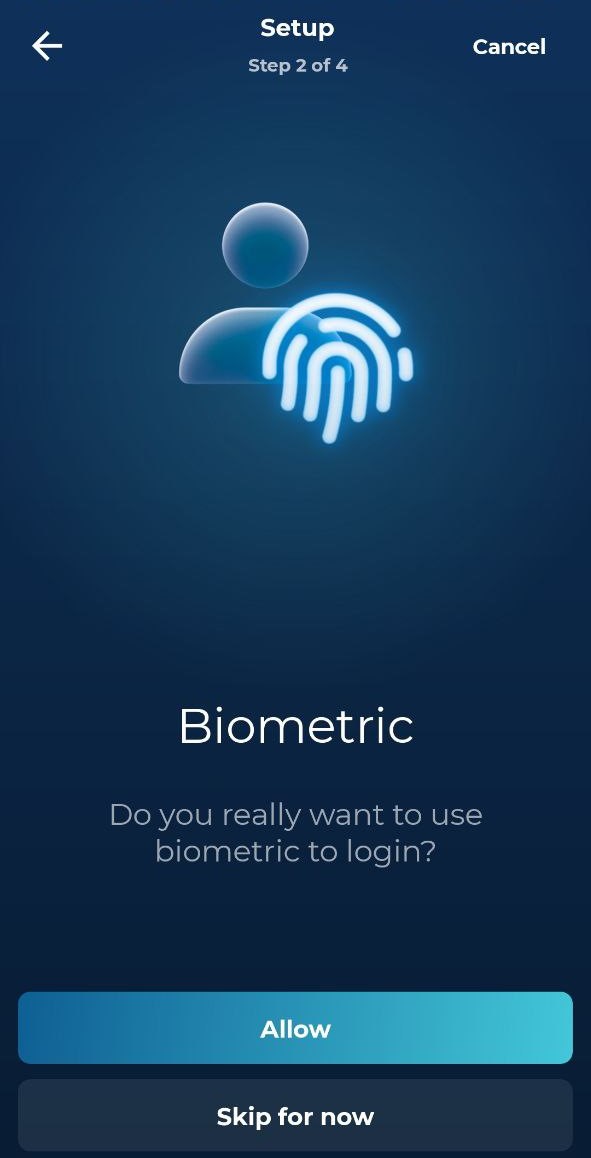
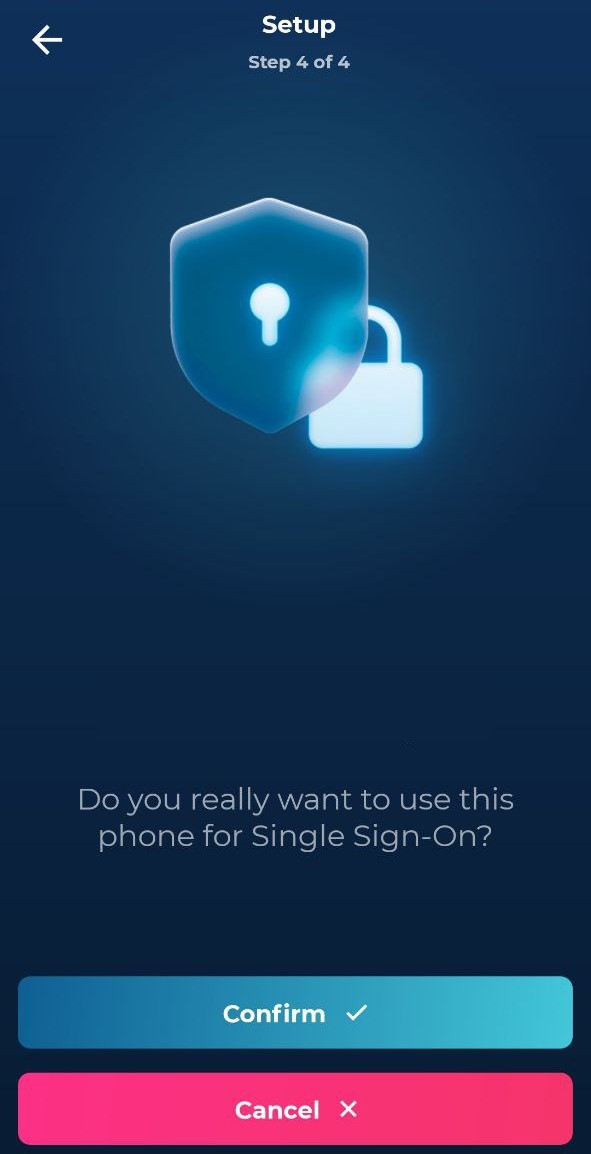
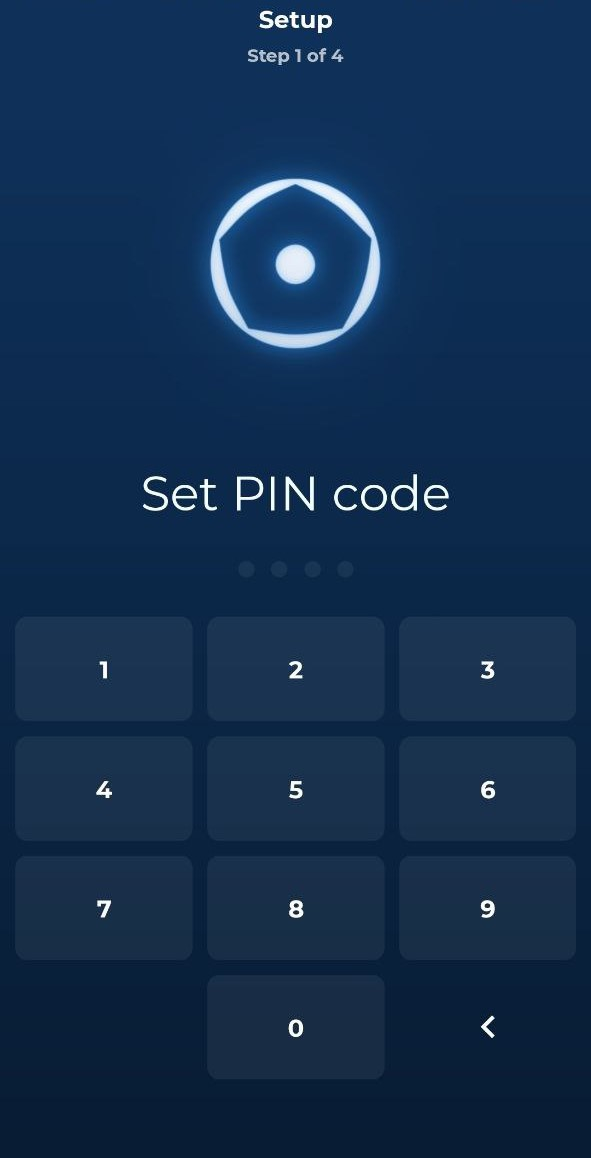
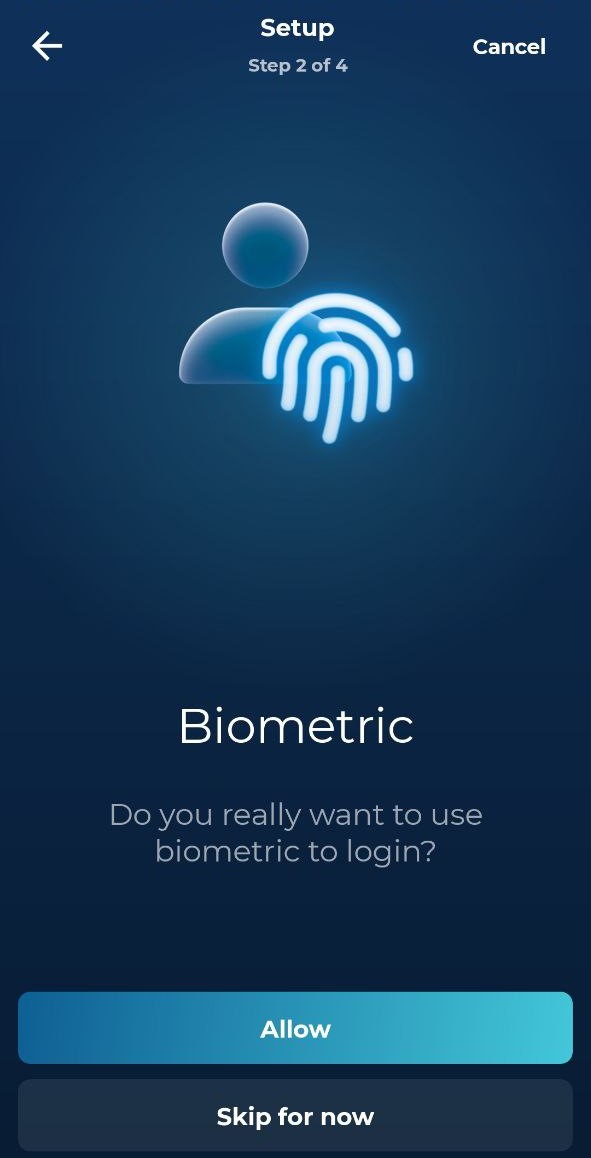
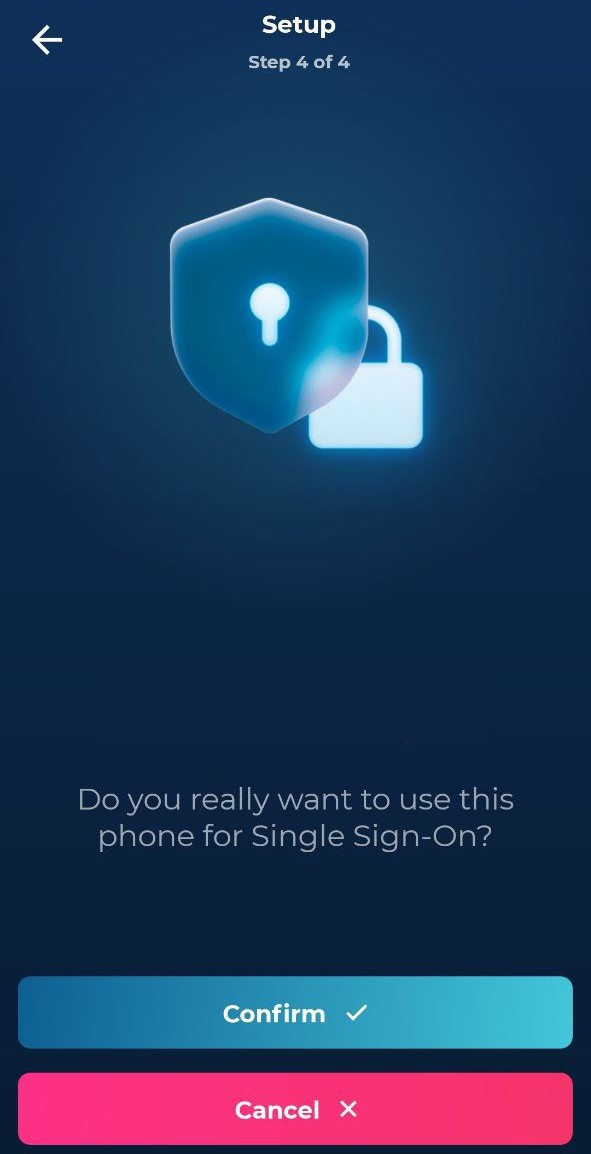
* Follow the on-screen steps within the mobile app to complete the setup.

<div><figure><img src="https://content.gitbook.com/content/RdTysrljwe610dPFG7tE/blobs/sbJsPr7xOMGsk49jJEdM/image.png" alt="" width="148"><figcaption></figcaption></figure> <figure><img src="https://content.gitbook.com/content/RdTysrljwe610dPFG7tE/blobs/fn1aLD2tZIvisWntBGyj/photo_2023-10-30_02-20-10.jpg" alt="" width="148"><figcaption></figcaption></figure> <figure><img src="https://content.gitbook.com/content/RdTysrljwe610dPFG7tE/blobs/gOLh5AudsmlUoc2kZSag/photo_2023-10-30_02-02-01.jpg" alt="" width="148"><figcaption></figcaption></figure></div>

### 2. Configure Passwordless SSO

Hideez Server allows you to enable passwordless Single Sign-On (SSO) based on the SAML and OpenID Connect (OIDC) protocols. These protocols are employed to verify a user’s identity when an employee tries to access web or mobile applications.&#x20;

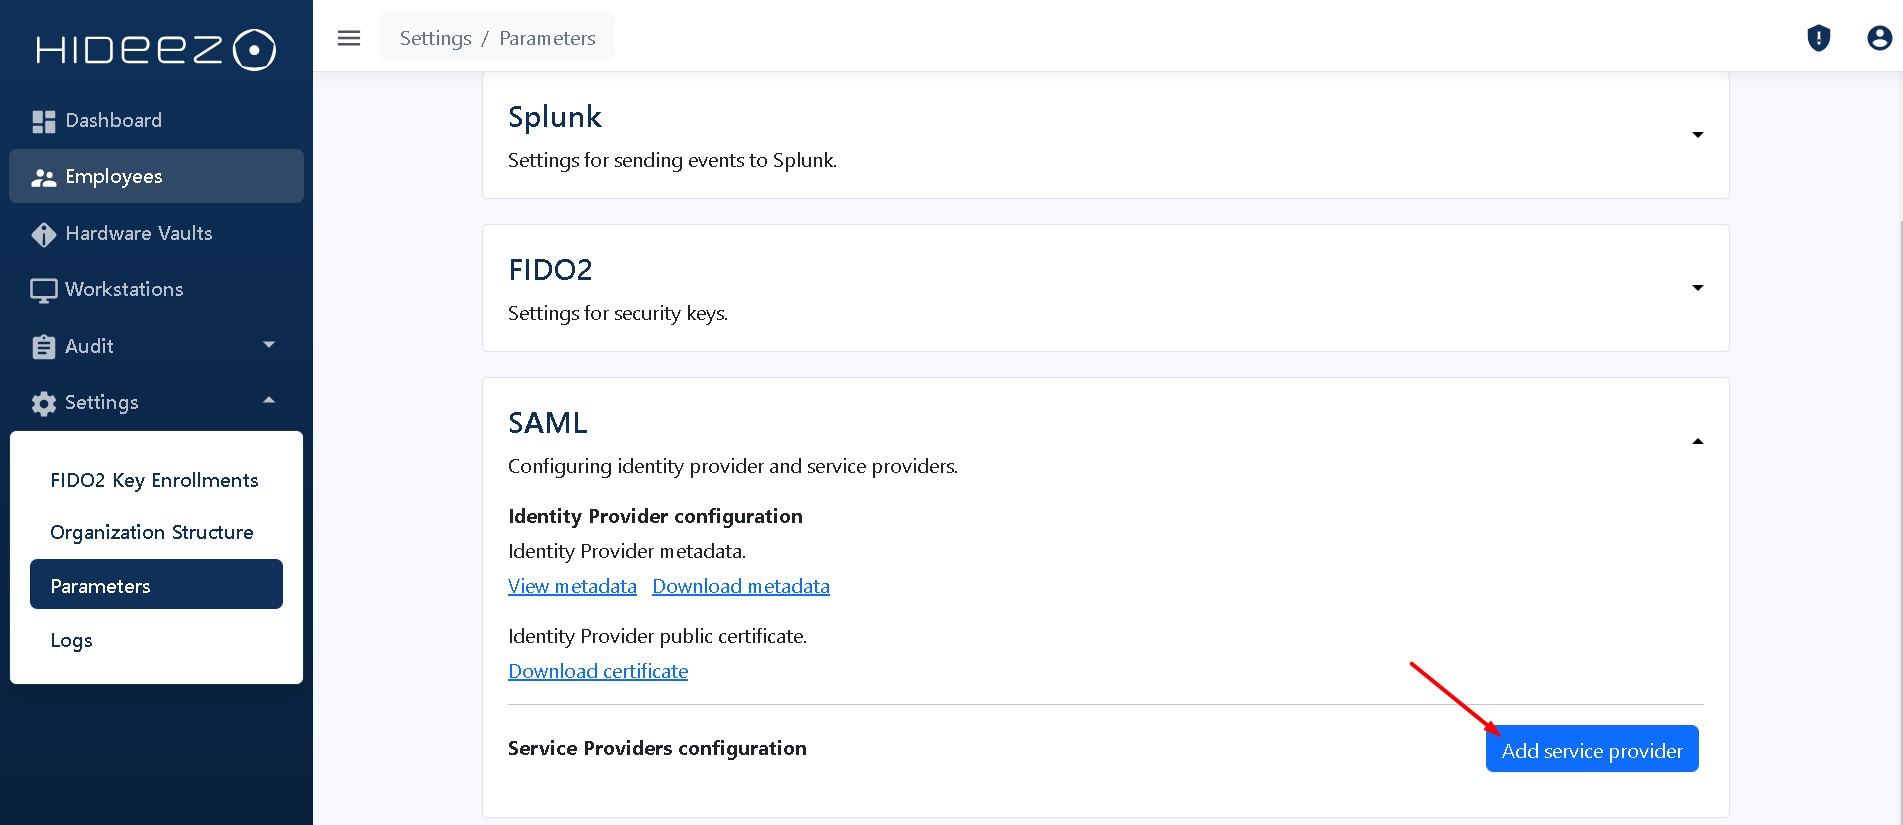
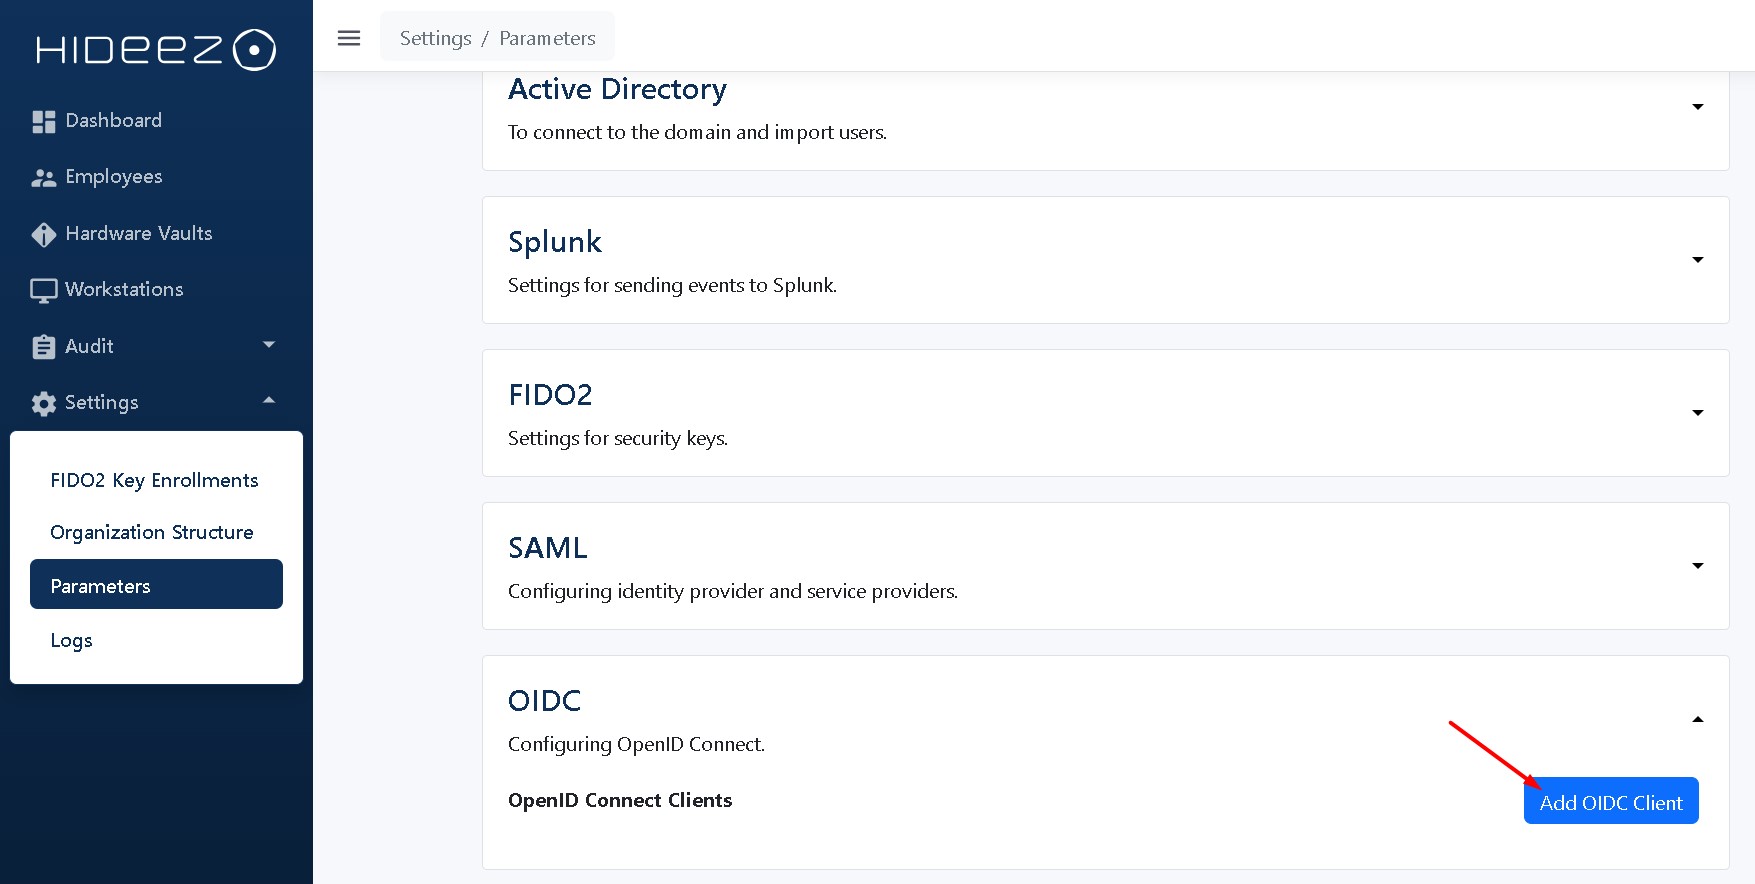
To configure the Hideez Server as an Identity Provider for passwordless SSO, go to Settings → Parameters, and proceed with [**SAML**](/hideez-enterprise-server/configuring-saml-protocol) or [**OIDC**](/hideez-enterprise-server/configuration-oidc-openid-connect) configuration as described in our user guide.

{% hint style="info" %}
**There are 2 possible use scenarios:**

* [**Windows login**](/hideez-authenticator-app/admin-guide/setup-for-pc-login-scenario)**:** passwordless or password-based PC login.
* [**SSO login to Web services**](/hideez-authenticator-app/admin-guide/setup-for-sso-scenario)&#x20;

**It is possible to use both of them simultaneously.**
{% endhint %}

### 3. Configure the computer to login with Hideez Client

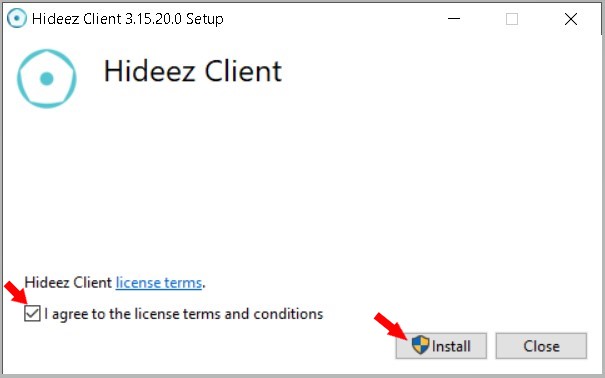
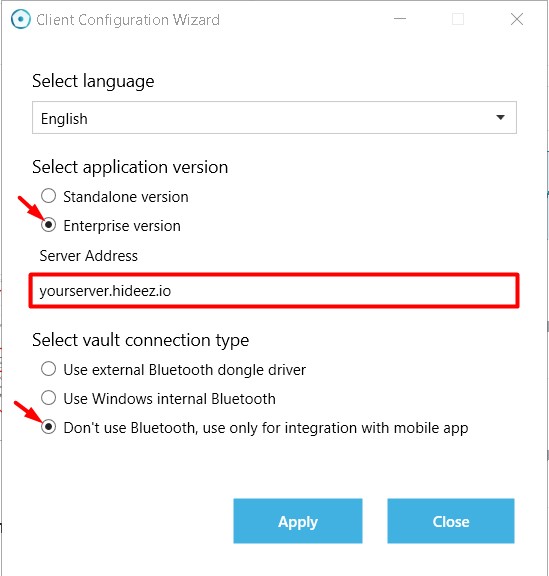
* Download [**.exe**](/product-updates/hideez-client-updates)  or **.msi** ([**x86**](https://update.hideez.com/update/hideezclient/x86/clientsetup.msi), [**x64**](https://update.hideez.com/update/hideezclient/x64/clientsetup.msi)) and install the Hideez Client on the computer.
* Select the Enterprise version of the program.
* Set your server address in the Hideez Client.&#x20;
* Select integration only with the mobile app.&#x20;

<figure><img src="https://content.gitbook.com/content/RdTysrljwe610dPFG7tE/blobs/CEWm5sTY13rBZ7l6P4jp/Screenshot_22.jpg" alt="" width="375"><figcaption></figcaption></figure>

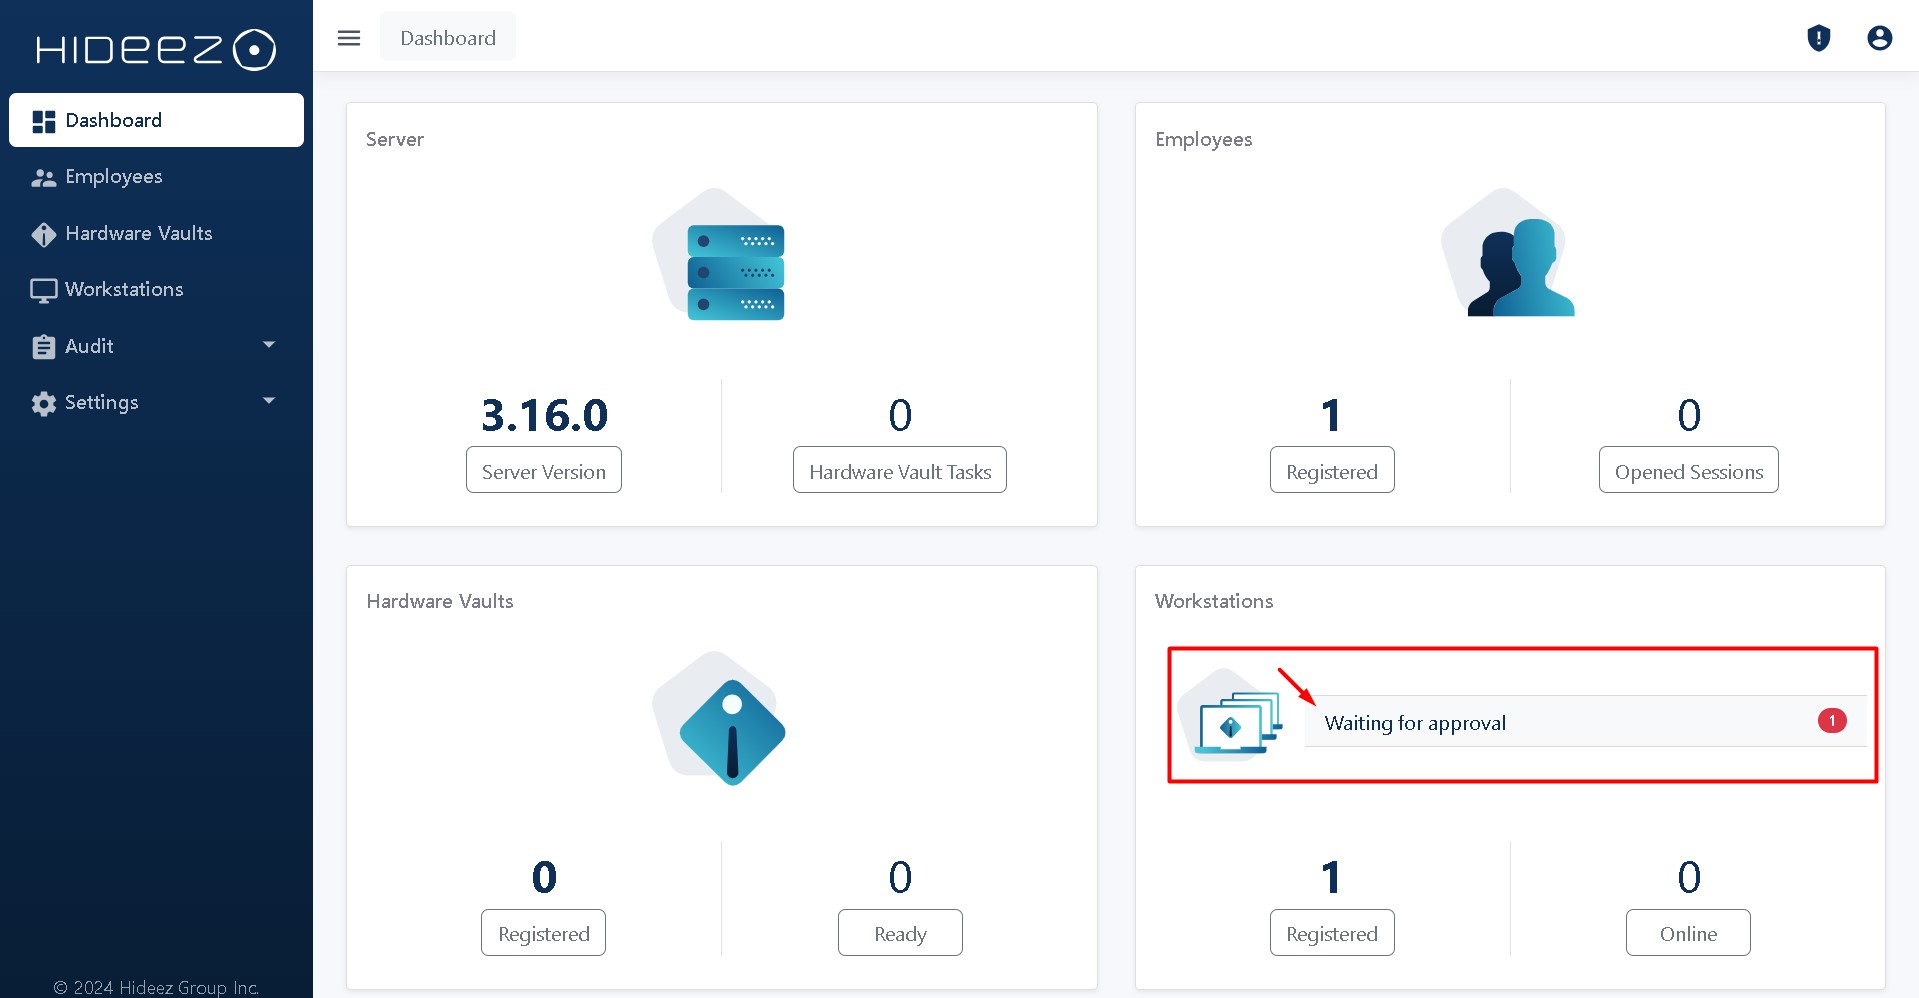
* After installing the program on your computer, your workstation will appear in the list for confirmation on the dashboard of your server

<figure><img src="https://content.gitbook.com/content/RdTysrljwe610dPFG7tE/blobs/hEzd3XgemNWtpFDMvY5q/Screenshot_24.jpg" alt="" width="563"><figcaption></figcaption></figure>

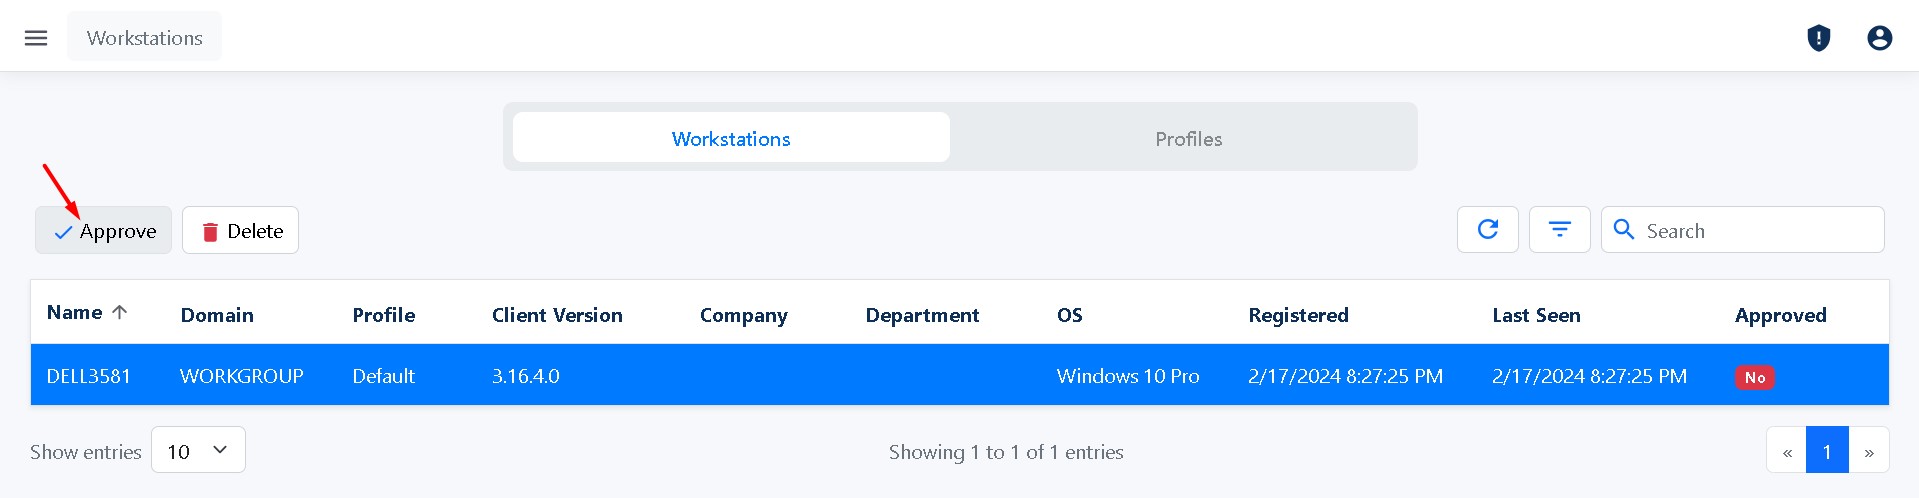
* Go to the section **Workstation** on your server, select Workstation, and click **Approve**

<figure><img src="https://content.gitbook.com/content/RdTysrljwe610dPFG7tE/blobs/VKwba6FmDwUUsGZ63kkm/Screenshot_28.jpg" alt=""><figcaption></figcaption></figure>

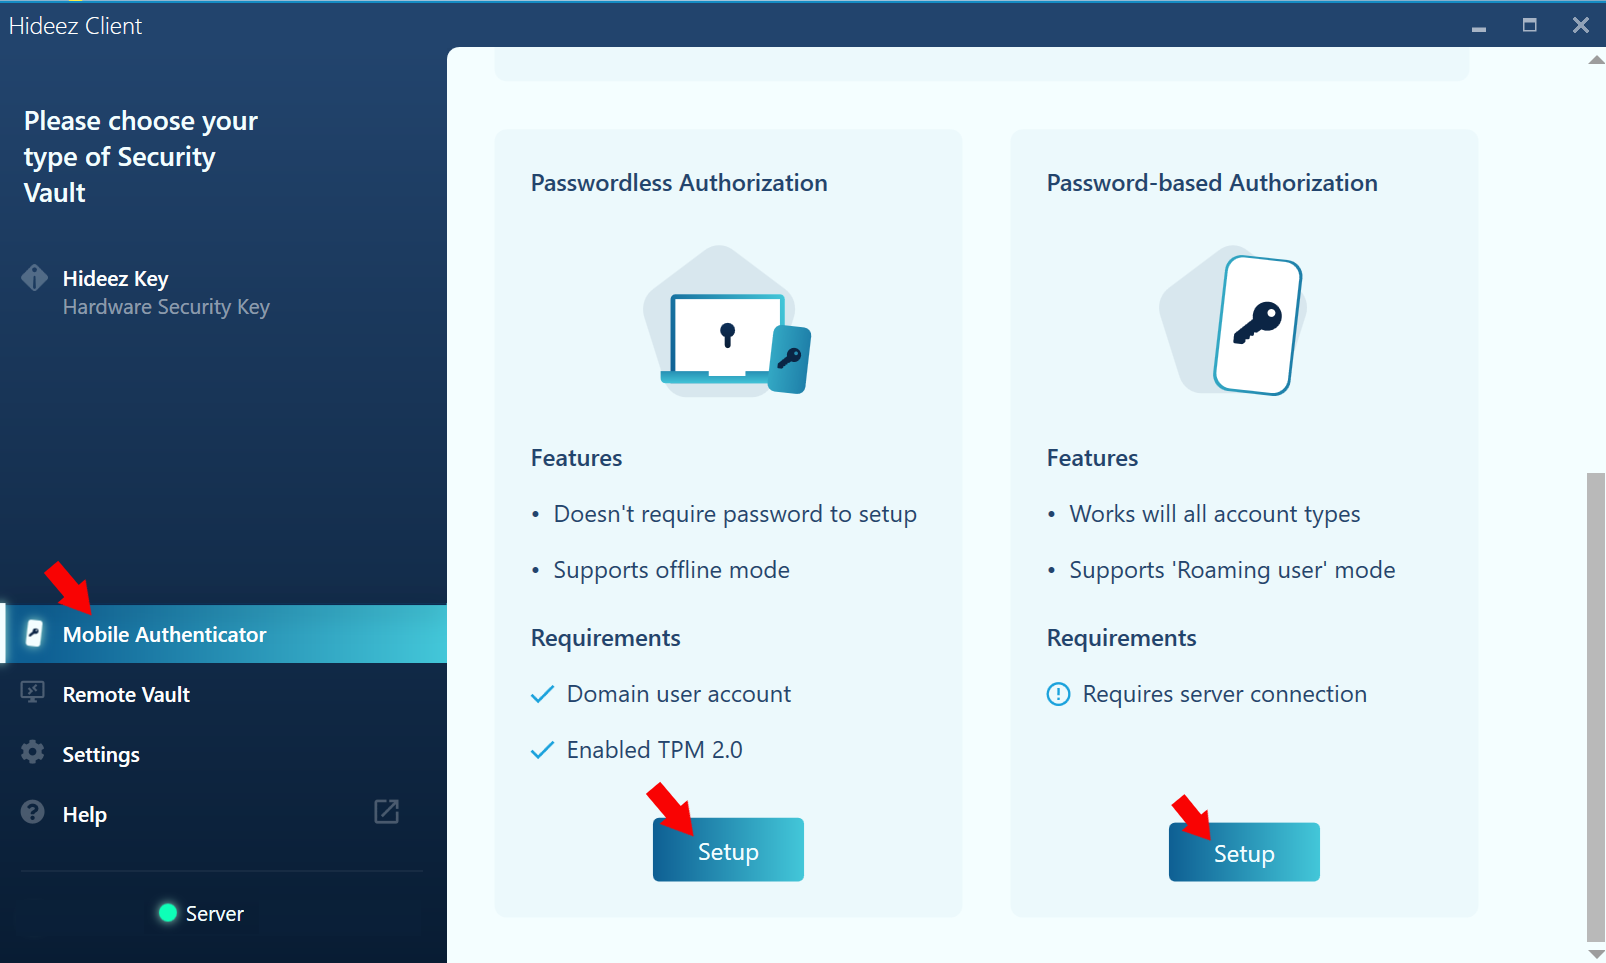
* Within the Hideez Client, select “Mobile Authenticator” as the chosen authentication method.

<figure><img src="https://content.gitbook.com/content/RdTysrljwe610dPFG7tE/blobs/j7dGH85CGae1E4VcuTbF/%D0%97%D0%BD%D1%96%D0%BC%D0%BE%D0%BA%20%D0%B5%D0%BA%D1%80%D0%B0%D0%BD%D0%B0%202023-11-01%20153111.png" alt="" width="375"><figcaption></figcaption></figure>

* Follow the provided steps to complete the configuration for computer login.

{% hint style="warning" %}
**Please note, that for Passwordless PC Authorization Administrator has to configure:**

* [**Configuring an Active Directory Certification Authority**](/hideez-authenticator-app/admin-guide/setup-for-pc-login-scenario/passwordless-pc-login-setup/configuring-an-active-directory-certification-authority)
* [**HES setup for passwordless login**](/hideez-authenticator-app/admin-guide/setup-for-pc-login-scenario/passwordless-pc-login-setup/hes-setup-for-passwordless-login)
  {% endhint %}

### **4. Add New Users:**

New users can be added through:

* [**Active Directory (On-Premises, Azure Ad)** ](/hideez-server-integration/microsoft-entra-id/import)
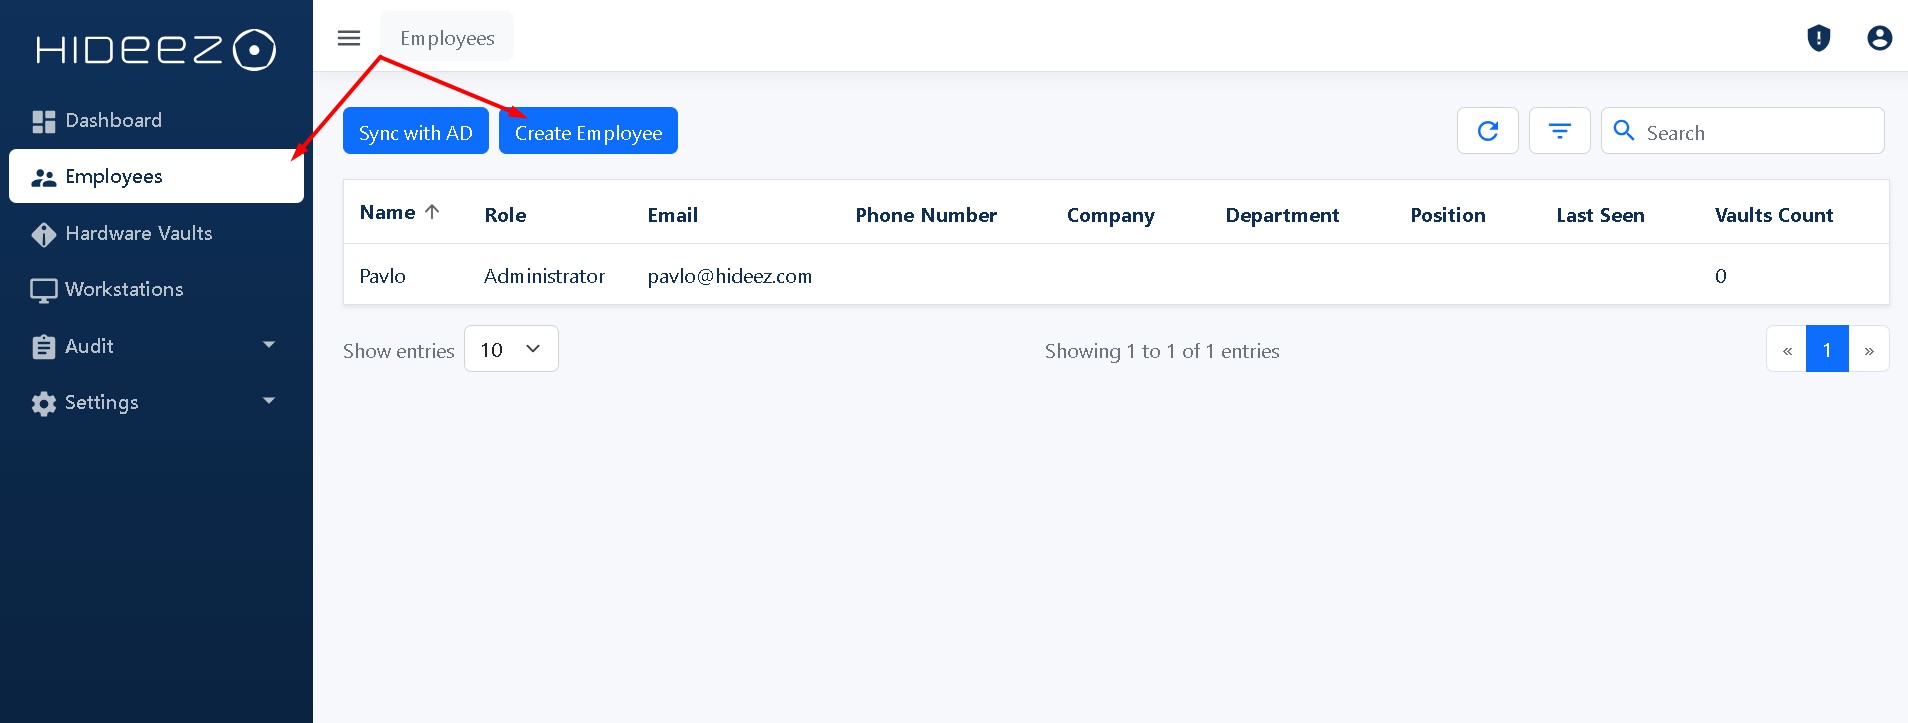
* [**Manually**](/hideez-enterprise-server/employees/how-to-add-an-employee)


# Hideez Key guide

Passwordless SSO, PS logon & logoff, password-based authentication

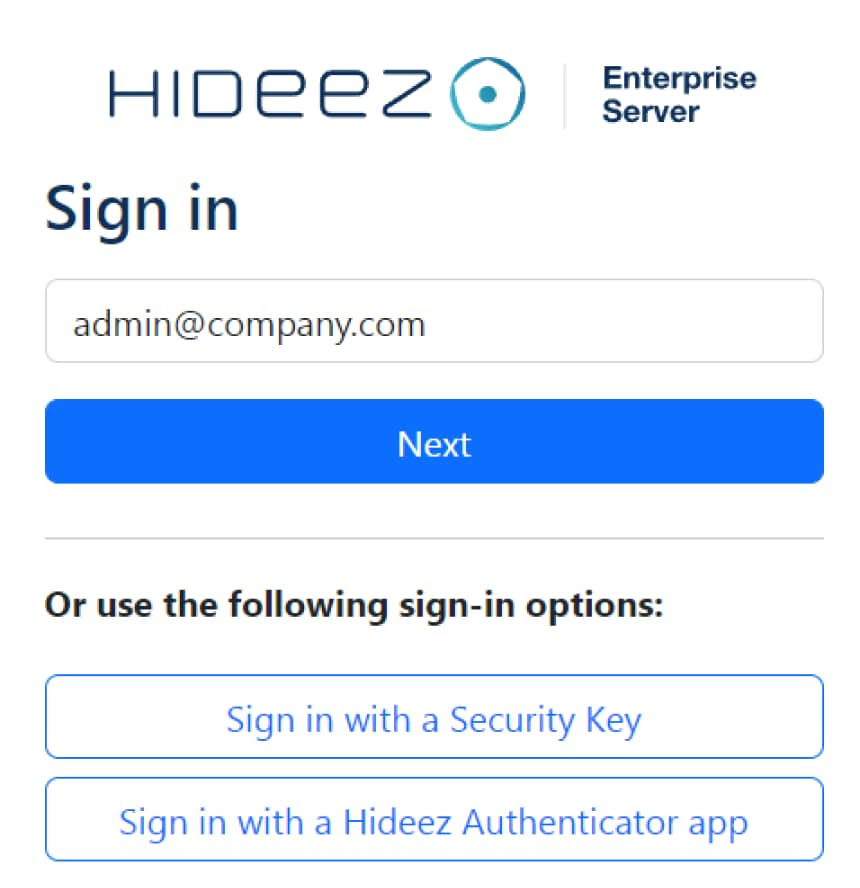
### 1. Sign in to your Hideez server using Admin account

<figure><img src="https://content.gitbook.com/content/RdTysrljwe610dPFG7tE/blobs/KTpf51g1KlSI4abhe7Dv/unnamed%20(1).jpg" alt="" width="375"><figcaption></figcaption></figure>

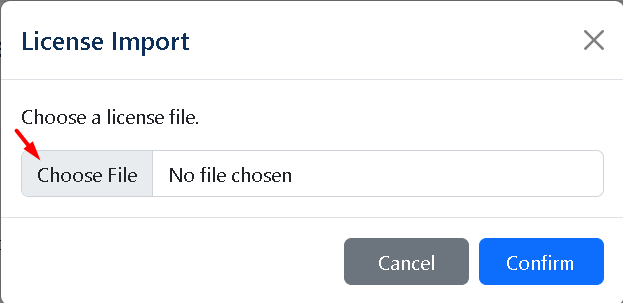
### **2. Import License from file on the server**&#x20;

Go to Settings->Parameters->Licensing

<figure><img src="https://1669663611-files.gitbook.io/~/files/v0/b/gitbook-x-prod.appspot.com/o/spaces%2FRdTysrljwe610dPFG7tE%2Fuploads%2F8OzA0UL8j1kgTwO2VrYu%2FScreenshot_15.png?alt=media&amp;token=c0c0c0dc-d1ab-4ffe-8f69-8d11bd1f2a4b" alt="" width="563"><figcaption></figcaption></figure>

<figure><img src="https://1669663611-files.gitbook.io/~/files/v0/b/gitbook-x-prod.appspot.com/o/spaces%2FRdTysrljwe610dPFG7tE%2Fuploads%2FwaALyalih4zfT5XiC2aA%2FScreenshot_1.png?alt=media&amp;token=d3f57d52-6f86-42a7-a74b-cb0675dd9c46" alt="" width="375"><figcaption></figcaption></figure>

{% hint style="info" %}
Import the file license that you download from the [Hideez Portal](https://portal.hideez.com/). Or you can [ask us](mailto:support@hideez.com), and we will generate a license for you.
{% endhint %}

### **3. Add Hideez Key to the Server**

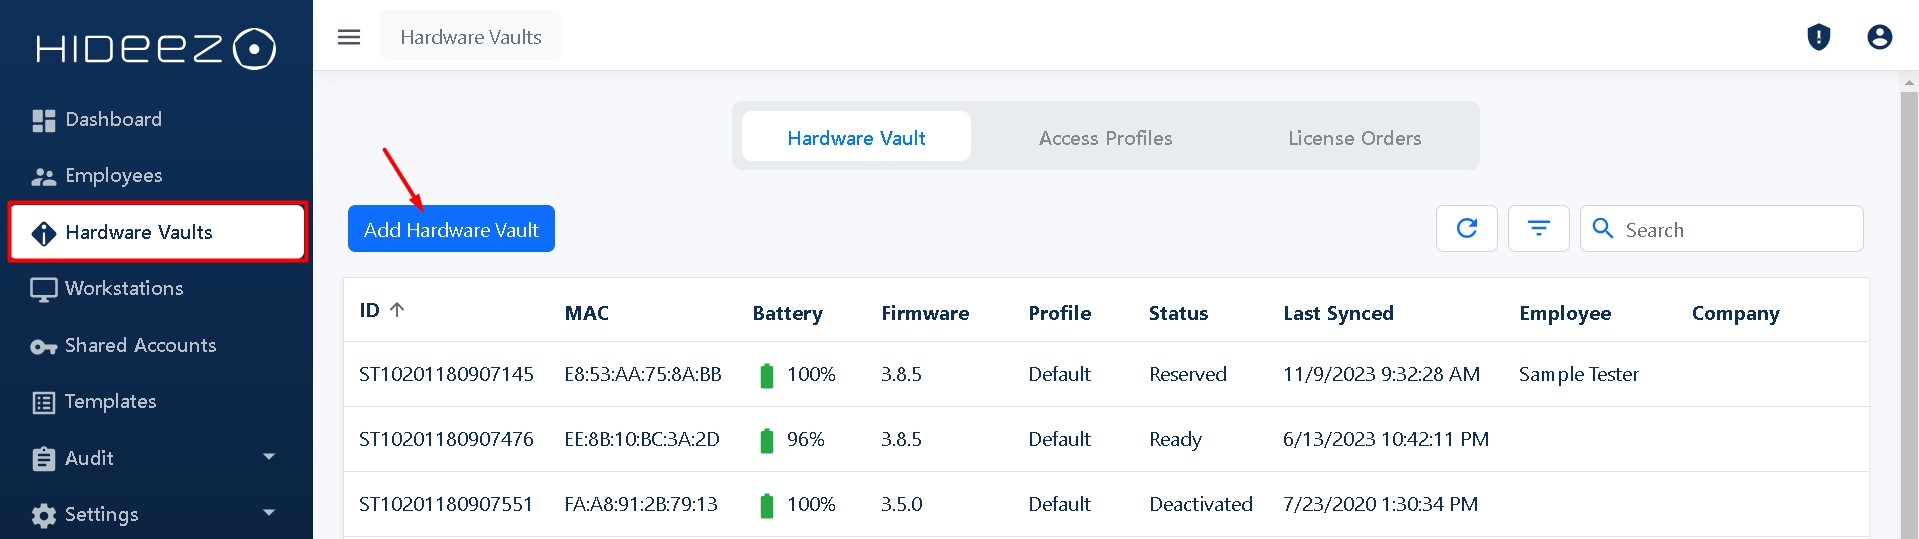
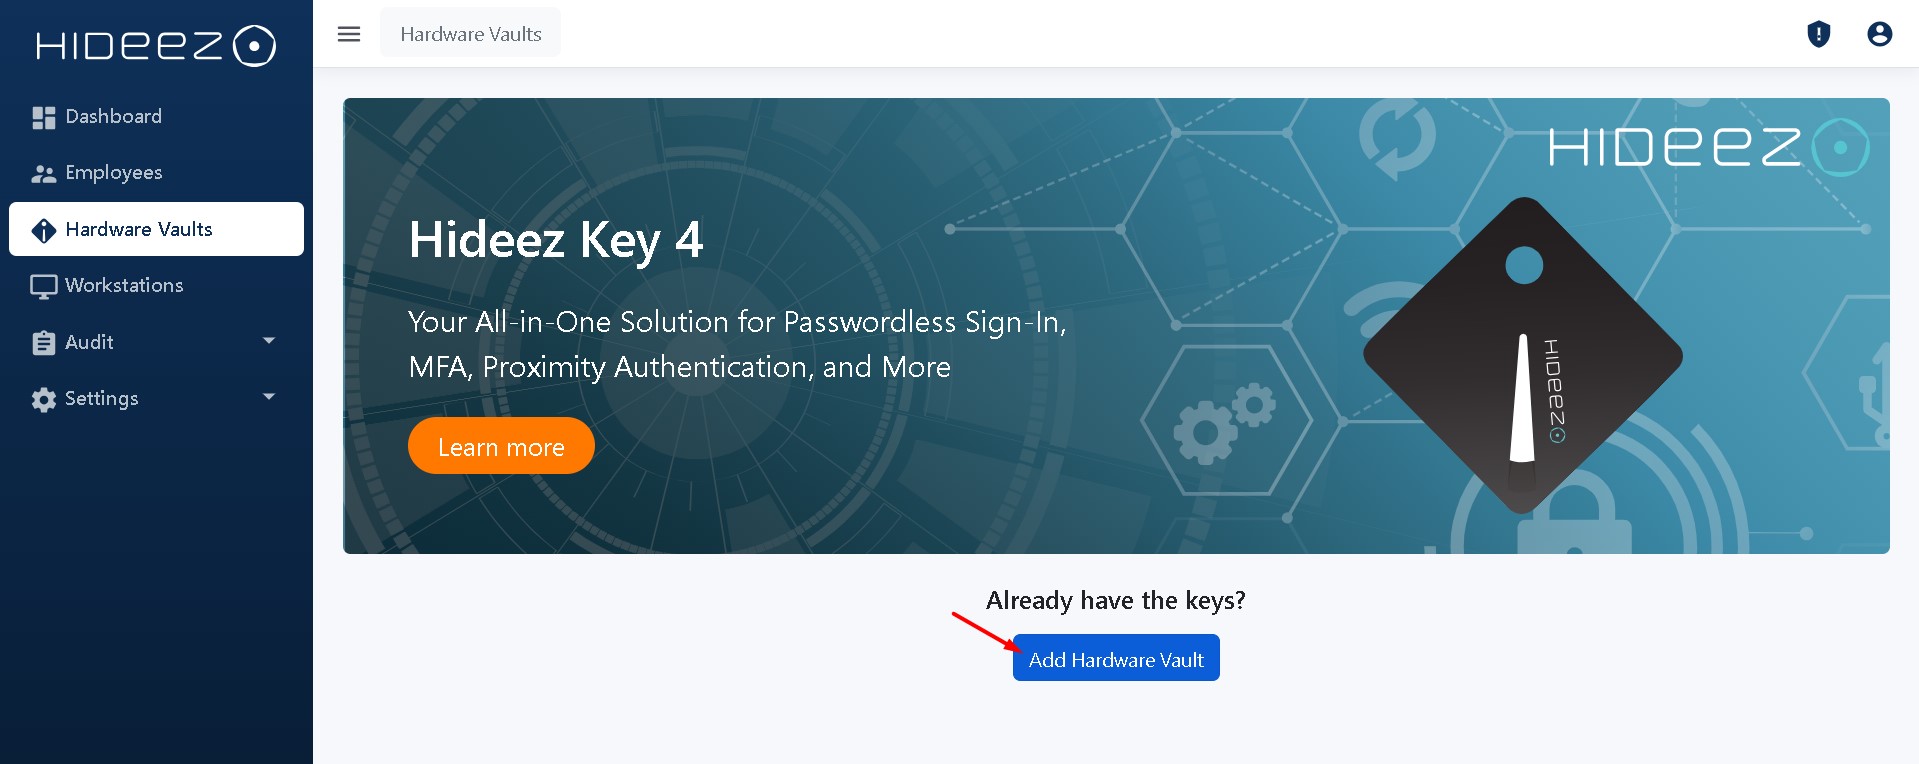
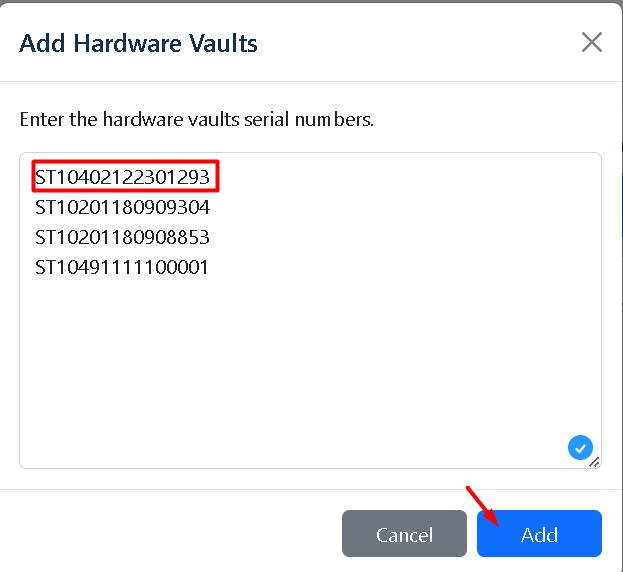
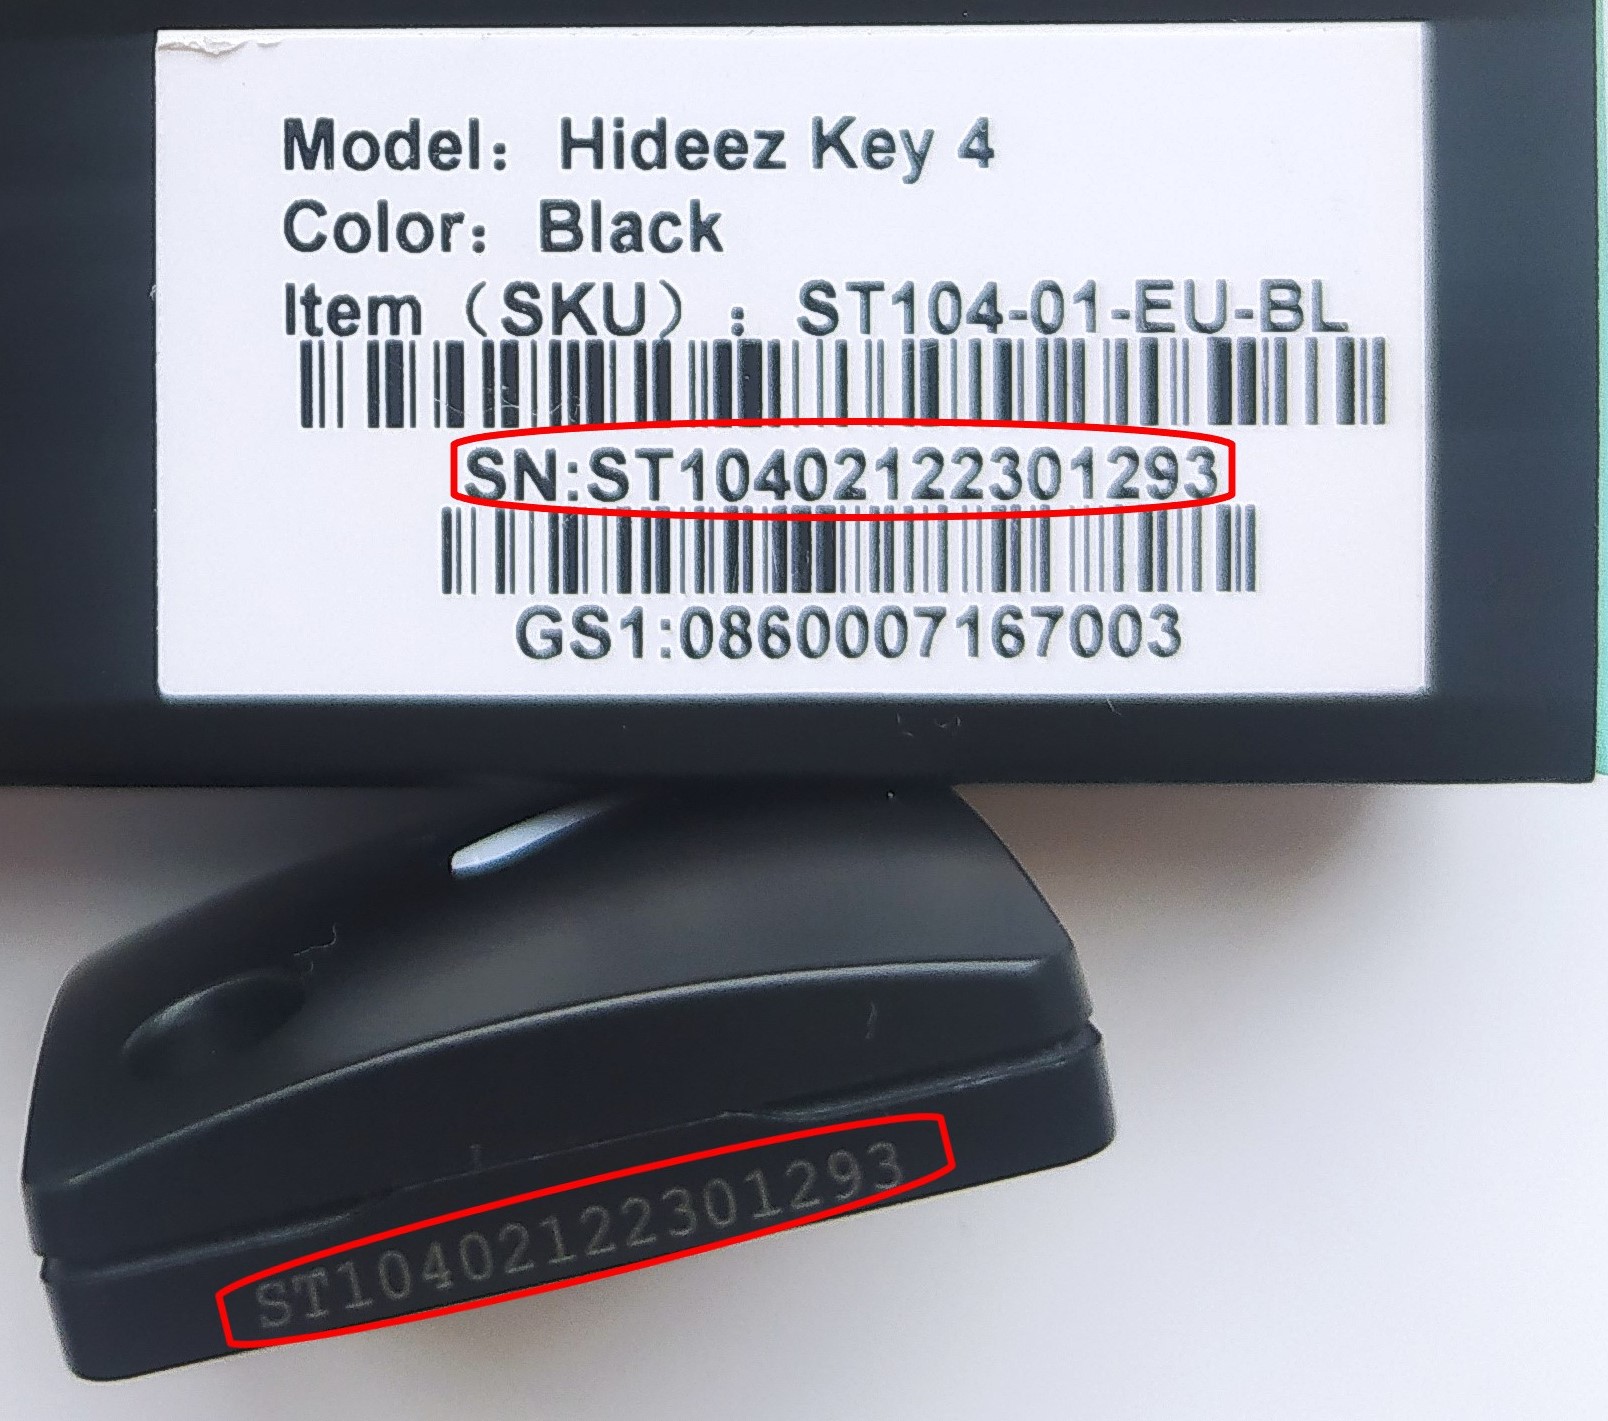
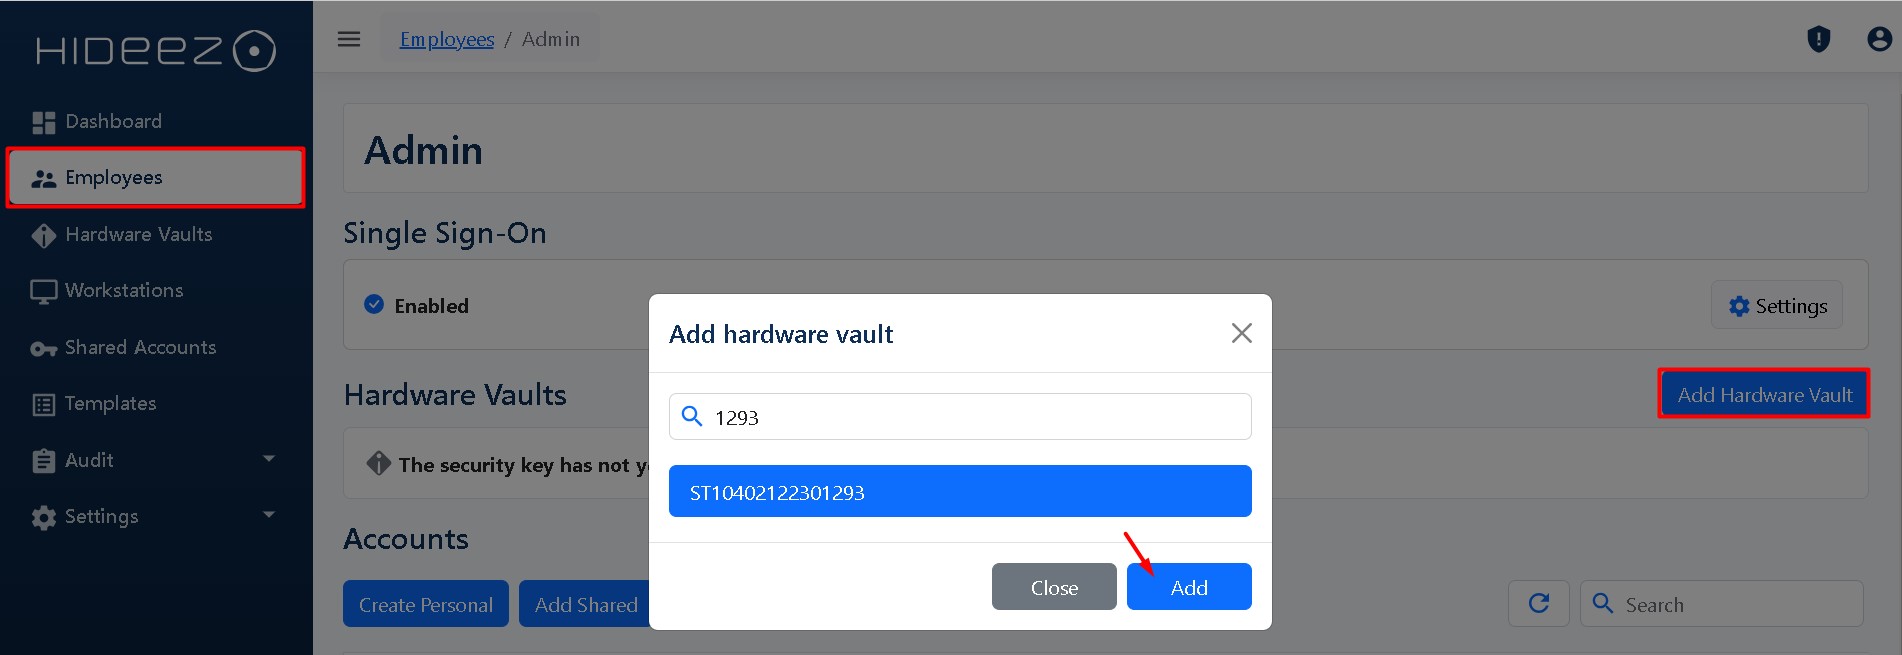
* Navigate to **Hardware Vaults → Add Hardware Vaults**
* In the opened tab, enter the serial numbers of the hardware vaults and click **“Add.”**

{% hint style="info" %}
**You can locate the serial number on the side panel of your Hideez Key or on the box containing your Key.**

**If other users also have a physical key, the admin must manually add their serial numbers on the server.**
{% endhint %}

<div><figure><img src="https://content.gitbook.com/content/RdTysrljwe610dPFG7tE/blobs/s32q0fJveToro2GGgbSL/Screenshot_37.jpg" alt="" width="375"><figcaption></figcaption></figure> <figure><img src="https://content.gitbook.com/content/RdTysrljwe610dPFG7tE/blobs/n5MF9ns3OhPqBJENf8DE/Screenshot_7.jpg" alt="" width="312"><figcaption></figcaption></figure> <figure><img src="https://content.gitbook.com/content/RdTysrljwe610dPFG7tE/blobs/k2mENzCRdMa2hTWlTq9Q/IMG_20240124_154042.jpg" alt="" width="375"><figcaption></figcaption></figure></div>

### 4. Configure Passwordless SS&#x4F;**:**

Hideez Server allows you to enable passwordless Single Sign-On (SSO) based on the SAML and OpenID Connect (OIDC) protocols. These protocols are employed to verify a user’s identity when an employee tries to access web or mobile applications.&#x20;

To configure the Hideez Server as an Identity Provider for passwordless SSO, go to Settings → Parameters, and proceed with [**SAML**](/hideez-enterprise-server/configuring-saml-protocol) or [**OIDC**](/hideez-enterprise-server/configuration-oidc-openid-connect) configuration as described in our user guide.

### 5. Configure Login and Logout from PC:

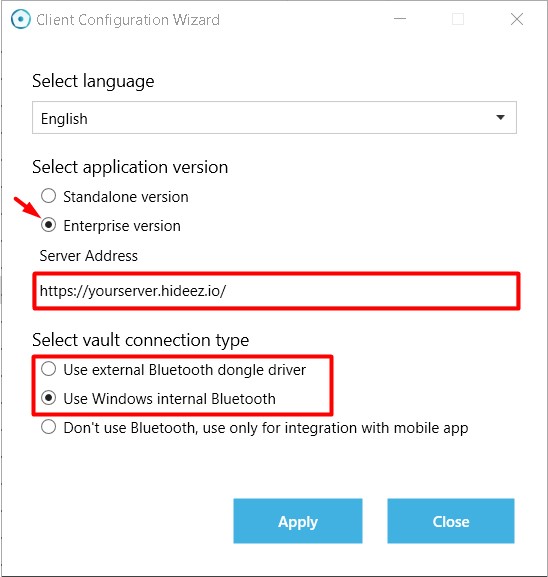
* Download [**.exe**](/product-updates/hideez-client-updates)  or **.msi** ([**x86**](https://update.hideez.com/update/hideezclient/x86/clientsetup.msi), [**x64**](https://update.hideez.com/update/hideezclient/x64/clientsetup.msi)) and install the Hideez Client on the computer.
* Select the Enterprise version of the program.
* Set your server address in the Hideez Client.&#x20;
* Select the type of connection for Hideez Key.&#x20;

<figure><img src="https://content.gitbook.com/content/RdTysrljwe610dPFG7tE/blobs/E0kx24Fw0xsz48BwAwrm/Screenshot_30.jpg" alt="" width="375"><figcaption></figcaption></figure>

{% hint style="info" %}
After installing the program on your computer, your workstation will appear in the list for confirmation on the dashboard of your server.
{% endhint %}

<figure><img src="https://content.gitbook.com/content/RdTysrljwe610dPFG7tE/blobs/hEzd3XgemNWtpFDMvY5q/Screenshot_24.jpg" alt="" width="375"><figcaption></figcaption></figure>

* Go to the section **Workstation** on your server, select the workstation, and click **Approve.**

<figure><img src="https://content.gitbook.com/content/RdTysrljwe610dPFG7tE/blobs/VKwba6FmDwUUsGZ63kkm/Screenshot_28.jpg" alt=""><figcaption></figcaption></figure>

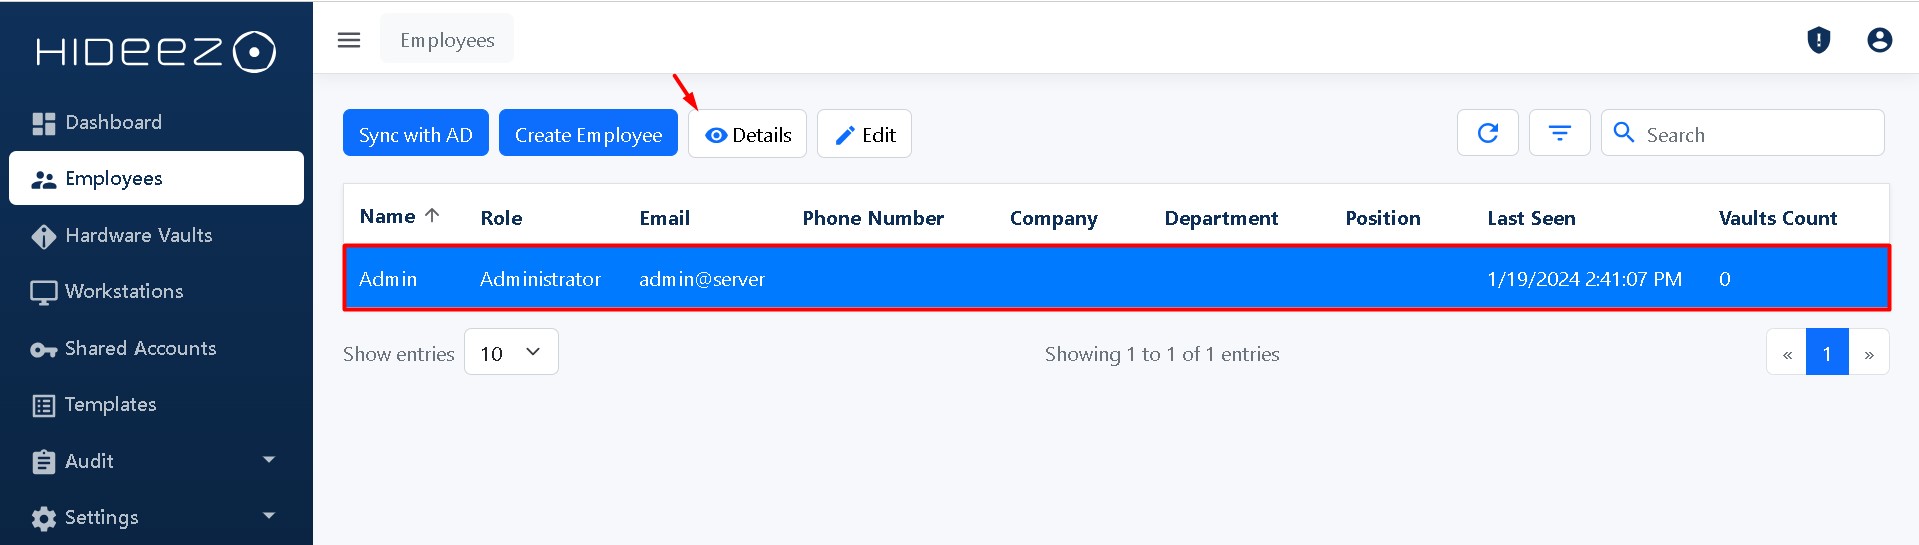
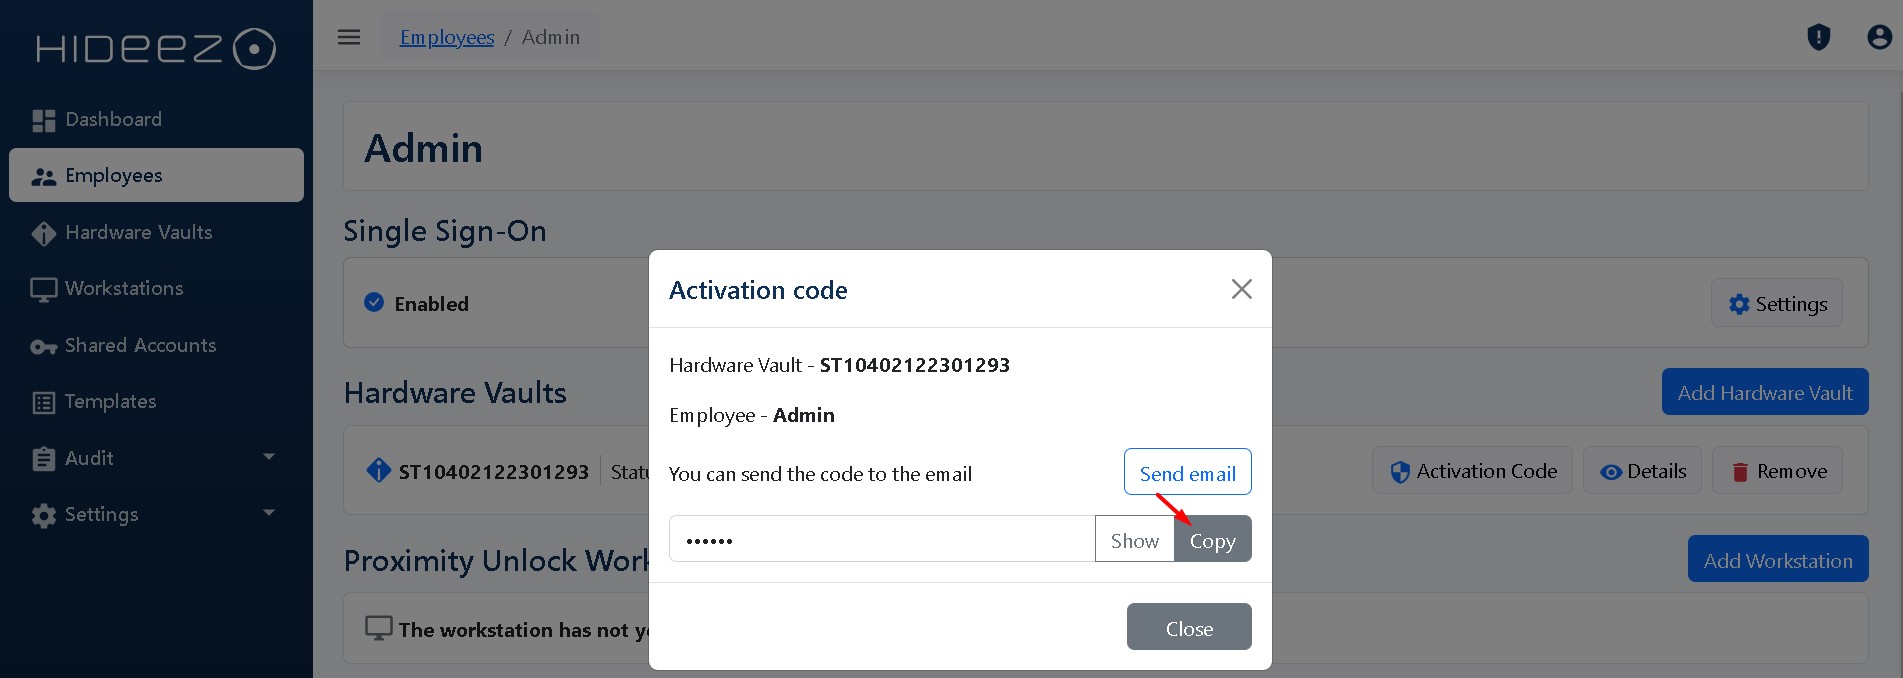
* Assign a key to the user and copy the activation code

<div><figure><img src="https://content.gitbook.com/content/RdTysrljwe610dPFG7tE/blobs/7gLkGqJcpL8pBK0JamgV/Screenshot_9.jpg" alt=""><figcaption></figcaption></figure> <figure><img src="https://content.gitbook.com/content/RdTysrljwe610dPFG7tE/blobs/a43dPnNEq6ZIoOj2AnRc/Screenshot_17.jpg" alt=""><figcaption></figcaption></figure> <figure><img src="https://content.gitbook.com/content/RdTysrljwe610dPFG7tE/blobs/H8e4TqhTRONYwDr2d4G2/Screenshot_19.jpg" alt=""><figcaption></figcaption></figure></div>

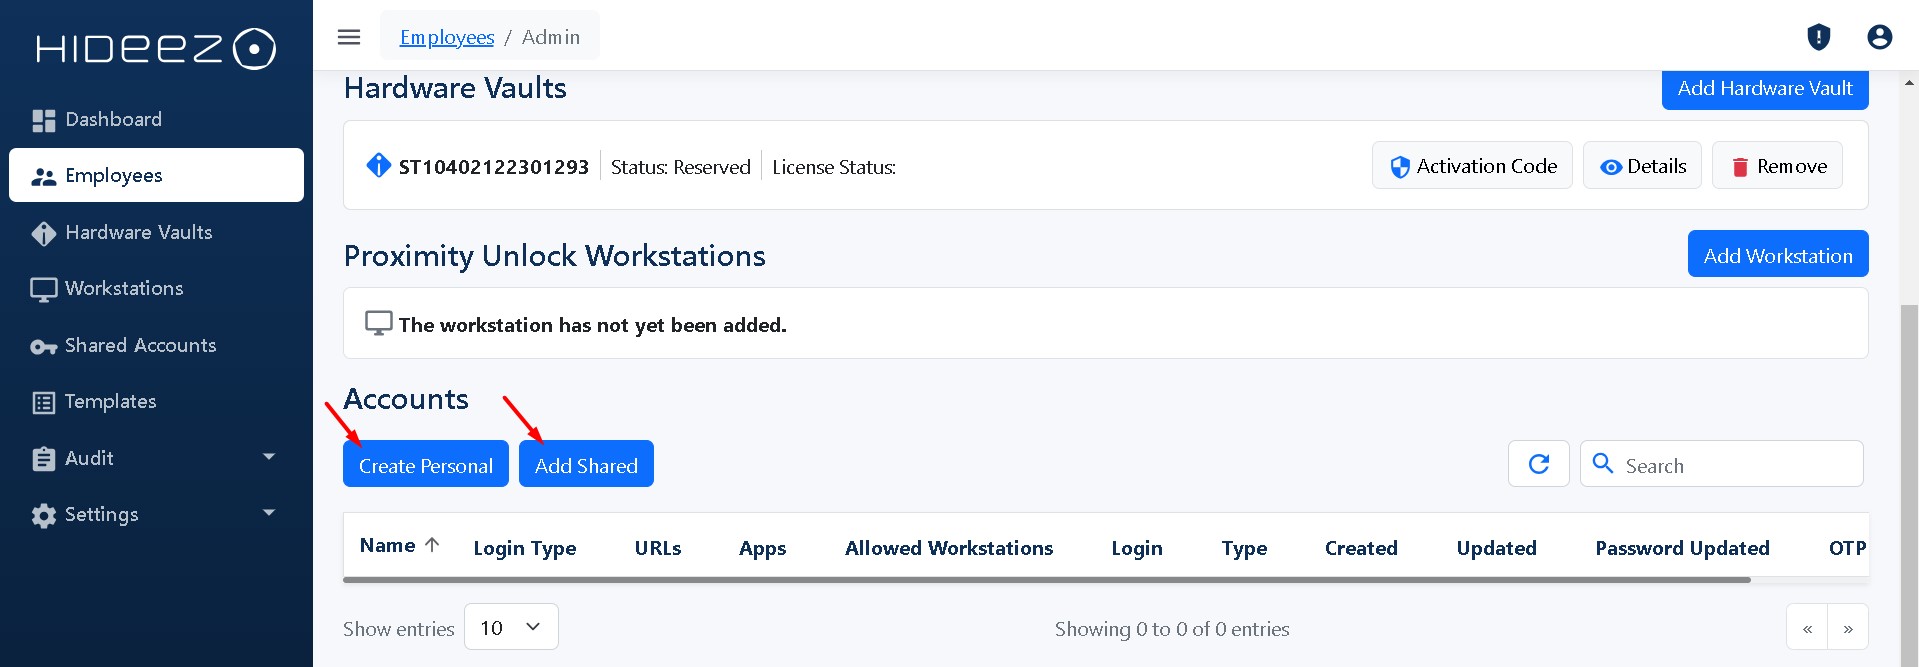
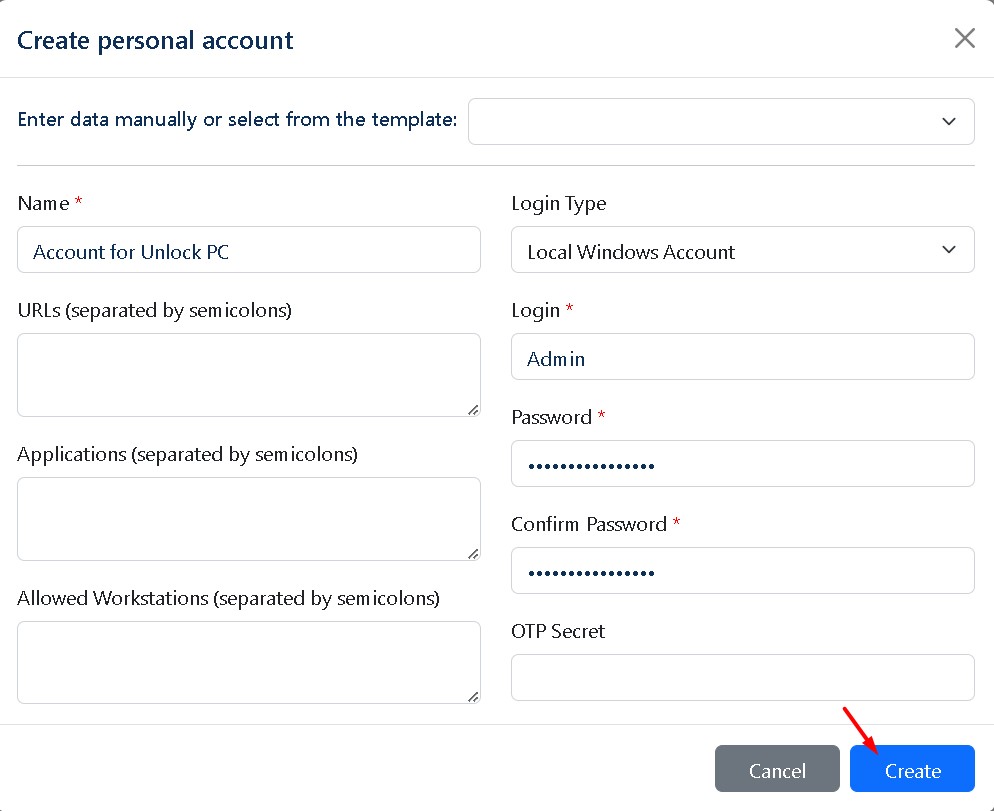
* Create an account to unlock the PC

<div><figure><img src="https://content.gitbook.com/content/RdTysrljwe610dPFG7tE/blobs/BOLt1UGYRE0nRsvvRCLN/Screenshot_20.jpg" alt=""><figcaption></figcaption></figure> <figure><img src="https://content.gitbook.com/content/RdTysrljwe610dPFG7tE/blobs/uzyFeTozI9scjfeZEKkv/Screenshot_24.jpg" alt=""><figcaption></figcaption></figure></div>

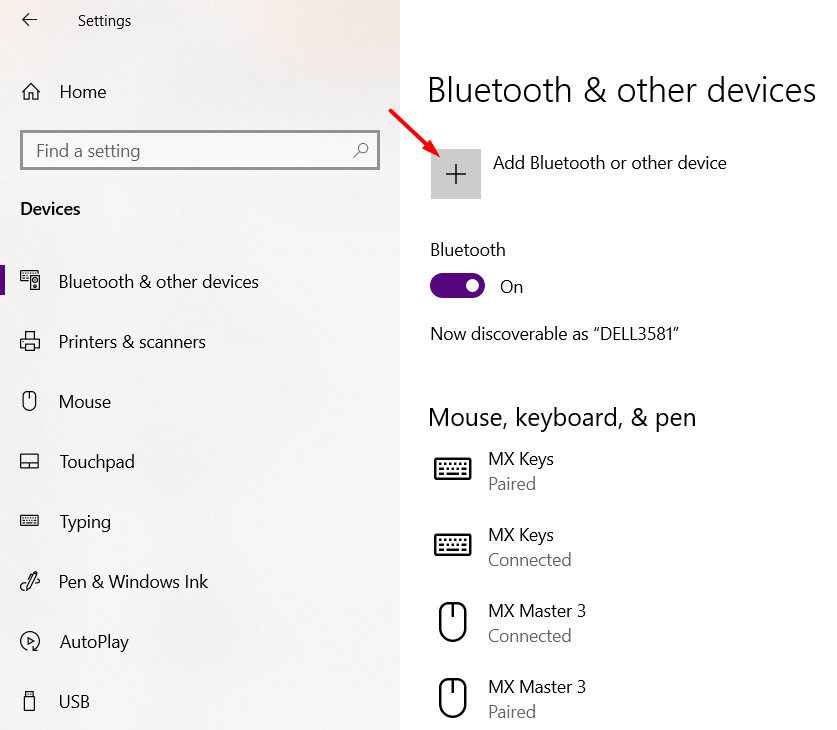
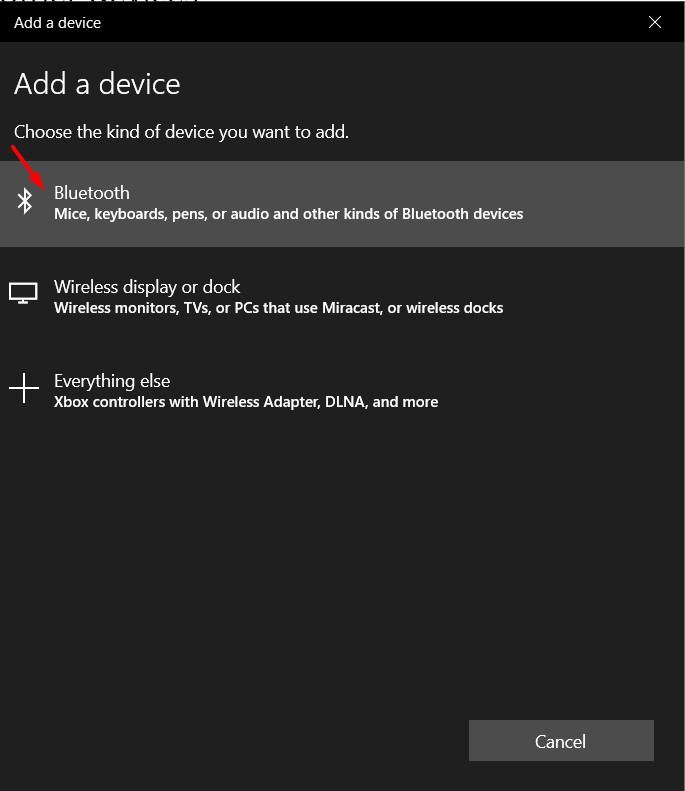
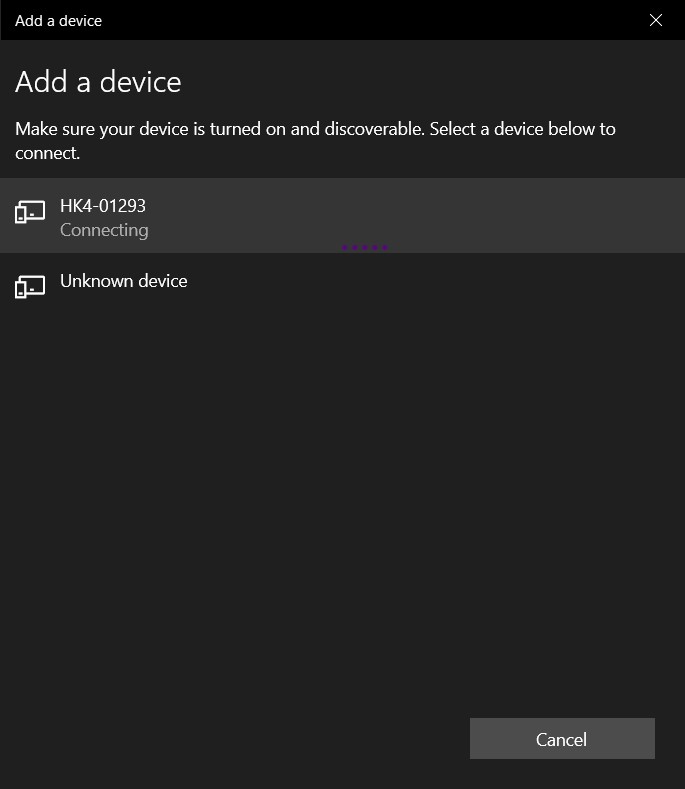
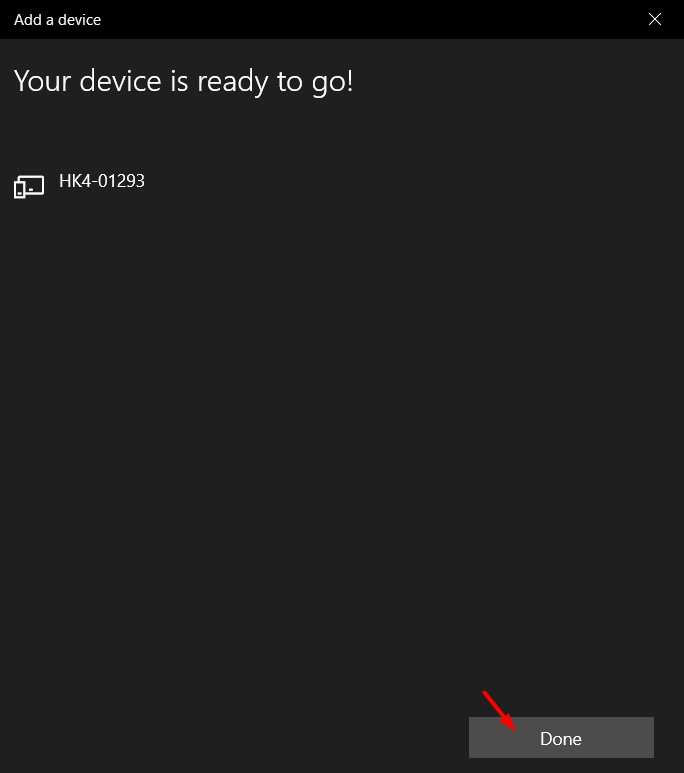
* Pair a Hideez Key with your PC by Bluetooth&#x20;

Go to **Start** → **Settings** → **Devices** → **Bluetooth & other devices → Bluetooth** and select your Hideez Key device in the list of devices&#x20;

<div><figure><img src="https://content.gitbook.com/content/RdTysrljwe610dPFG7tE/blobs/EUI8eRWlqytcm4VS6I7S/Screenshot_32.jpg" alt=""><figcaption></figcaption></figure> <figure><img src="https://content.gitbook.com/content/RdTysrljwe610dPFG7tE/blobs/8rTDoq3FOJdv7A8APgUP/Screenshot_33.jpg" alt=""><figcaption></figcaption></figure> <figure><img src="https://content.gitbook.com/content/RdTysrljwe610dPFG7tE/blobs/tc26XuDH7PfwArNH1JRQ/Screenshot_35.jpg" alt=""><figcaption></figcaption></figure> <figure><img src="https://content.gitbook.com/content/RdTysrljwe610dPFG7tE/blobs/IshwMVHBy4LK6AcMsekE/Screenshot_36.jpg" alt=""><figcaption></figcaption></figure></div>

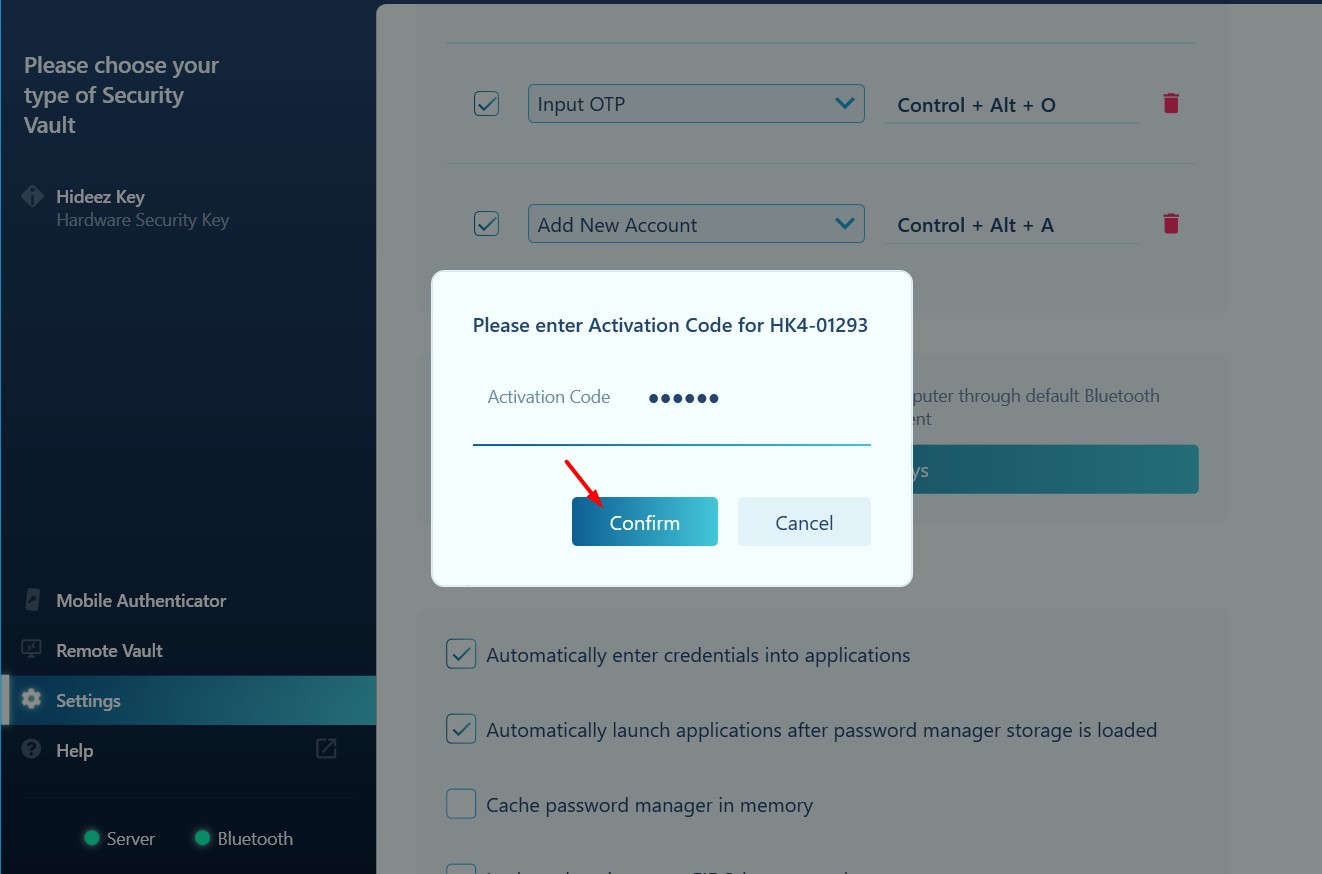
* Enter the Activation code and activate the Key&#x20;

<figure><img src="https://content.gitbook.com/content/RdTysrljwe610dPFG7tE/blobs/kXQf7MhZK34OmsgMTXwI/Screenshot_30.jpg" alt="" width="375"><figcaption></figcaption></figure>

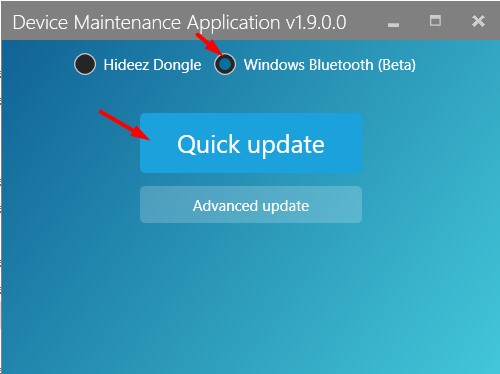
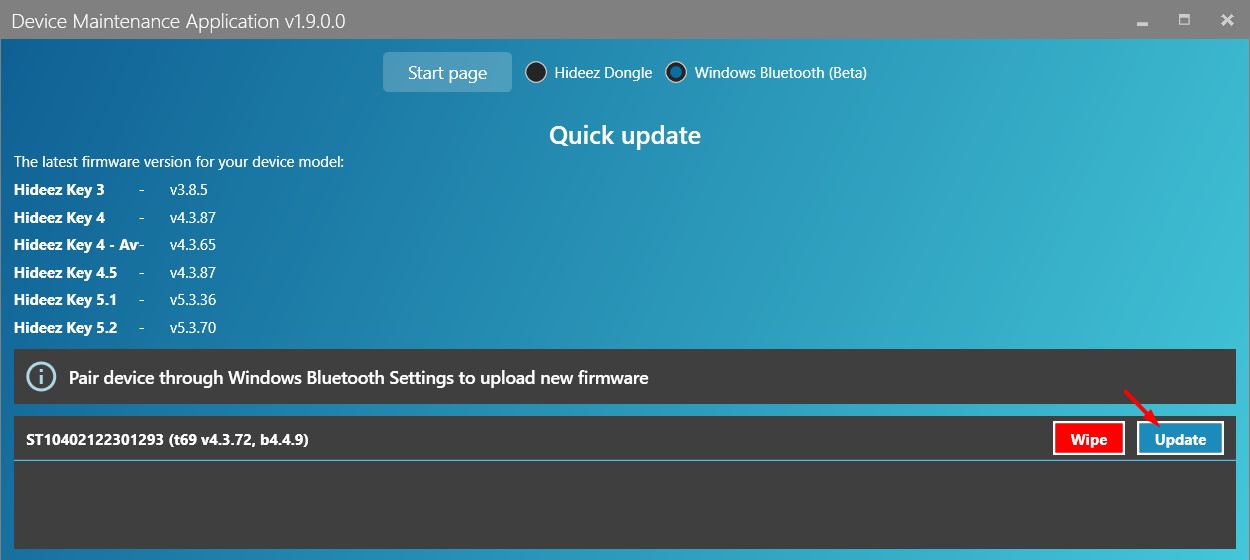
* Update the firmware on Hideez Key

Navigate to **Program Files → Hideez > Client →** and run **Device Maintenance Application.** Select **Quick update** and click **Update.**

<div><figure><img src="https://content.gitbook.com/content/RdTysrljwe610dPFG7tE/blobs/RhhYYPNPIlnjOXUfKPbV/Screenshot_42.jpg" alt=""><figcaption></figcaption></figure> <figure><img src="https://content.gitbook.com/content/RdTysrljwe610dPFG7tE/blobs/zoWTIS5cROqlADf3Vlxn/Screenshot_43.jpg" alt=""><figcaption></figcaption></figure></div>

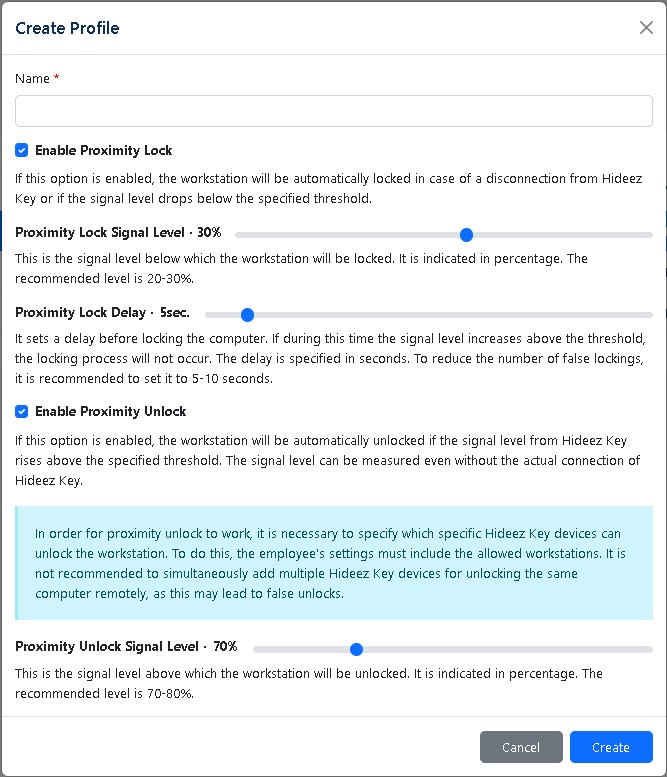
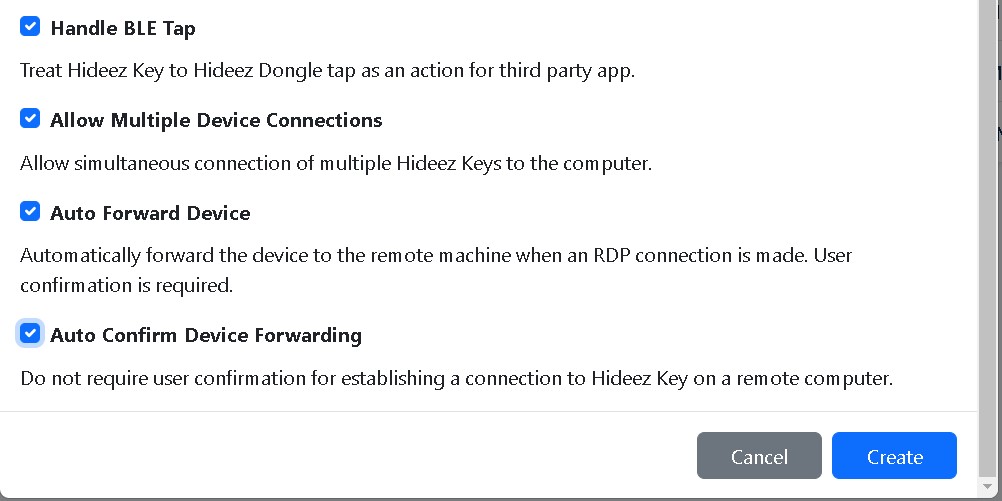
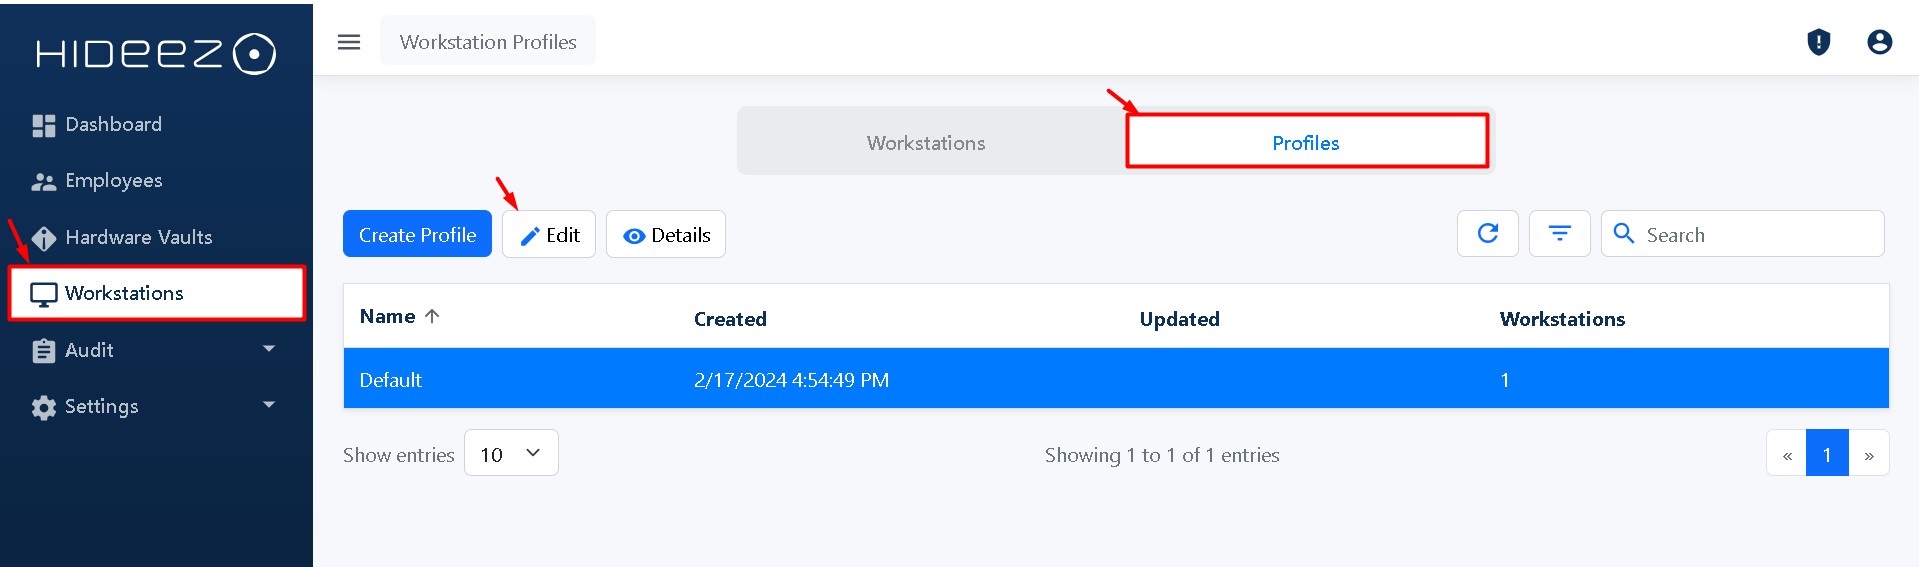
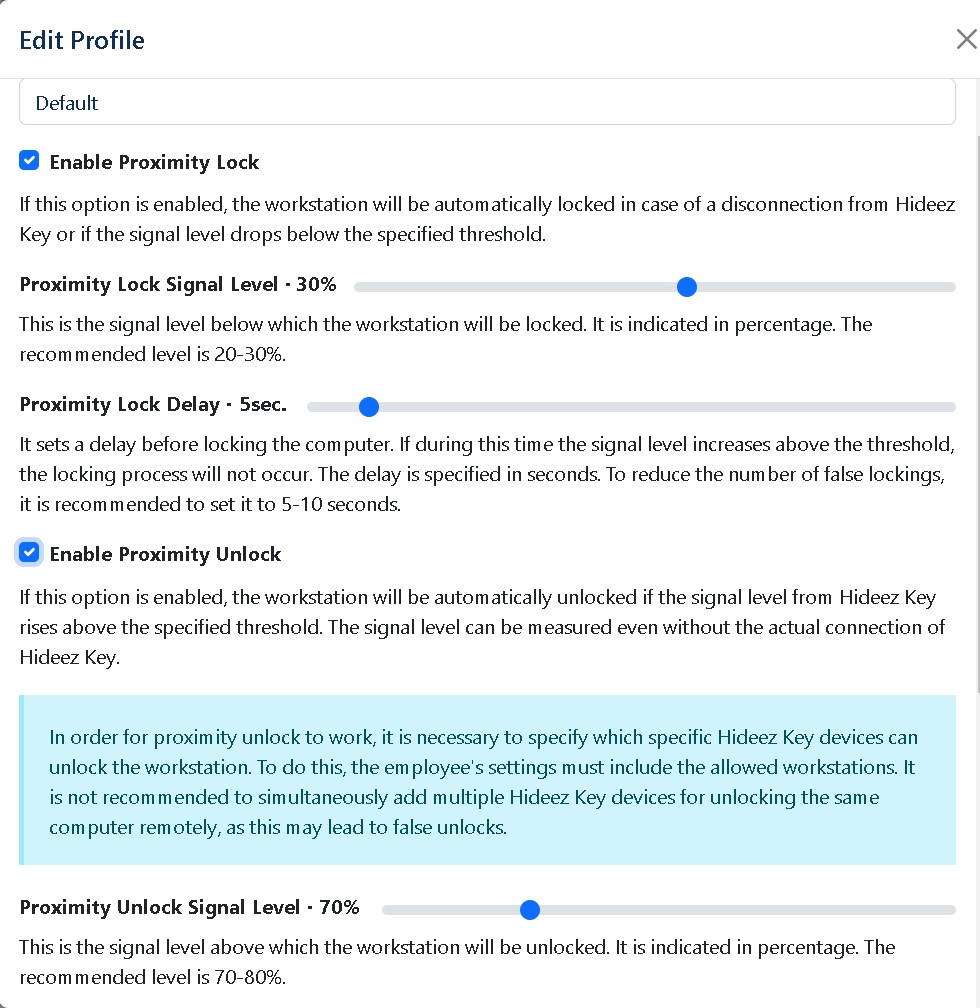
* Configure Proximity login and logout settings for the workstation

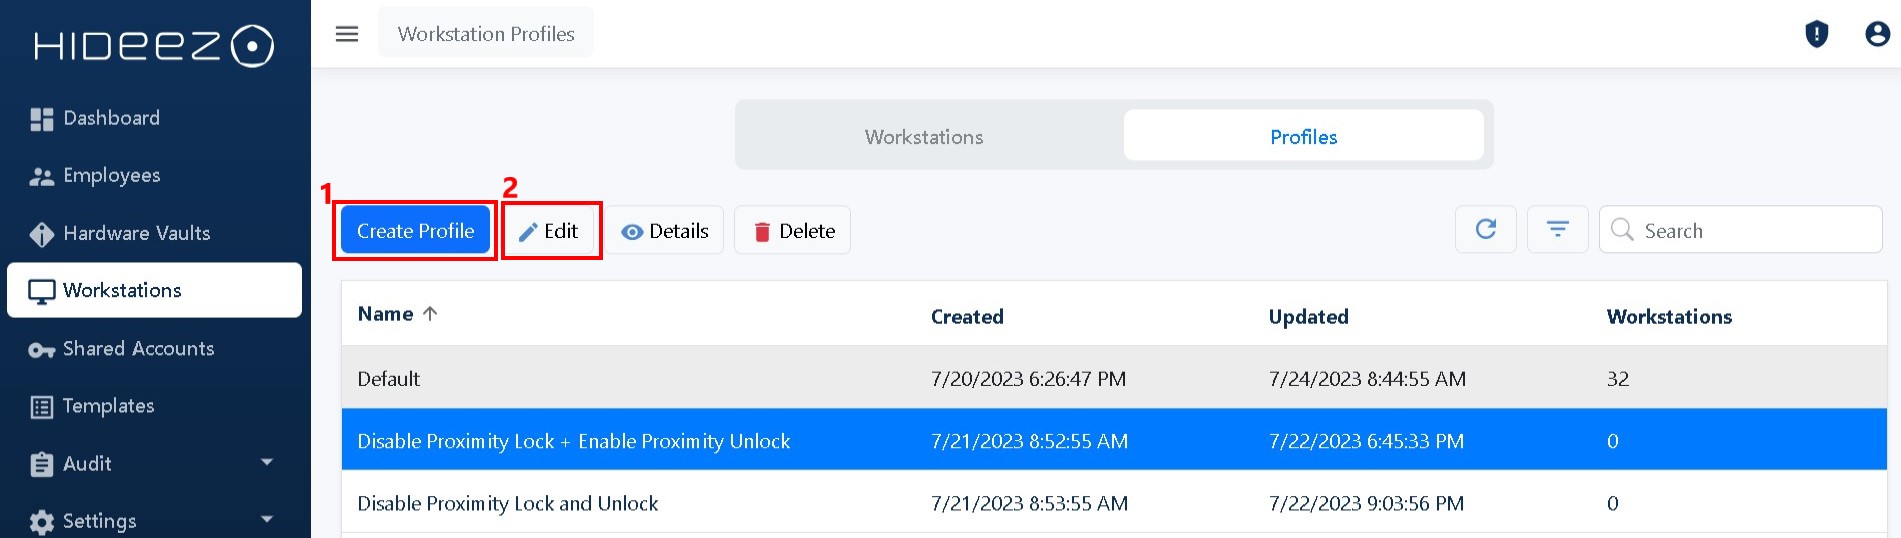
Go to **Workstations→Workstation Profiles→** Select the profile and click **Edit**

<div><figure><img src="https://content.gitbook.com/content/RdTysrljwe610dPFG7tE/blobs/SNu8OHvkeG32LNwSUDdp/Screenshot_38.jpg" alt=""><figcaption></figcaption></figure> <figure><img src="https://content.gitbook.com/content/RdTysrljwe610dPFG7tE/blobs/tsezk3CGdXxdAUxspdRN/Screenshot_39.jpg" alt=""><figcaption></figcaption></figure></div>

{% hint style="info" %}
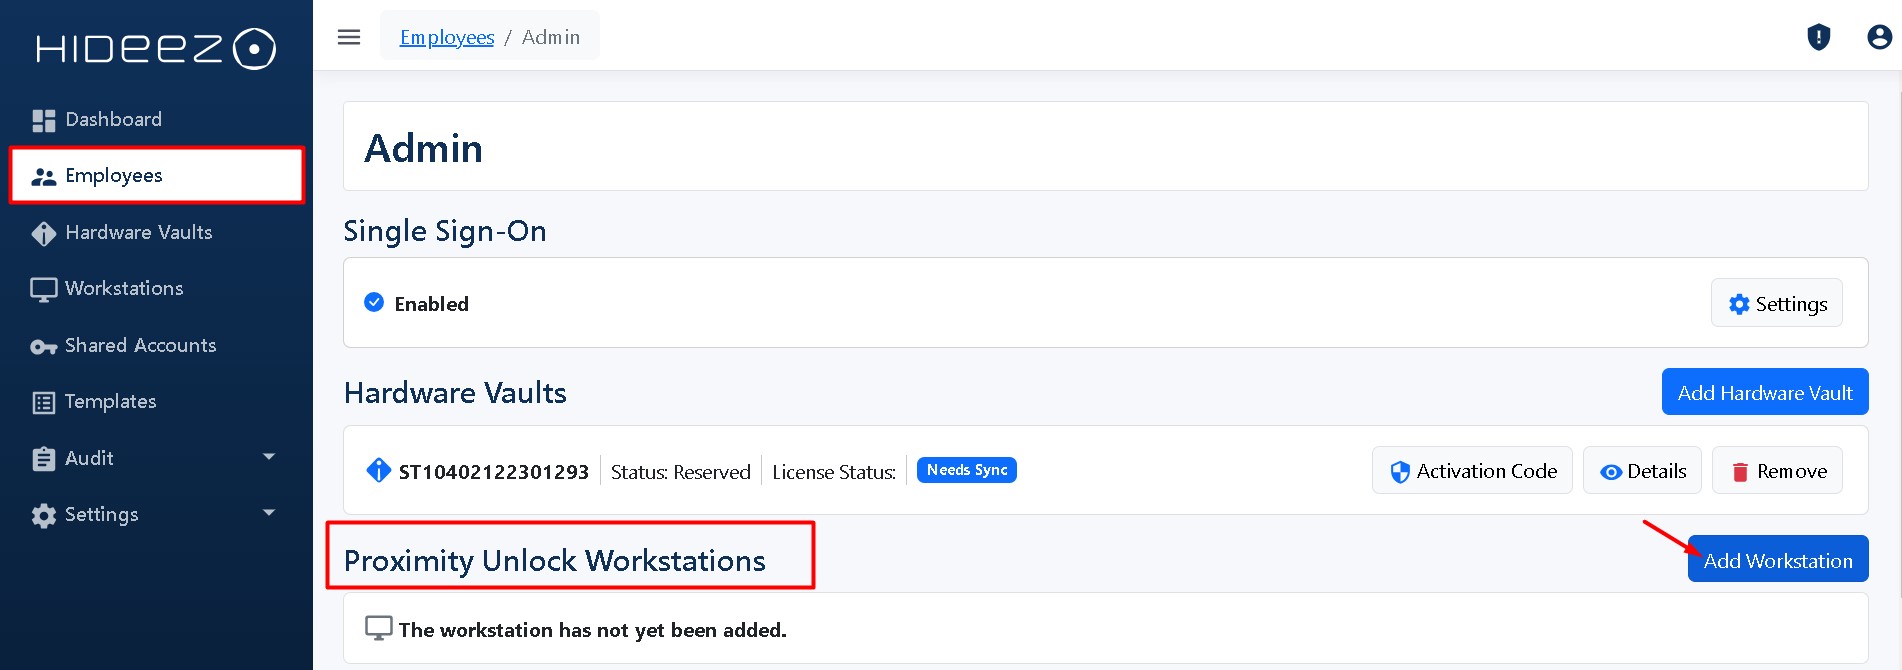
To enable **Proximity Unlock**, you need to add the workstation for it on the Employee page

<img src="https://content.gitbook.com/content/RdTysrljwe610dPFG7tE/blobs/4DU1BiC0pIKTpXaxAiIr/Screenshot_40.jpg" alt="" data-size="original">
{% endhint %}

### **6.** Configure additional functions for your key, including Password Management and OTP provider (optional step)

* &#x20;[Use the Hideez key for password management.](/hideez-client-app/account-management/account-creation)
* [Optionally, integrate One-Time Passwords (OTP) as an additional security feature.](/hideez-client-app/account-management/account-creation#hideez-client-as-a-one-time-password-otp-generator)


# Passkey guide

Passwordless SSO with Passkeys

### Minimum requirements for using a smartphone as a Passkey

{% hint style="info" %}
Here are the minimum requirements for using a smartphone as a Passkey on Android and iOS:

#### Android

1. **Operating System:** Android 9.0 or later.
2. **Google Play Services:** Version 19.2.75 or later, which provides support for Passkeys.
3. **Biometric Authentication:** The device should support biometric methods (fingerprint, face recognition) or PIN code for secure authentication.

#### iOS

1. **Operating System:** iOS 15 or later.
2. **Devices:** iPhone or iPad with Face ID or Touch ID support.
3. **iCloud Keychain:** iCloud Keychain must be enabled to sync Passkeys across devices.
   {% endhint %}

### About the Passkey

{% hint style="success" %}
Based on FIDO standards, **passkeys** are a replacement for passwords that provide faster, easier, and more secure sign-ins to websites and apps across a user’s devices. Unlike passwords, passkeys are always strong and phishing-resistant.​

Passkeys simplify account registration for apps and websites, are easy to use, work across most of a user’s devices, and even work on other devices within physical proximity.​

**Passkey may include:**

* Biometric authentication using Android devices;
* Touch ID / Face ID using iOS devices;
* Windows Hello;
* External security keys (like [**Hideez Key**](https://hideez.com/products/hideez-key-4) or YubiKey).
  {% endhint %}

### Seting Passkey on the Hideez Server

#### 1. Sign in to your Hideez server using the Hideez account
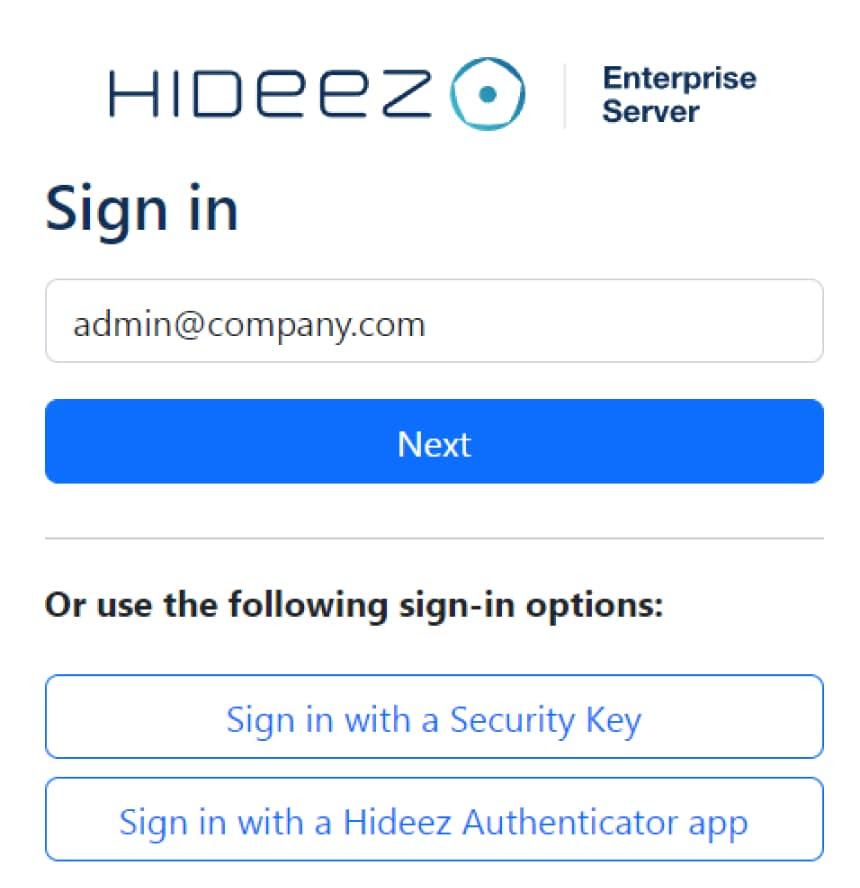
<figure><img src="https://content.gitbook.com/content/RdTysrljwe610dPFG7tE/blobs/NRCZl1ds20Y4v9OAchZA/image.png" alt="" width="375"><figcaption></figcaption></figure>

### **To Create Passkeys for Admin account:**

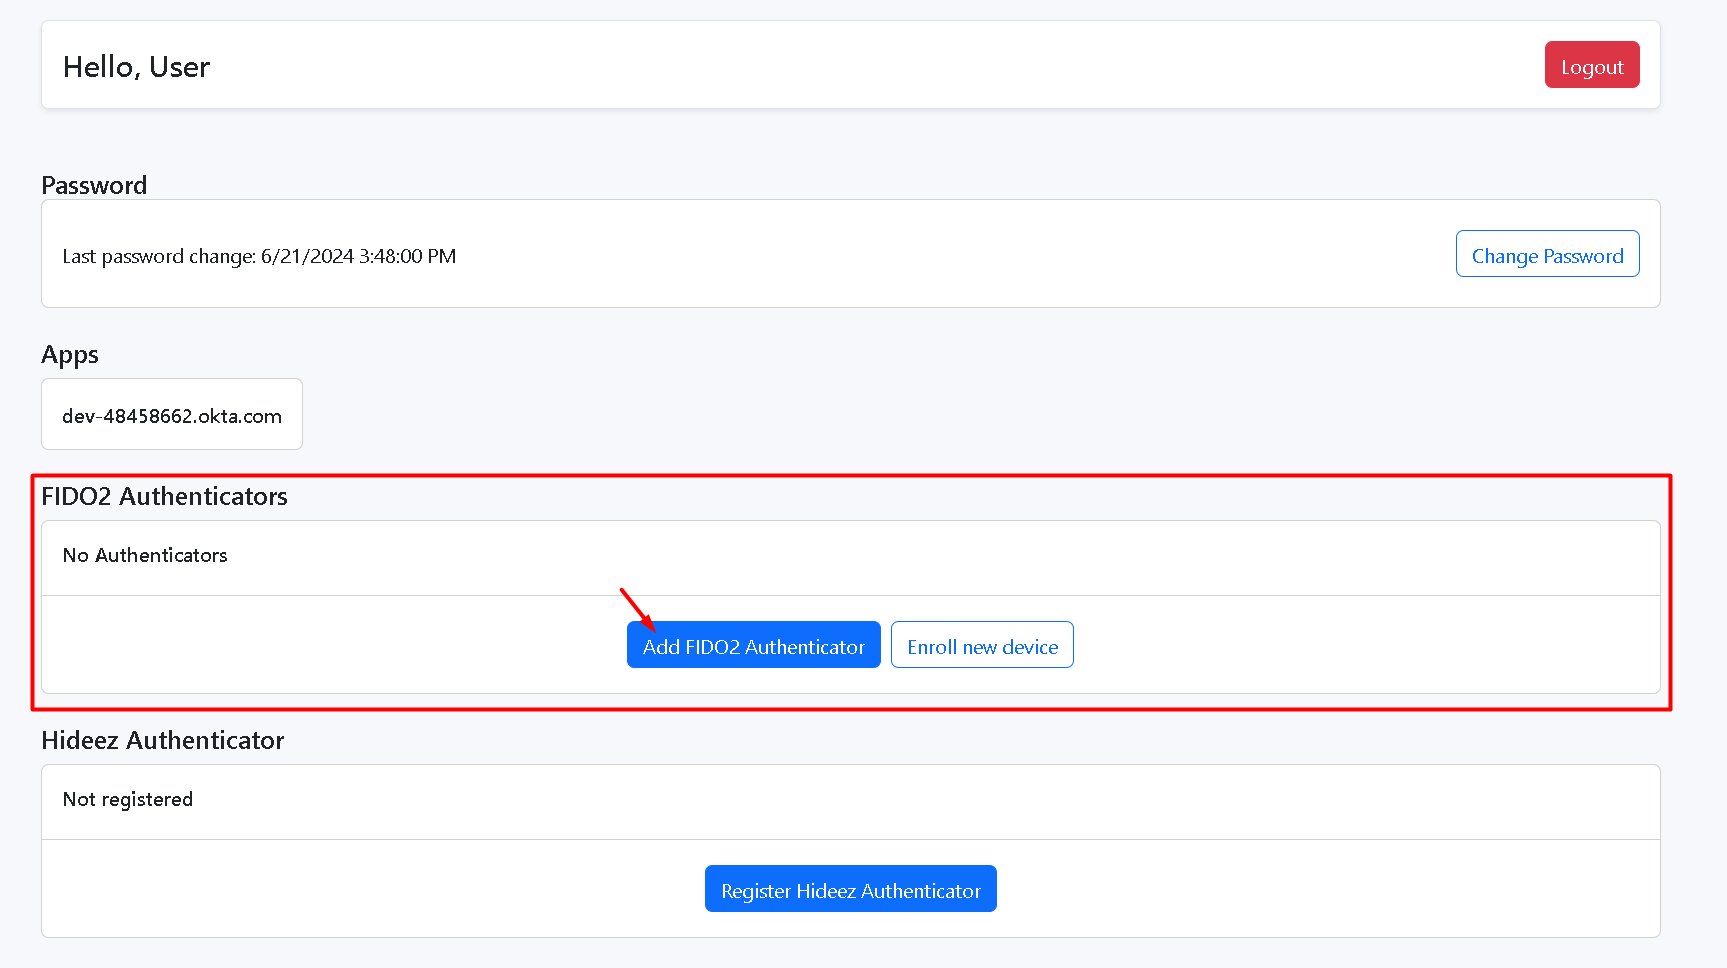
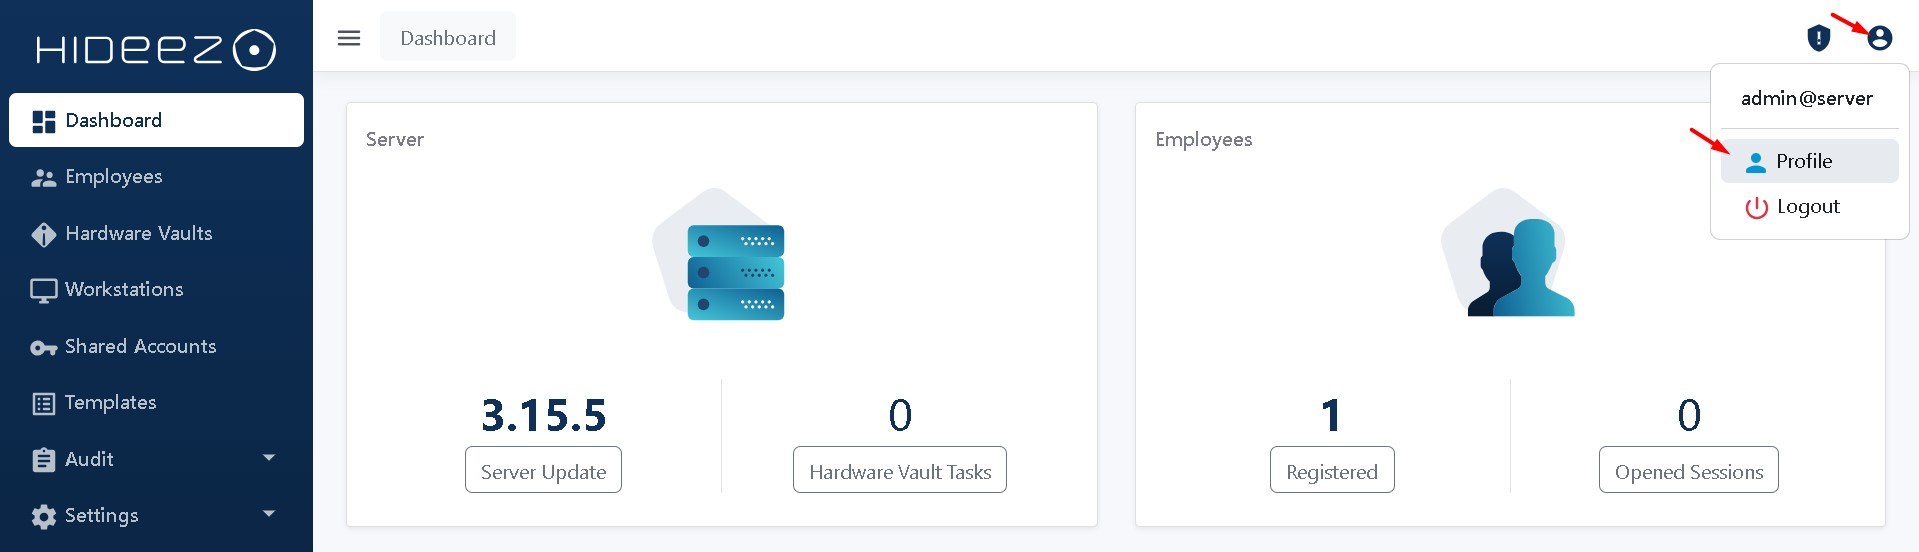
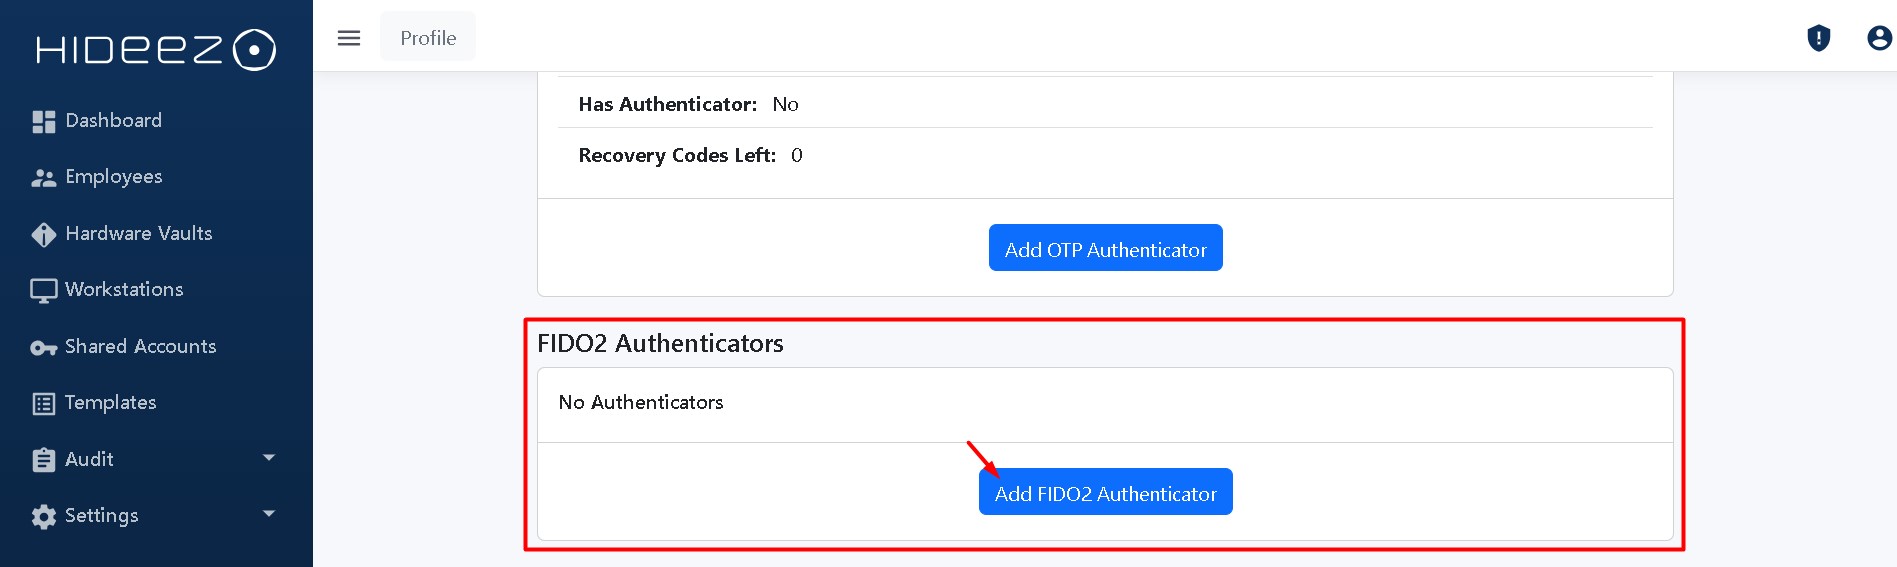
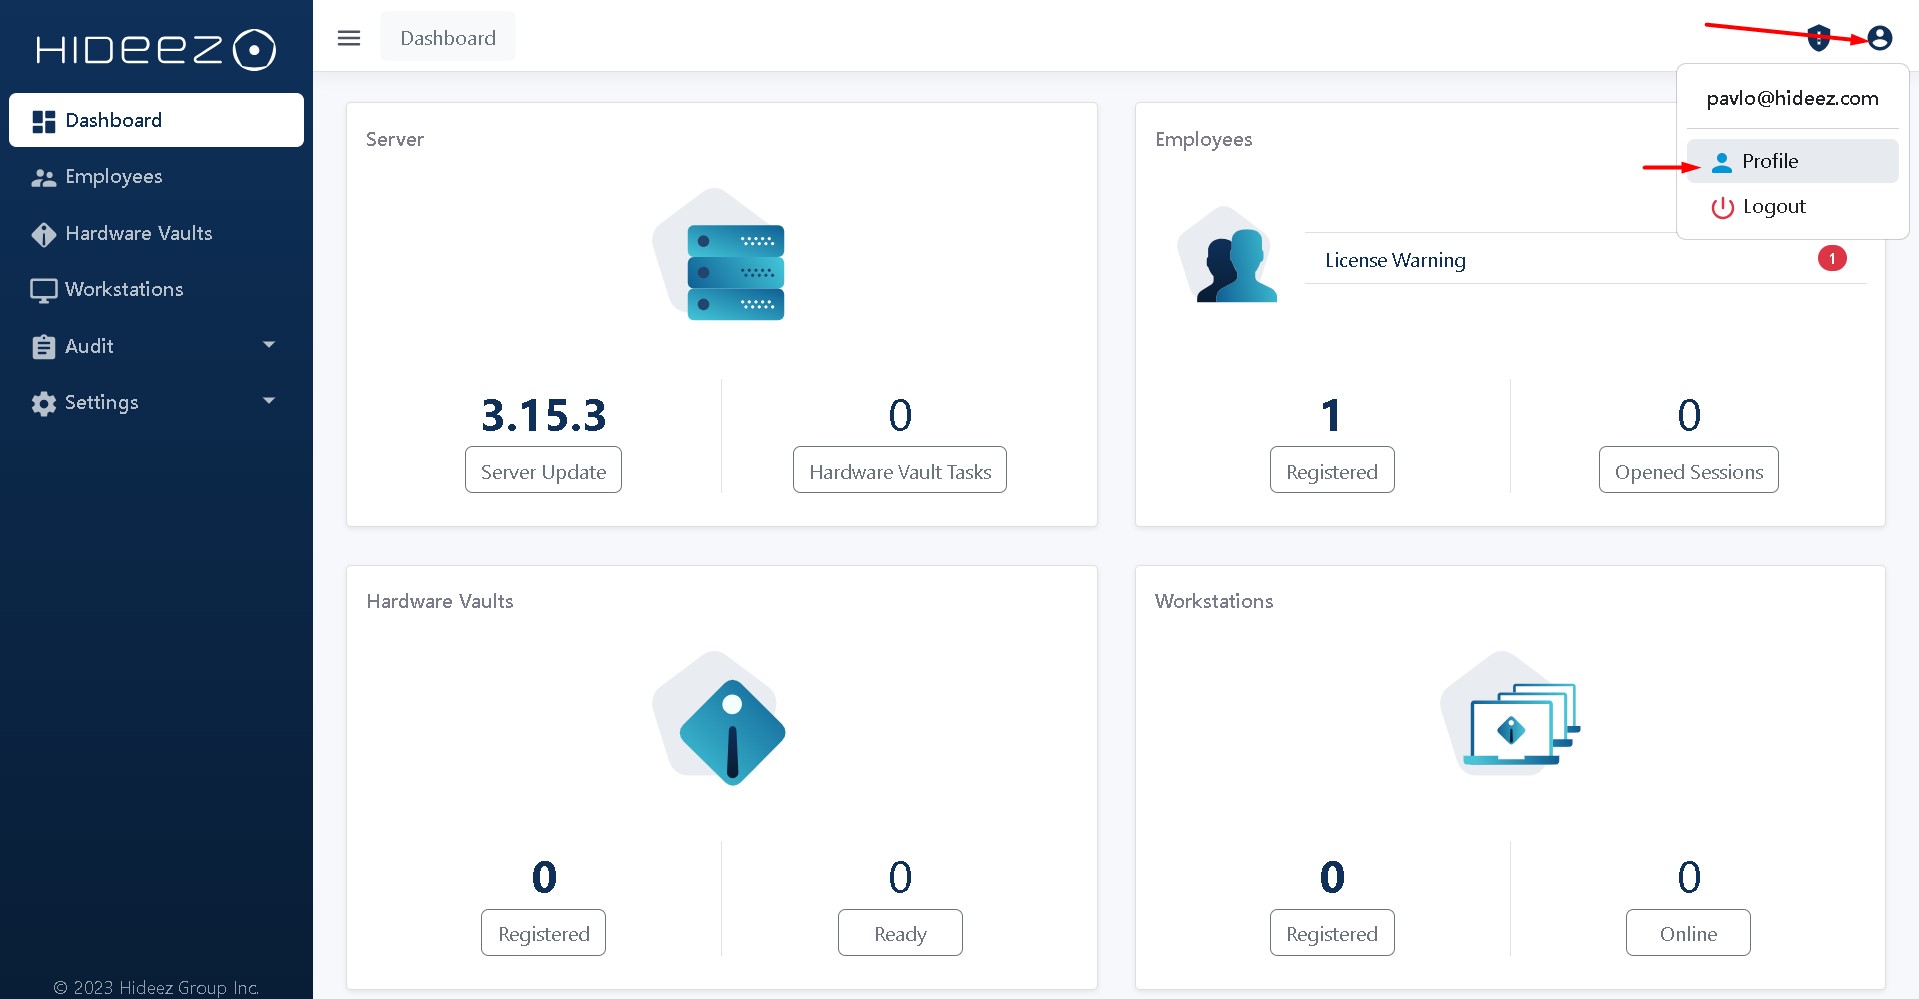
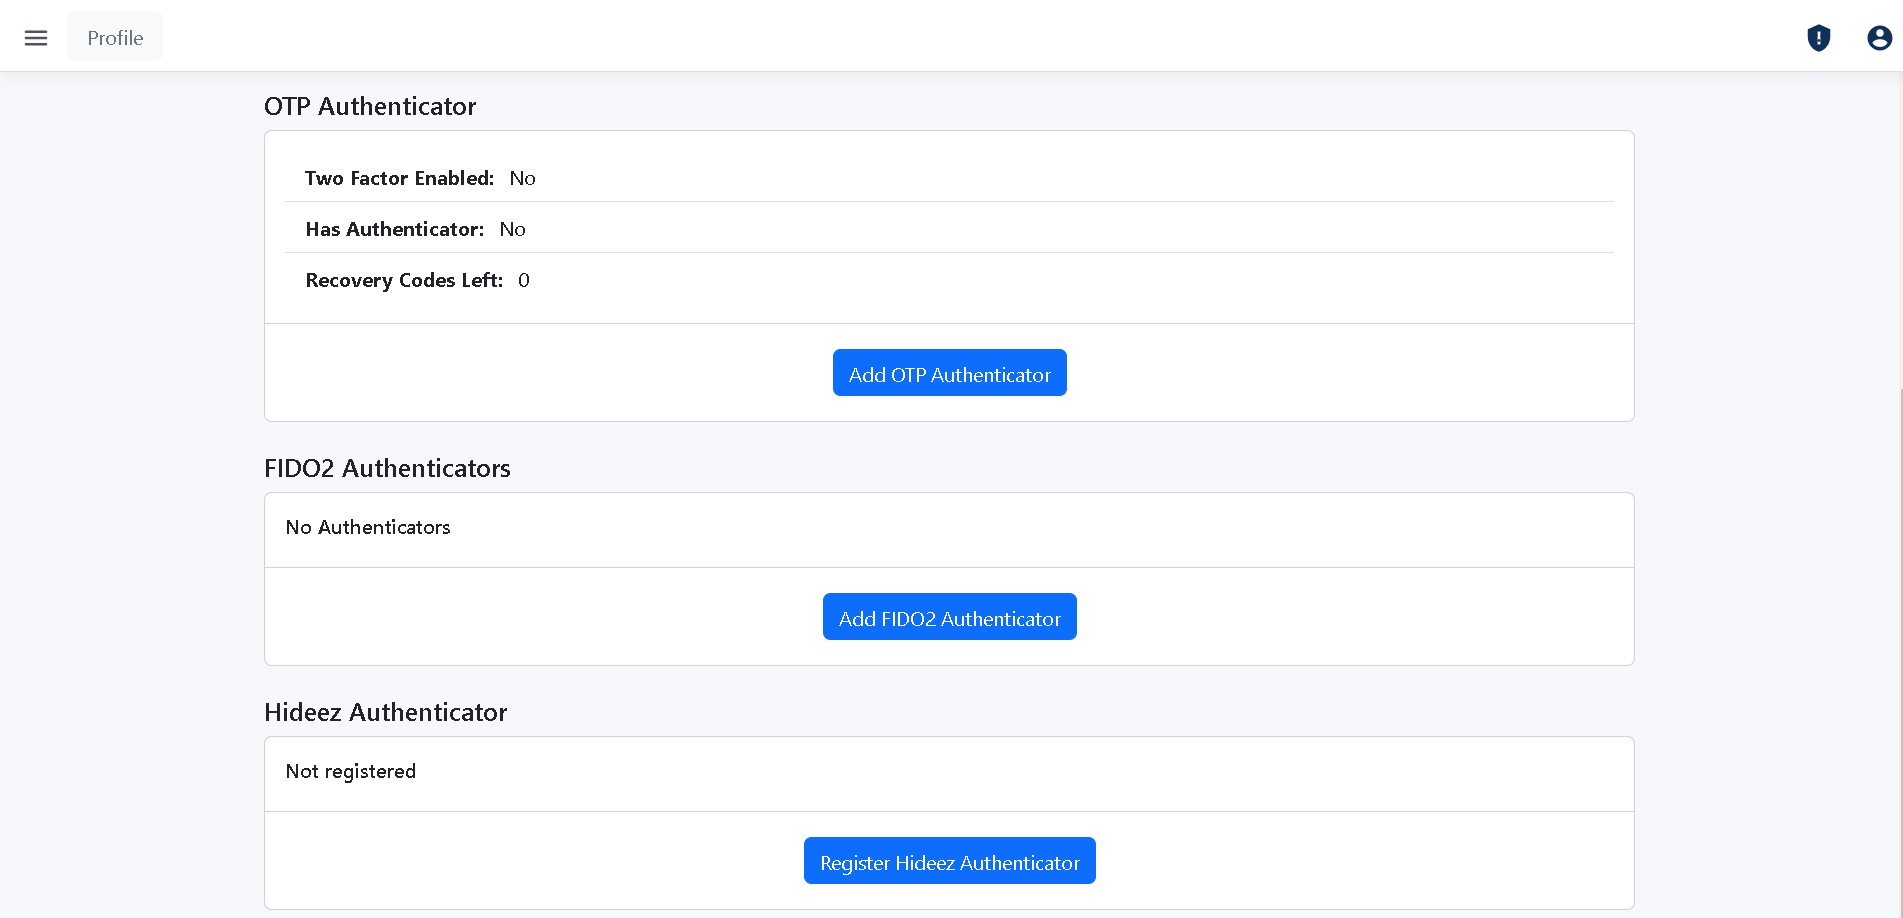
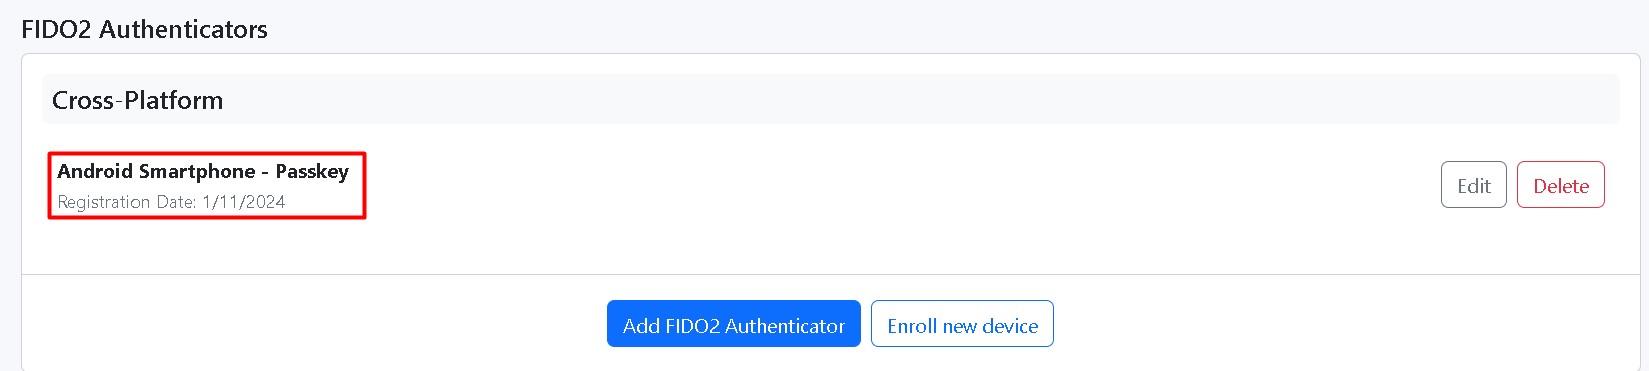
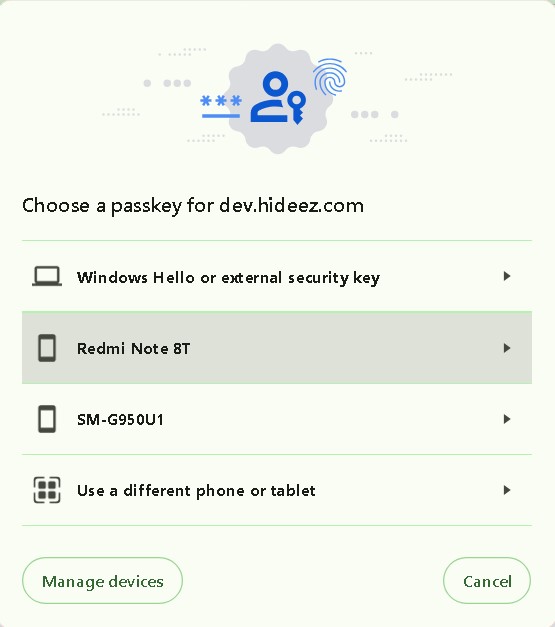
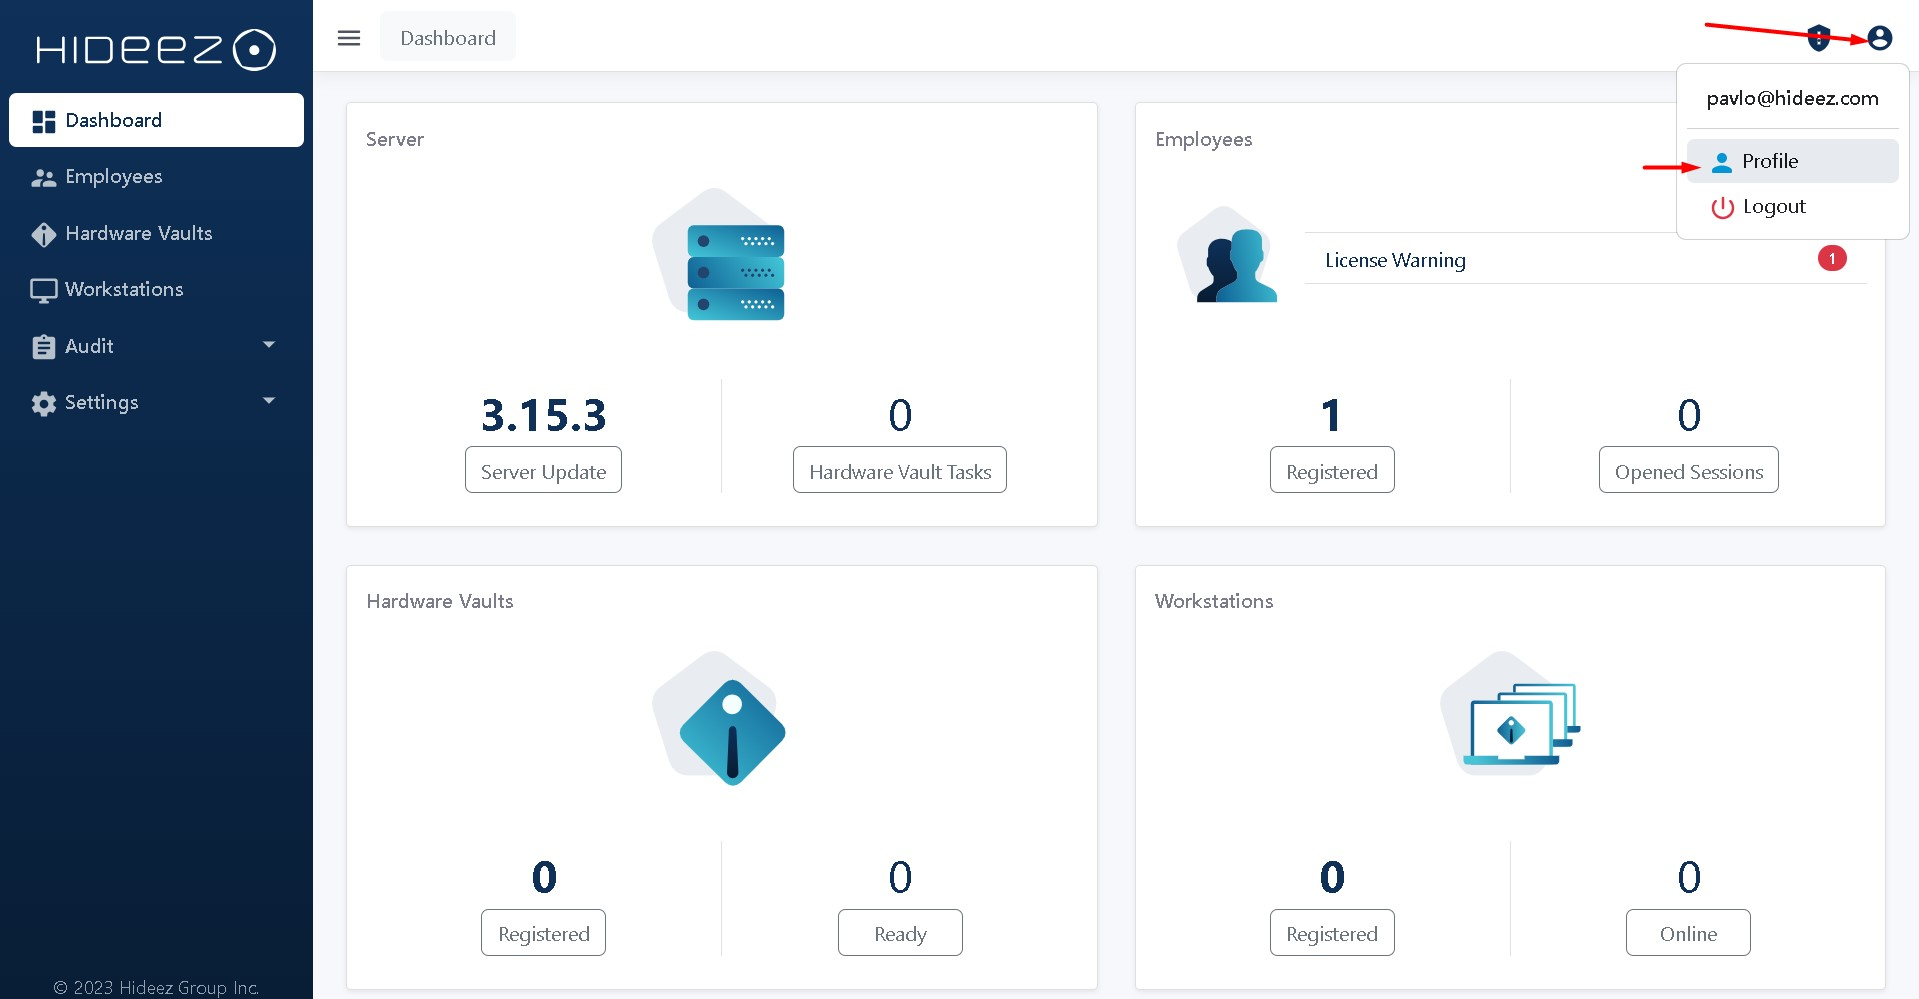
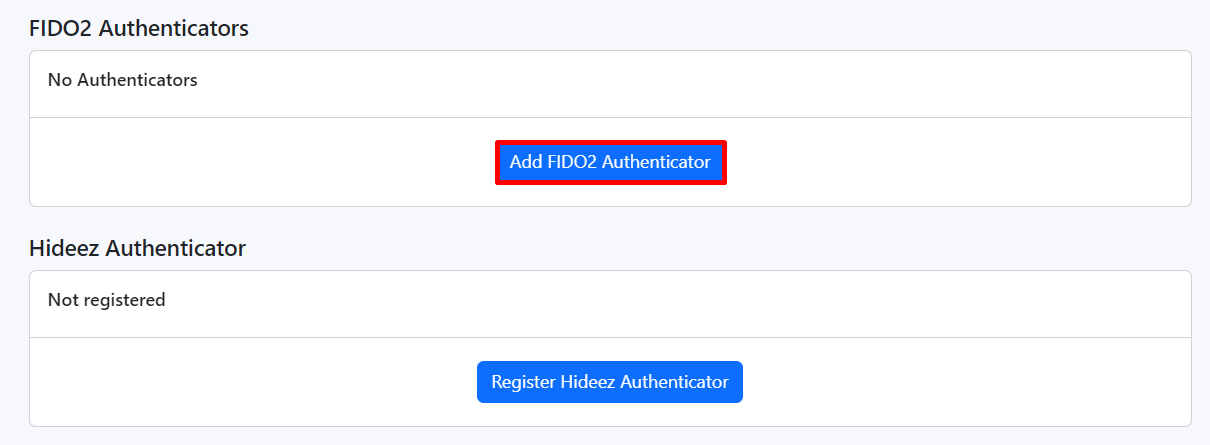
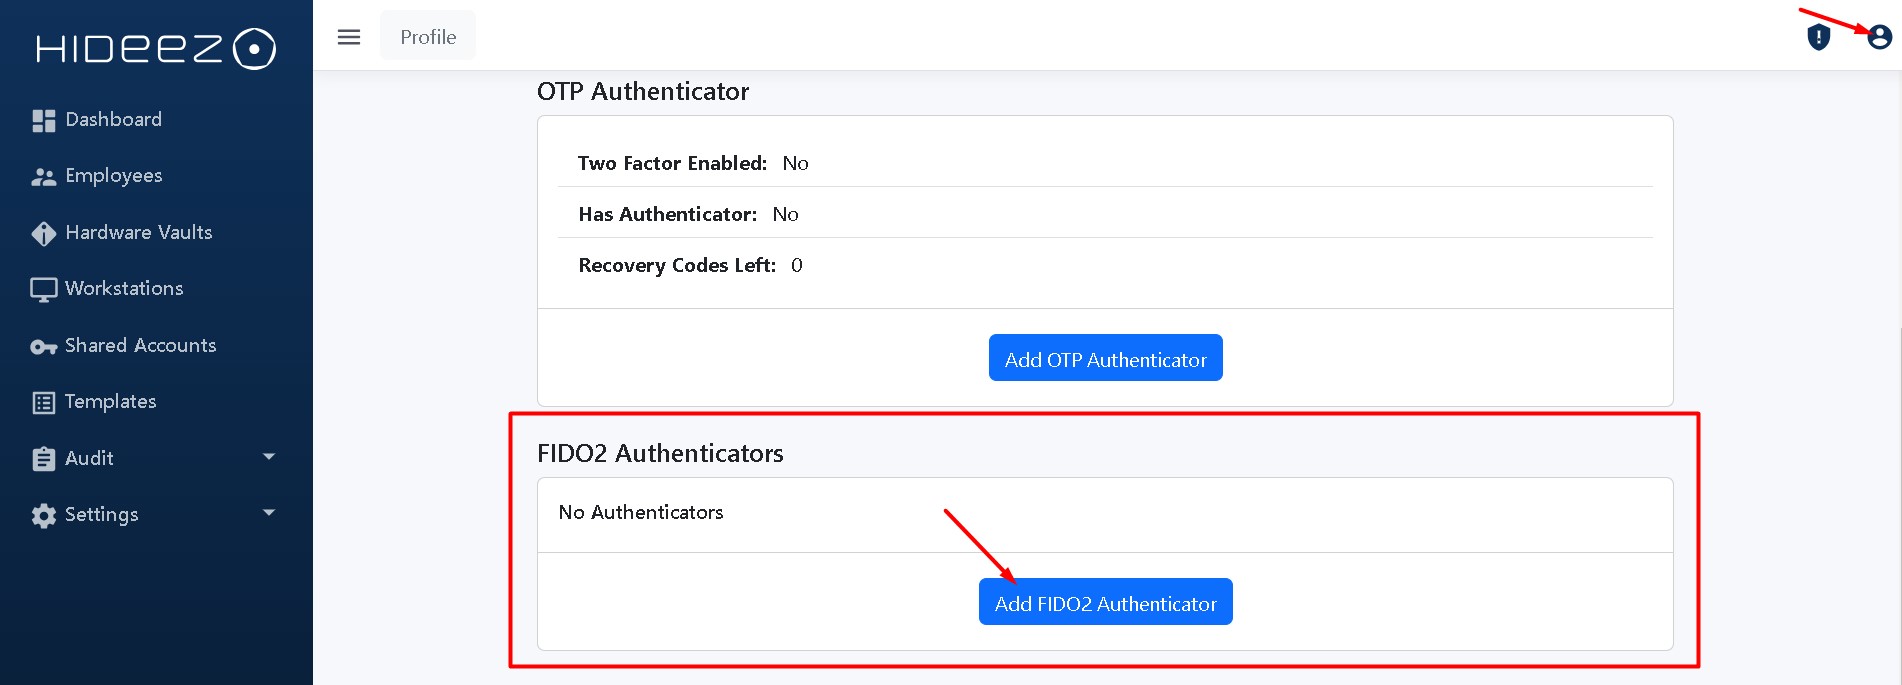
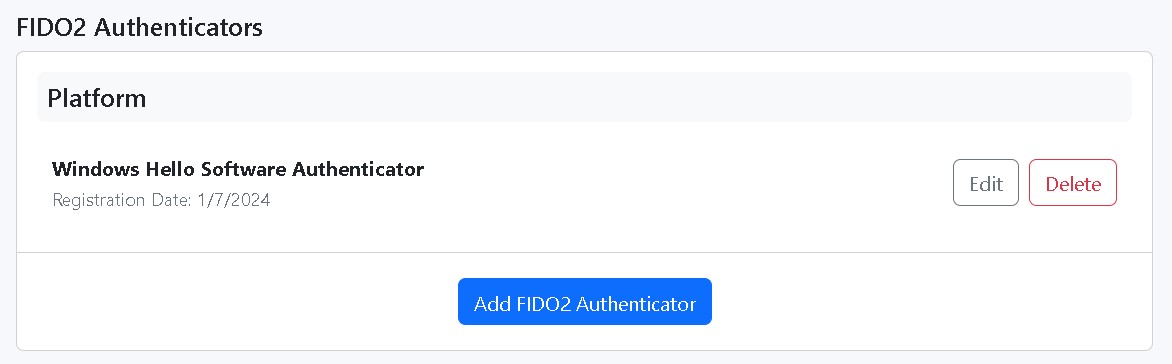
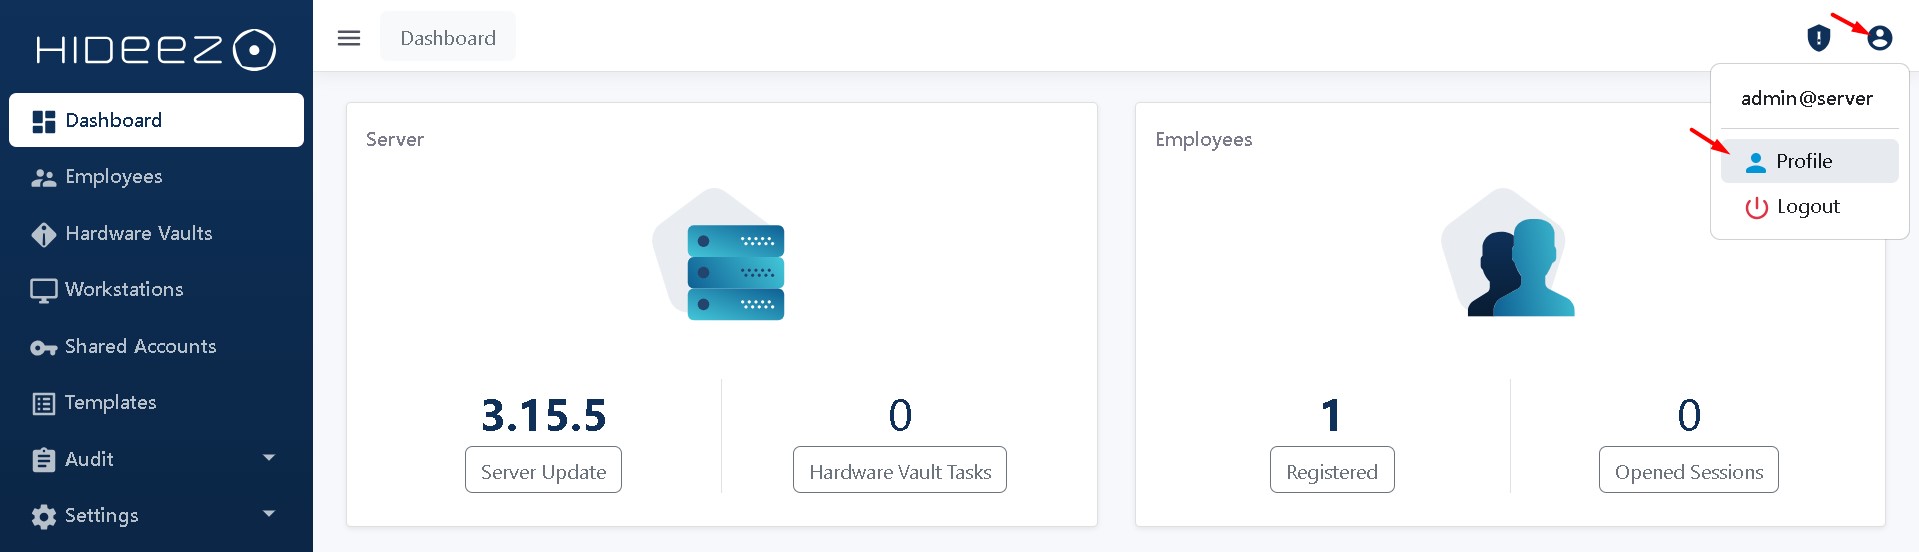
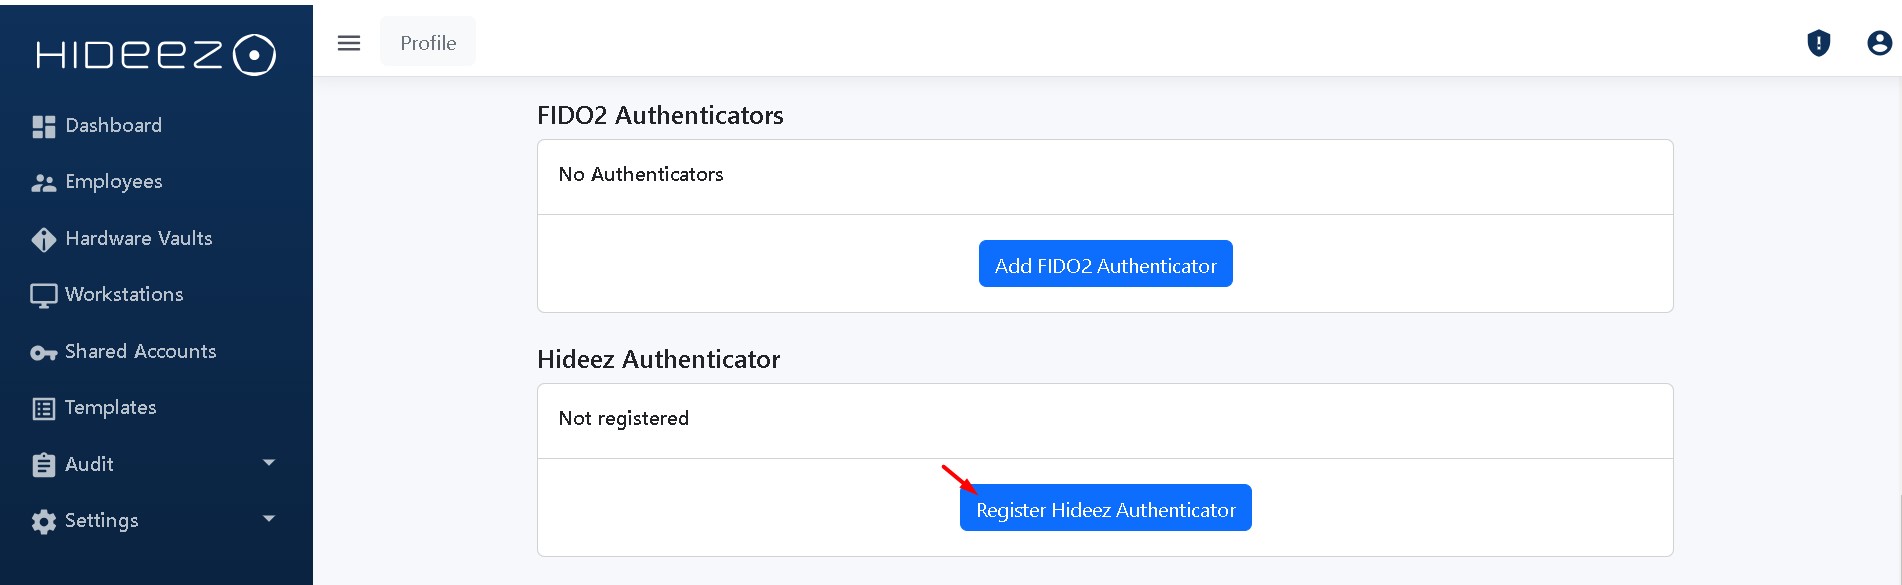
* To create a passkey, go to the **Profile** page, then the  **FIDO2 Authenticators** section, and click **Add FIDO2 Authenticator**.

<div><figure><img src="https://content.gitbook.com/content/RdTysrljwe610dPFG7tE/blobs/hfccsaLoI7ESORI5IjhL/Screenshot_6%20(1).jpg" alt=""><figcaption></figcaption></figure> <figure><img src="https://content.gitbook.com/content/RdTysrljwe610dPFG7tE/blobs/Vuza45MuLwOo5tRtk7DJ/Screenshot_1%20(1).jpg" alt=""><figcaption></figcaption></figure></div>

### **To Create Passkeys for User Accounts:**

<figure><img src="https://content.gitbook.com/content/RdTysrljwe610dPFG7tE/blobs/rCWvKDDE0TrrSmstwq5V/image.png" alt="" width="563"><figcaption></figcaption></figure>

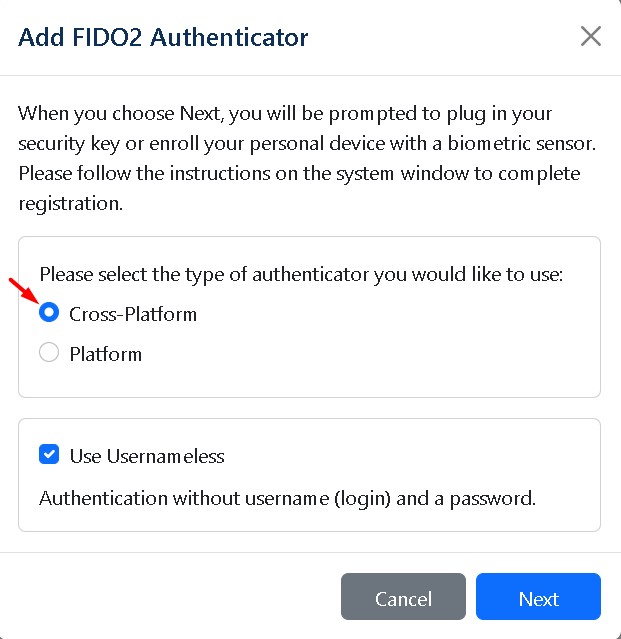
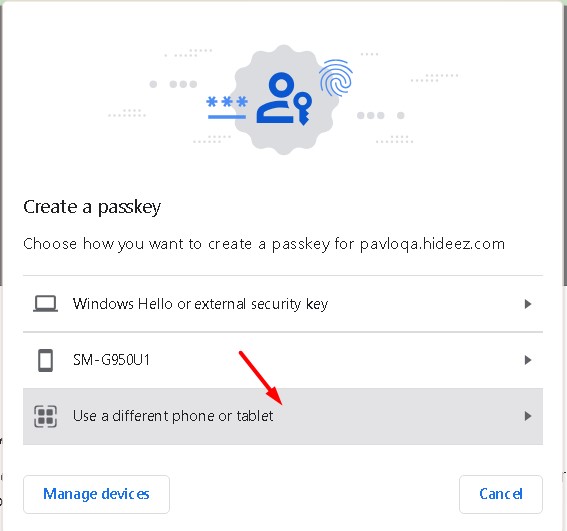
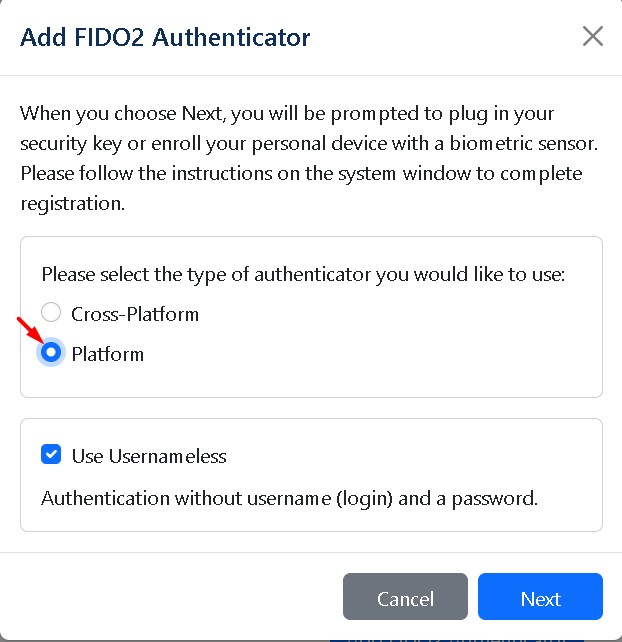
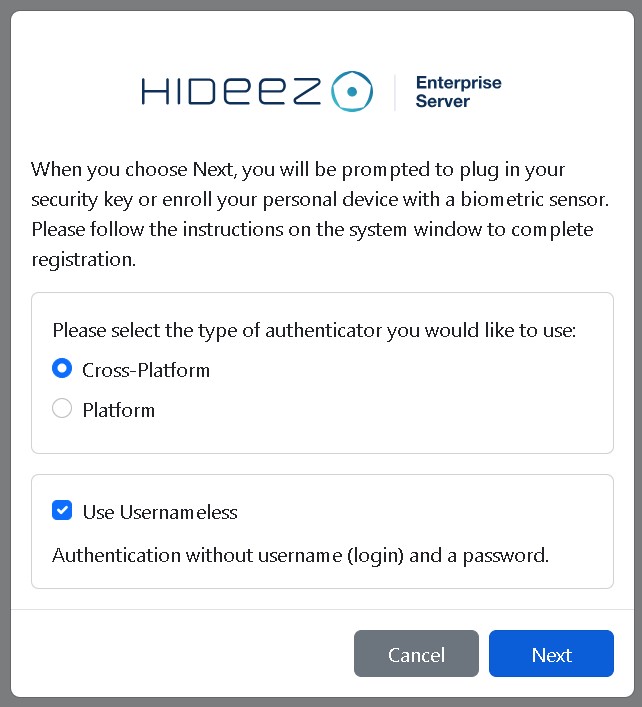
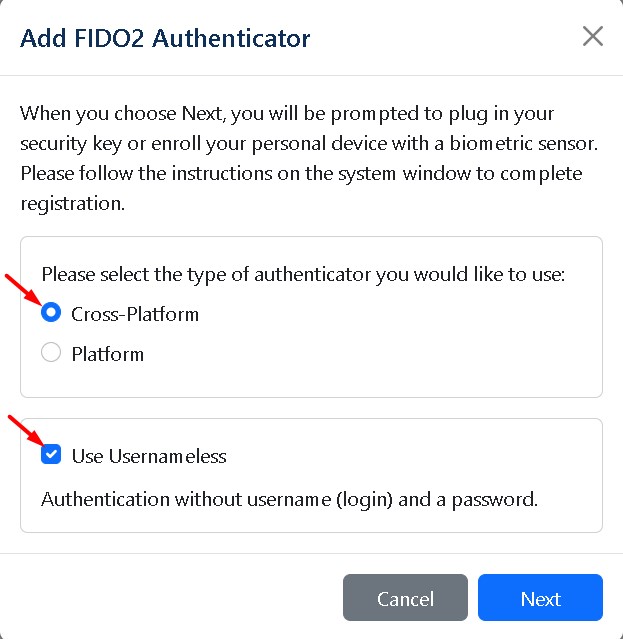
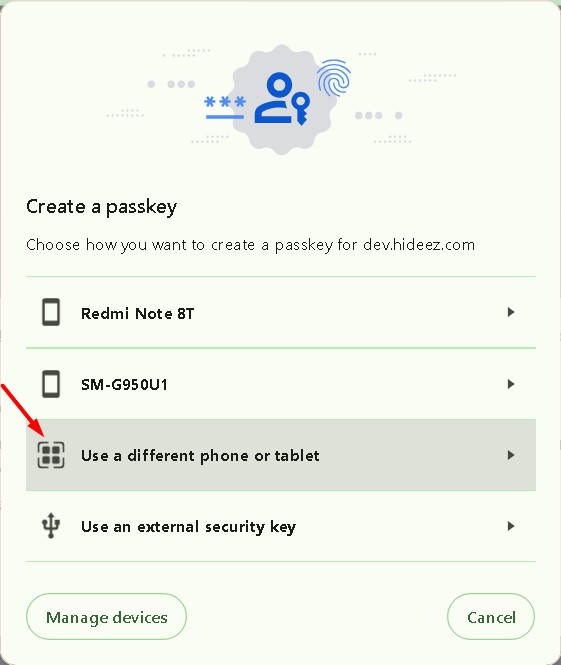
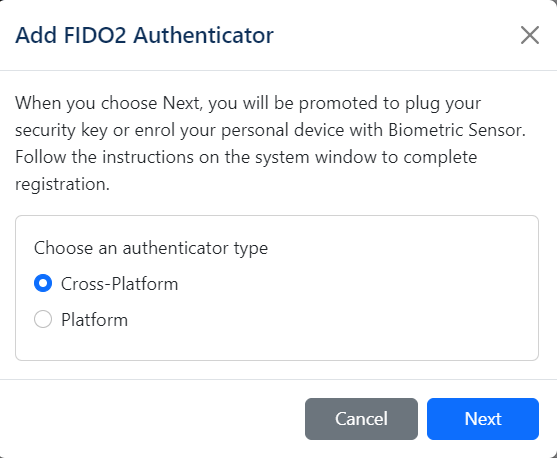
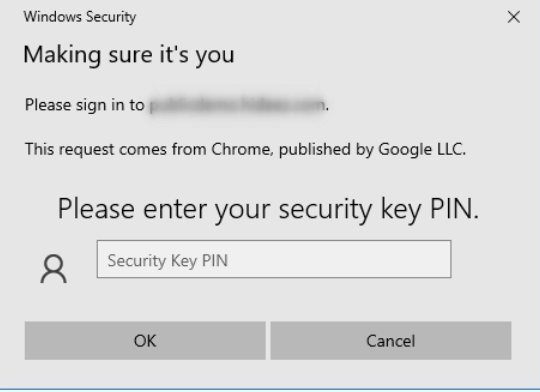
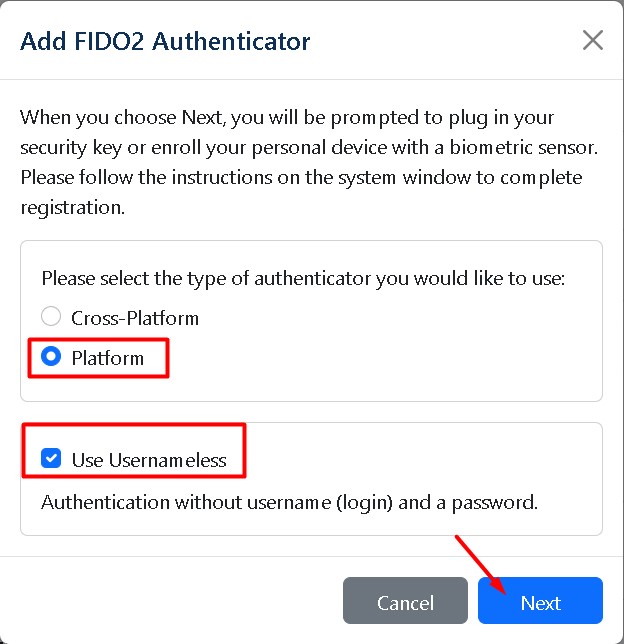
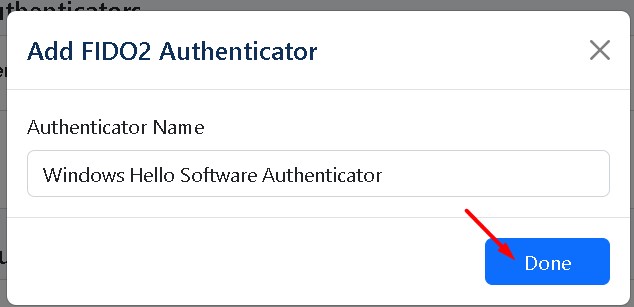
* Following the on-screen steps, add a FIDO2 Authenticator, choosing between a **Cross-Platform key** (another device, like a phone or tablet) or **Platform key** (current device).

#### &#x20;Adding a [**Cross-Platform key:**](/use-cases/passkey/sso-login-to-web-services-fido2-via-passkey-and-hideez-server-as-identity-provider)

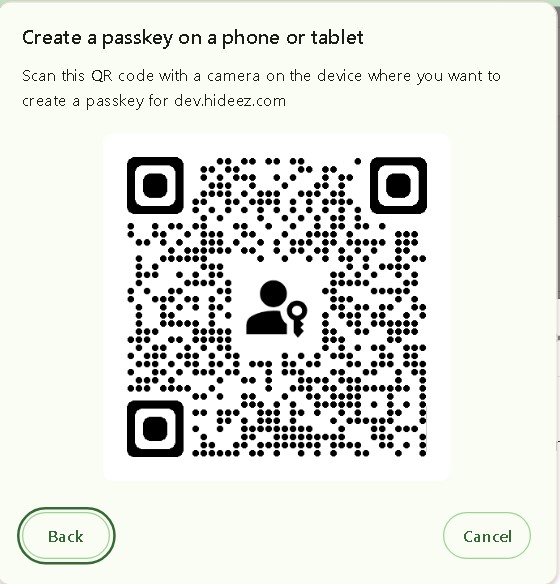
<div><figure><img src="https://content.gitbook.com/content/RdTysrljwe610dPFG7tE/blobs/BFc1qv3kXAHqZAmFFhxE/Screenshot_14.jpg" alt="" width="466"><figcaption></figcaption></figure> <figure><img src="https://content.gitbook.com/content/RdTysrljwe610dPFG7tE/blobs/zzAdOb9Ct0QXhuSBSHuj/Screenshot_26.jpg" alt="" width="425"><figcaption></figcaption></figure> <figure><img src="https://content.gitbook.com/content/RdTysrljwe610dPFG7tE/blobs/wEXwE23FPql91iPPxpQY/Screenshot_27.jpg" alt="" width="422"><figcaption></figcaption></figure></div>

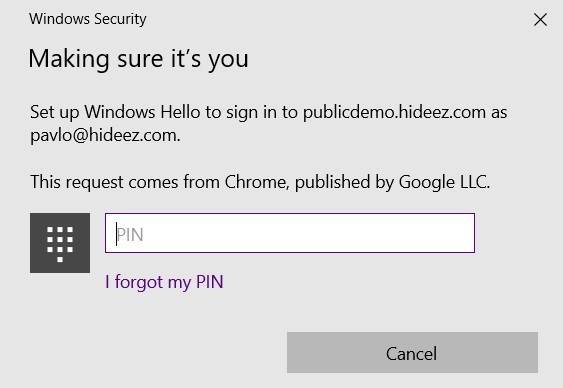
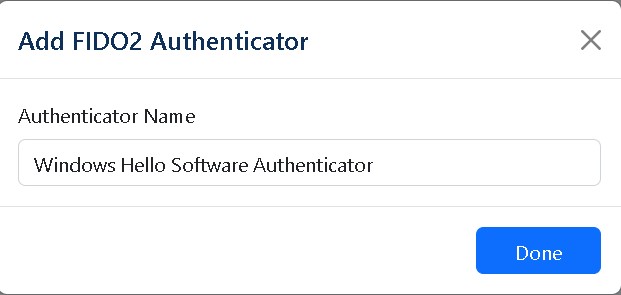
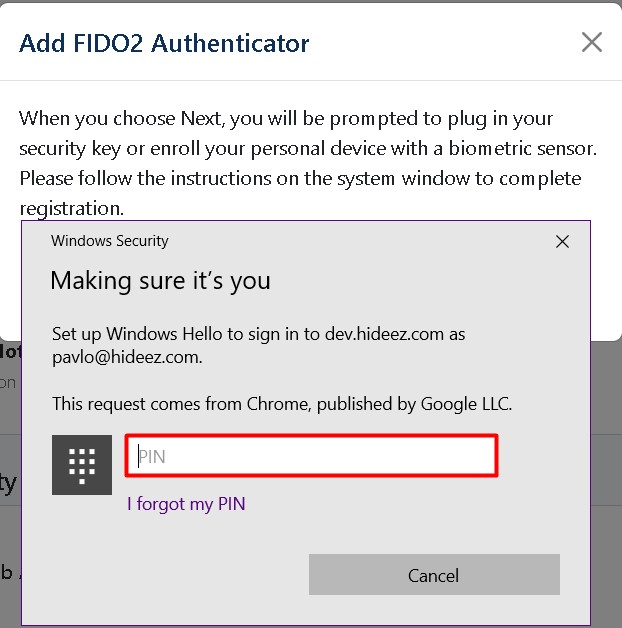
#### Adding a [**Platform key**](/hideez-enterprise-server/administration/platform-authentication-on-the-hes-server)

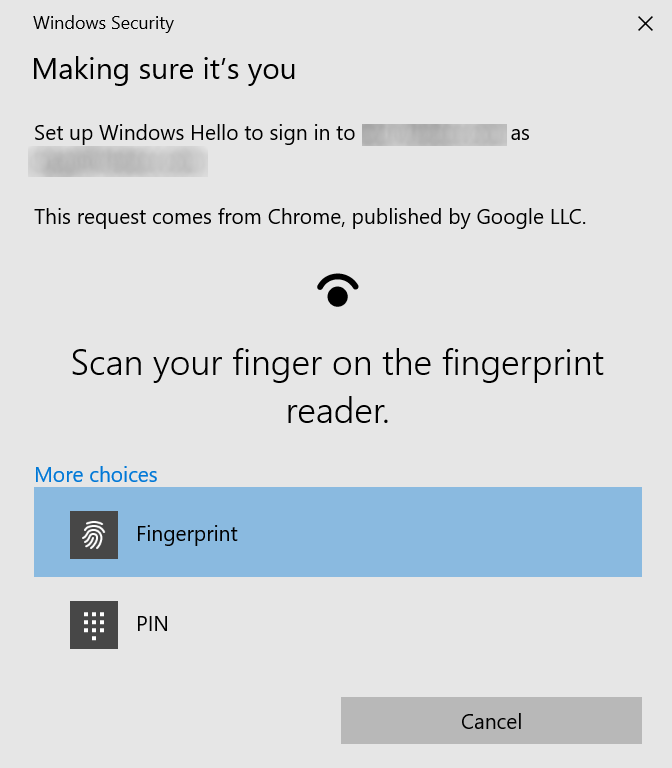
<div><figure><img src="https://content.gitbook.com/content/RdTysrljwe610dPFG7tE/blobs/ouMIczCty0i6qgfmbrMK/Screenshot_15.jpg" alt="" width="467"><figcaption></figcaption></figure> <figure><img src="https://content.gitbook.com/content/RdTysrljwe610dPFG7tE/blobs/IF4WKxSK1i5dNg6KzA7L/Screenshot_16.jpg" alt=""><figcaption></figcaption></figure> <figure><img src="https://content.gitbook.com/content/RdTysrljwe610dPFG7tE/blobs/P4sVwmY9OAh4fyeVoo8z/Screenshot_18.jpg" alt=""><figcaption></figcaption></figure></div>

{% hint style="info" %}
Note: Multiple devices can be added simultaneously.

&#x20;A **biometric sensor** or **Trusted Platform Module** **(TPM)** module must be present.
{% endhint %}


# FIDO Security Key guide

FIDO2 and FIDO U2F authentication within Hideez Authentication Service

### 1. Sign in to your Hideez server using the Hideez account

<figure><img src="https://content.gitbook.com/content/RdTysrljwe610dPFG7tE/blobs/dMP9sKzqMVPmwytM68UJ/image.png" alt="" width="375"><figcaption></figcaption></figure>

### **To add FIDO keys for Admin account:**

* To add the FIDO key, go to the **Profile** page, then the  **FIDO2 Authenticators** section, and click **Add FIDO2 Authenticator**.

<div data-full-width="true"><figure><img src="https://content.gitbook.com/content/RdTysrljwe610dPFG7tE/blobs/FsRzv92ZzdvkVGshwl7e/image.png" alt=""><figcaption></figcaption></figure> <figure><img src="https://content.gitbook.com/content/RdTysrljwe610dPFG7tE/blobs/PQ2pek1PwsJostLWaLjH/Screenshot_7.jpg" alt=""><figcaption></figcaption></figure></div>

### **To add FIDO keys for User account:**

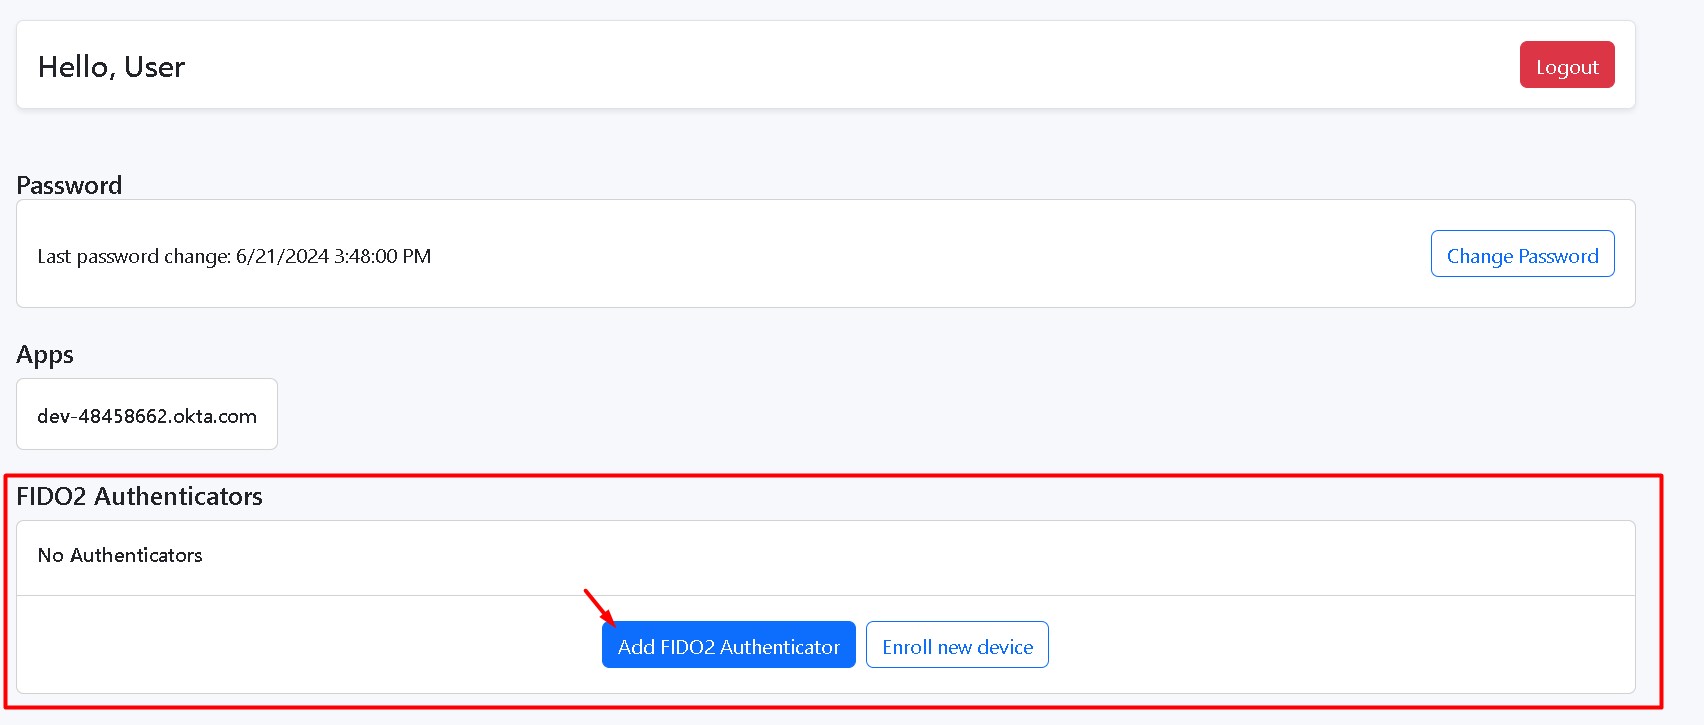
To add the FIDO key, go to the **Profile** page, then the  **FIDO2 Authenticators** section, and click **Add FIDO2 Authenticator**.

<figure><img src="https://content.gitbook.com/content/RdTysrljwe610dPFG7tE/blobs/fWS4BEVwctJaf3eZ6BXb/Screenshot_10.jpg" alt="" width="563"><figcaption></figcaption></figure>

### Here are several websites and their documentation related to FIDO U2F authentication:&#x20;

* [Google account](https://support.google.com/accounts/answer/6103523)
* [AOL](https://help.aol.com/articles/2-step-verification-with-a-security-key)
* [AWS Single Sign](https://docs.aws.amazon.com/singlesignon/latest/userguide/user-device-registration.html)
* [AWS Identity and Acess Management (IAM)](https://docs.aws.amazon.com/IAM/latest/UserGuide/id_credentials_mfa_enable_u2f.html)
* [Basecamp](https://3.basecamp-help.com/article/443-two-factor-authentication-2fa#use-a-security-key)
* [Binance](https://www.binance.com/en/blog/security/2169449142999141489)
* [Bitbucket](https://support.atlassian.com/bitbucket-cloud/docs/enable-two-step-verification/)
* [Boxcryptor](https://www.boxcryptor.com/ru/help/boxcryptor-account/windows/#two-factor-authentication)
* [Cloudflare](https://blog.cloudflare.com/cloudflare-now-supports-security-keys-with-web-authentication-webauthn/)
* [Coinbase](https://help.coinbase.com/en/coinbase/managing-my-account/verify-my-identity/using-and-managing-security-keys)
* [Dropbox](https://help.dropbox.com/account-access/enable-two-step-verification#How-to-use-a-security-key-fornbspmultifactor-authentication)
* [eBay](https://www.ebay.com/help/account/protecting-account/tips-keeping-ebay-account-secure?id=4872\&st=3\&pos=1\&query=Tips%20for%20keeping%20your%20eBay%20account%20secure\&intent=2%20factor\&lucenceai=lucenceai#section2)
* [Facebook](https://www.facebook.com/help/401566786855239)
* [Gandi.net](https://docs.gandi.net/en/account_management/security/security_key.html)
* [Gemini](https://support.gemini.com/hc/en-us/articles/360044275792)
* [GeolP2](https://support.maxmind.com/hc/en-us/articles/15329017158427-Set-Up-Security-Key-2FA)
* [GitHub](https://docs.github.com/en/github/authenticating-to-github/securing-your-account-with-two-factor-authentication-2fa/configuring-two-factor-authentication#configuring-two-factor-authentication-using-fido-u2f)
* [GitLab](https://docs.gitlab.com/ee/user/profile/account/two_factor_authentication.html#enable-2fa-via-u2f-device)
* [Gluu Server](https://gluu.org/docs/ce/authn-guide/U2F/)
* [GoDaddy](https://ua.godaddy.com/help/dodajte-aparatnij-klyuch-bezpeki-dlya-dvoetapnoyi-perevirki-31900)
* [ISL Online Remote Desktop](https://help.islonline.com/35746/286527)
* [Jira](https://aserve.atlassian.net/wiki/spaces/U2F/pages/746979329/How%2Bto%2Blog%2Bin%2Bwith%2B2FA%2Bfor%2BJira%2Busing%2BU2F%2Bdevice%2Bas%2Bauthentication%2Bsecond%2Bfactor)
* [JumpCloud](https://support.jumpcloud.com/support/s/article/Using-a-Security-Key-with-your-JumpCloud-User-Account)
* [minFraud](https://support.maxmind.com/hc/en-us/articles/15329017158427-Set-Up-Security-Key-2FA)
* [Namecheap](https://www.namecheap.com/support/knowledgebase/article.aspx/10102/45/how-can-i-use-the-u2f-method-for-twofactor-authentication/)
* [Nitrado](https://server.nitrado.net/eng/news2/view/nitrado-highlighted-features-two-factor-authentication/)
* [Nulab](https://support.nulab.com/hc/en-us/articles/7732936736537-How-to-set-up-two-factor-authentication)
* [Opalstack](https://docs.opalstack.com/user-guide/your-account/#multi-factor-authentication)
* [Porkbun](https://kb.porkbun.com/article/119-how-to-secure-your-account-with-a-physical-security-key-using-webauthn)
* [PushCoin](https://knowhow.pushcoin.com/2015/01/12/using-security-key-for-2-step-verification/)
* [Quonference](https://quonference.com/security-guide#yubikey)
* [Salesforce](https://help.salesforce.com/s/articleView?id=sf.security_u2f_register_security_key.htm\&type=5)
* [Segulink](https://segusoft.freshdesk.com/support/solutions/articles/19000117048-multi-faktor-authentifizierung-mfa-einrichten)
* [Sentry](https://blog.sentry.io/2016/06/22/introducing-2fa)
* [Shopify](https://help.shopify.com/en/manual/your-account/account-security/two-step-authentication#enable-two-step-authentication-with-security-keys)
* [Twitter](https://help.twitter.com/en/managing-your-account/two-factor-authentication#security-key)
* [Twitch](https://help.twitch.tv/s/article/two-factor-authentication?language=en_US)
* [Yahoo](https://help.yahoo.com/kb/-step-verification-security-key-sln35380.html)
* [WSO2](https://docs.wso2.com/display/IS560/Multi-factor+Authentication+using+FIDO)
* [/n software SFTP Drive](https://www.nsoftware.com/kb/articles/yubikey)

### Password managers and identity management platforms:

* [1Password](https://support.1password.com/security-key/)
* [Authereum](https://medium.com/authereum/authereum-now-supports-hardware-security-keys-for-two-factor-authentication-2fa-dff699912b97?)
* [Auth0](https://auth0.com/docs/login/mfa/fido-authentication-with-webauthn/configure-webauthn-security-keys-for-mfa)
* [Bitwarden](https://bitwarden.com/help/article/setup-two-step-login-fido/)
* [Dashlane](https://support.dashlane.com/hc/en-us/articles/360021374760-Open-the-web-app-with-your-PIN-code-fingerprint-or-security-key#biometric-unlock)
* [DUO](https://guide.duo.com/security-keys)
* [Egnyte Protect](https://helpdesk.egnyte.com/hc/en-us/articles/360040496691-Multifactor-Authentication-using-FIDO2-WebAuthn-)
* [ESET Secure Authentication](https://support.eset.com/en/kb3648-using-hard-tokens-with-eset-secure-authentication-7157)
* [HelloID](https://docs.helloid.com/hc/en-us/articles/360011028700-How-to-view-your-account-s-security-overview)
* [ID.me](https://help.id.me/hc/en-us/articles/360025737794-How-do-I-add-more-than-one-2-factor-authentication-2FA-method-to-my-ID-me-Account-)
* [Keeper](https://www.keepersecurity.com/blog/2024/01/16/keeper-now-supports-hardware-security-keys-as-a-single-2fa-method/)
* [Okta](https://www.yubico.com/us/works-with-yubikey/catalog/okta/)
* [Oracle](https://docs.oracle.com/en/cloud/paas/identity-cloud/uaids/configure-fido-security.html)

### Set up passwordless sign-in with the Hideez Key

Please follow the instructions of services that support the FIDO2/WebAuthn passwordless sign-in to use the Hideez Key instead of your password:

* [Azure Active Directory](https://docs.microsoft.com/en-us/azure/active-directory/authentication/concept-authentication-passwordless#fido2-security-keys)
* [Centrify](https://docs.centrify.com/Content/CoreServices/Authenticate/U2FAuth.htm)
* [Curity](https://curity.io/resources/learn/webauthn-authenticator/)
* [Microsoft account](https://support.microsoft.com/en-us/windows/sign-in-to-your-microsoft-account-with-windows-hello-or-a-security-key-800a8c01-6b61-49f5-0660-c2159bea4d84)
* [Microsoft Azure Active Directory](https://docs.microsoft.com/en-us/azure/active-directory/authentication/concept-authentication-passwordless#fido2-security-keys)
* [SecSign](https://www.secsign.com/two-factor-authentication-fido2-webauth/)

{% hint style="info" %}
You can review the full list of websites supporting FIDO U2F and FIDO2 standards [here.](https://hideez.com/pages/supported-services)
{% endhint %}


# Activation FIDO key and setting PIN code

{% hint style="info" %}
Hideez Key supports two authentication standards developed by the [FIDO Alliance](https://fidoalliance.org/): FIDO U2F and FIDO2.
{% endhint %}

1. Select **Start** > **Windows Settings** > **Account** > **Sign-in options** > **Security Key** > **Manage**
2. After clicking on the **Manage** button, the Hideez Key will require confirmation of this operation with a short press on the button. If you don’t confirm it in 20 seconds, Windows reports the problem and restarts the operation. \
   &#x20; <br>

   <figure><img src="https://content.gitbook.com/content/RdTysrljwe610dPFG7tE/blobs/ixZwPUsLaIh23aB8sDzj/8.jpg" alt="" width="563"><figcaption></figcaption></figure>
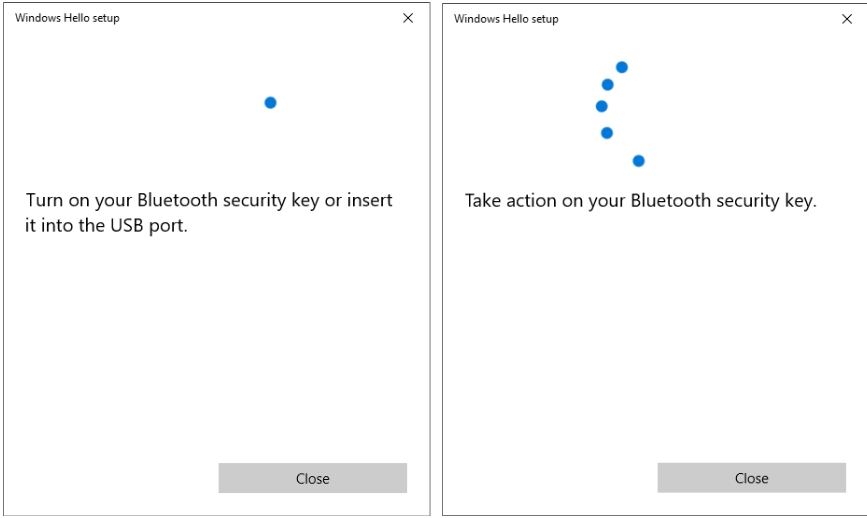
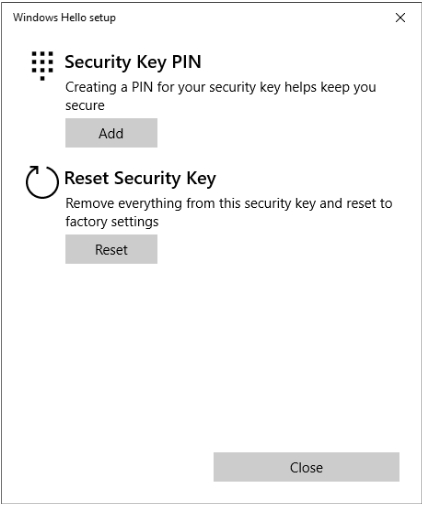
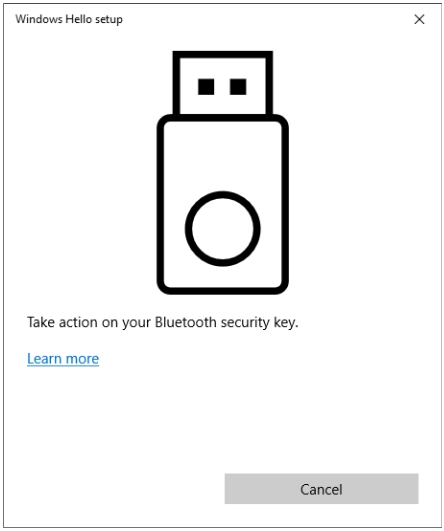
3. When the message “Take action on your Bluetooth security key” appears, confirm it with a short press on the Hideez Key button. A "Windows Hello setup" window appears with the menu "Add Security Key PIN" and "Reset Security Key".&#x20;

<figure><img src="https://content.gitbook.com/content/RdTysrljwe610dPFG7tE/blobs/SjaK5MogcTjaHyxmY9St/9.jpg" alt="" width="375"><figcaption></figcaption></figure>

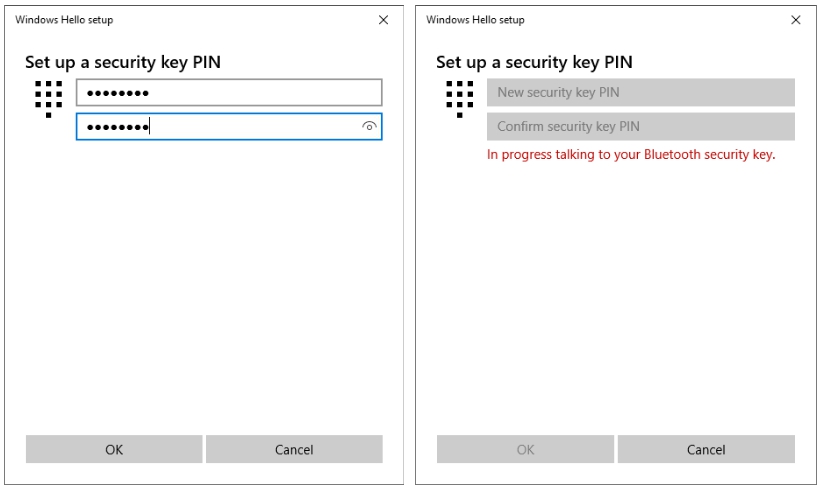
1. Select “Add PIN to Security Key” and enter the same PIN code containing 4 to 32 digits twice.\
   &#x20;&#x20;

   <figure><img src="https://content.gitbook.com/content/RdTysrljwe610dPFG7tE/blobs/PTYCA1Y89Gy2KWCErTp2/10.jpg" alt="" width="563"><figcaption></figcaption></figure>

### **‌Changing PIN code for the FIDO technology**

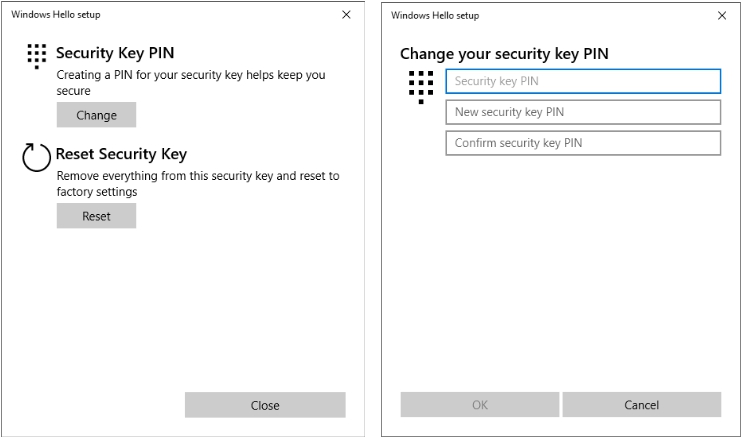
Go to the “Windows Hello setup” section and select “Change Security Key PIN” to change the PIN code. Next, you need to type your old PIN followed by a new one (twice) and click “OK”.\
&#x20;&#x20;

<figure><img src="https://content.gitbook.com/content/RdTysrljwe610dPFG7tE/blobs/xiGjjaNGBkznQ0GebmvU/11.jpg" alt="" width="563"><figcaption></figcaption></figure>

### **Removing PIN code and clearing all FIDO data**

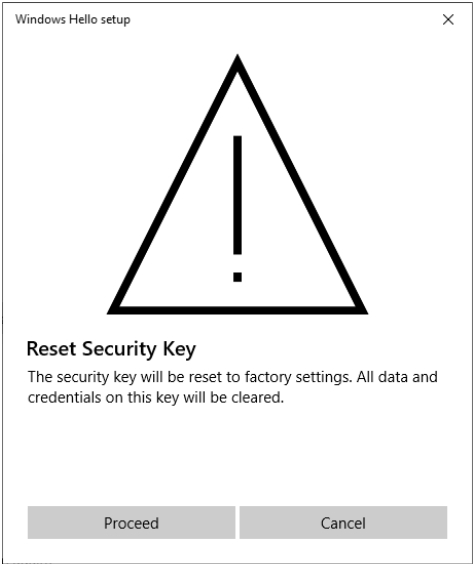
1. Enter the “Windows Hello setup” section and select “Reset Security Key” and then “Proceed” to remove the PIN code and FIDO data. \
   &#x20;&#x20;

   <figure><img src="https://content.gitbook.com/content/RdTysrljwe610dPFG7tE/blobs/MtiCIWrdh6xIQBkrsPmm/12.jpg" alt="" width="375"><figcaption></figcaption></figure>
2. Each time the message “Take action on your Bluetooth security key” appears, confirm it with a short press. This action must be confirmed twice.\
   &#x20; \
   [Video](https://youtu.be/baczWo7j73M)

   <figure><img src="https://content.gitbook.com/content/RdTysrljwe610dPFG7tE/blobs/V0AkvxAfPBUz261sfdjh/13.jpg" alt="" width="375"><figcaption></figcaption></figure>
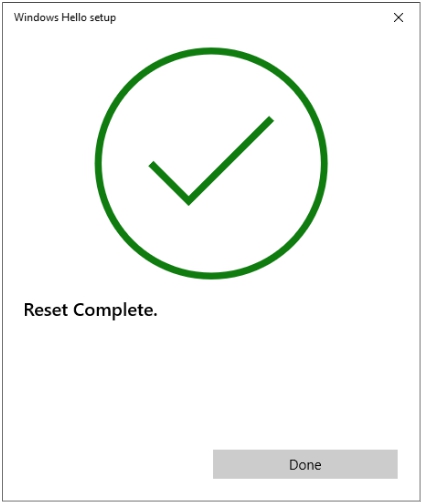
3. The success of the operation is signaled by the message “Reset Complete”. After that, all data associated with FIDO (PIN, accounts, resident key) will be removed.\
   &#x20;&#x20;

   <figure><img src="https://content.gitbook.com/content/RdTysrljwe610dPFG7tE/blobs/EEt6oQ4rWktWKjxFz5An/14.jpg" alt="" width="375"><figcaption></figcaption></figure>

### Set up two-factor authentication using FIDO U2F

To set up two-factor authentication using FIDO U2F in Gmail, Facebook, Twitter and/or a host of other services, no additional software is needed. Please, follow the instructions of U2F-supporting services to use Hideez Key as your second factor. Here are some of them:


# Quick Start Guide for subscriptions

Hideez Authentication Service – Pilot Projects

We are very interested in having you try our product asap; therefore, we have put together simple steps in this guide that you can try to implement and get the result right away.

First, you need to [install Hideez Enterprise Server](/hideez-enterprise-server/deployment).

{% hint style="info" %}
**Then request a file with licenses, just contact us at** [**support@hideez.com**](mailto:support@hideez.com) **and our Customer Care team will provide you with all the needed information.**
{% endhint %}

After HES setting up you have 3 options that you can try either separately or together:

* [Hideez Key —  FIDO2 Hardware Security Key ](/quick-start-guides/quick-start-guide-for-subscriptions/hardware-key-guide)
* [Mobile security key — Hideez Authenticator](/quick-start-guides/quick-start-guide-for-subscriptions/hideez-authenticator-guide)
* [Hardware security keys from other vendors](/use-cases/fido-security-key/other-vendors-hardware-keys) &#x20;
* [Software security keys — Passkeys](/quick-start-guides/quick-start-guide-for-subscriptions/passkeys)

{% hint style="info" %}
If you have any questions on the deployment or configuring HES, please contact our Customer Care team at <support@hideez.com>. We’ll be happy to help!
{% endhint %}


# Hideez Security Key

Hideez Authentication Service – Hardware key pilot guide

## **Hideez Hardware Key Solution Components**

[**Hideez Enterprise Server**](/hideez-enterprise-server/deployment)

* can be deployed on both Windows and Linux server&#x20;
* is deployed from source or run on Docker
* must be deployed on the Customer's side and entered into the domain&#x20;

  &#x20;in order to work with AD

[**Hideez Client**](broken://pages/gZg9qEKxqyY9r90si0iO) **(desktop application)**

* can be installed centrally, .msi&#x20;
* is designed for Windows 10-11 only
* You can register the server address on all Сlients centrally&#x20;

[**Hideez Keys**](/hideez-key-enterprise-edition/hideez-key-enterprise-edition) **(Hardware security tokens)**

* Replaceable (Hideez Key 3) or rechargeable (Hideez Key 4) battery
* Multifunctional button with different color modes
* Bluetooth connection

[**Other vendor's Security Keys**](/use-cases/fido-security-key/other-vendors-hardware-keys)

* USB, NFS, Bluetooth connection&#x20;
* Universal Second Factor Authentication on HES (FIDO/2FA)
* Usernameless login on HES (FIDO/WebAuthn)
* Passwordless login on HES (FIDO/WebAuthn)

If you ordered a pilot project and successfully deployed your Hideez Enterprise Server, your Hideez Keys with active licenses have been added to it.&#x20;

## **Use cases**

### Using the Hideez Key as a Security Key

#### Step 1

Unpack the box with the Hideez Key. Take out the key.

{% hint style="info" %}
At this stage, you don't need either a dongle or additional Hideez Group software.
{% endhint %}

#### Step 2

Try to use the Hideez Key as a U2F security key.\
[Using Hideez Key as a U2F security key for your two-factor authentication](/use-cases/fido-security-key/using-hideez-key-as-u2f-security-key-for-your-two-factor-authentication)

#### Step 3

Try to use the Hideez Key as a FIDO2 security key for Windows 10 logon.\
[Unlock PC by Security Key](/use-cases/fido-security-key/unlock-pc-by-security-key)

### Using the full functionality of Hideez Authentication Service

#### Step 1

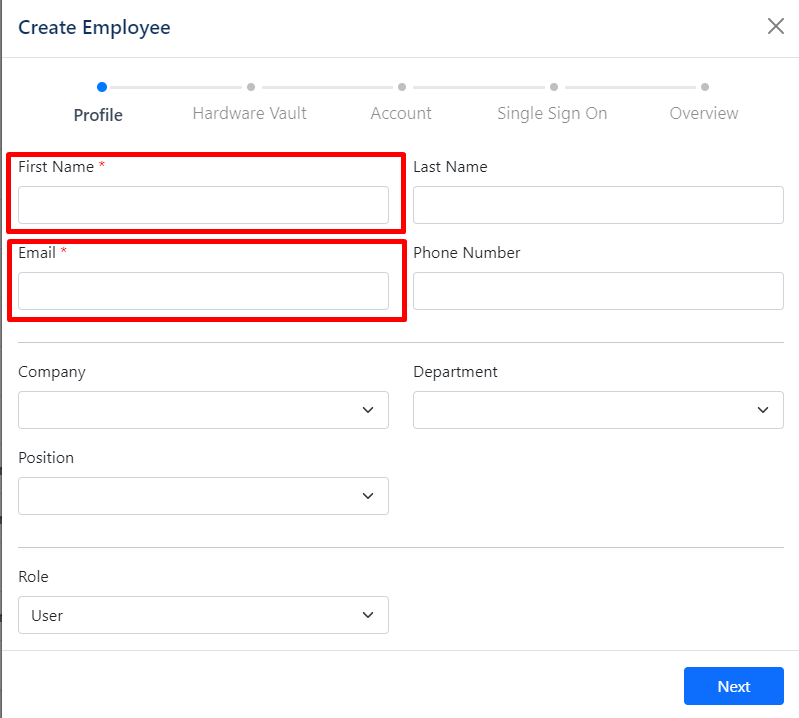
In a Hideez Group email, you received the server address and access. Please go to the server and add one employee. At this stage, it is enough to fill in only his or her name and leave the rest of the data blank.\
[How to add an Employee?](/hideez-enterprise-server/employees/how-to-add-an-employee)

#### Step 2

Add the Hideez Key to your Employee.\
[Assign a key to the user](/hideez-enterprise-server/hardware-vaults/assign-a-key-to-the-user)

#### Step 3

Install the Hideez Client on your workstation.&#x20;

If Hideez staff didn't give you any special version, then use the latest stable version, which can be downloaded [here](/product-updates/hideez-client-updates).&#x20;

Installation instructions are [here](/hideez-client-app/windows-deployment/set-up-hideez-client-app).

{% hint style="warning" %}
Note! You can install the Hideez Client version to work with internal Bluetooth **or** with an external Hideez Dongle.
{% endhint %}

#### Step 4

Enter the HES address in the Hideez Client.\
Approve the workstation on the server.\
[How to add and approve Workstations?](/hideez-enterprise-server/workstations/how-to-add-and-approve-workstations)

#### Step 5 (only for working with the Hideez Dongle)

Unpack the box with the Hideez Key if you haven't done so previously. Take out the key and insert the dongle into the USB port.

#### Step 6

Follow the steps to configure the Hideez Client for the Hardware Vault.<br>

#### Step **7**

Create your first account in the Hideez Client with two-factor authentication (OTP).\
[Using Hideez Key as an OTP security key for your two-factor authentication](/use-cases/hideez-key/using-hideez-key-as-otp-security-key-for-your-two-factor-authentication)

#### Step 8

Add an account to an existing employee to unlock the workstation on the server.\
[How to work with personal employee accounts?](/hideez-enterprise-server/accounts/how-to-work-with-personal-employee-accounts)

#### Step 9 (only for working with the Hideez Dongle)

Unlock your computer with Bluetooth Touch.\
[Unlock PC by Bluetooth Touch (Tap-and-Go)](/use-cases/hideez-key/lock-unlock-pc-by-proximity/unlock-pc-by-bluetooth-touch-tap-and-go)

**Step 10**

Turn on the proximity unlock option for the Workstation added to the server and specify the Hideez Key that can use this option.\
[Use proximity with Workstation](/hideez-enterprise-server/workstations/use-proximity-with-workstation)

#### Step 11

Try to unlock the workstation by proximity.\
[Unlock PC by proximity](/use-cases/hideez-key/lock-unlock-pc-by-proximity)


# Hideez Authenticator App

Hideez Authentication Service – Mobile key pilot guide

## **Hideez Authenticator App Solution Components**

[**Hideez Enterprise Server**](/hideez-enterprise-server/deployment)

* can be deployed on both Windows and Linux server&#x20;
* is deployed from source or run on Docker
* must be deployed on the Customer's side and entered into the domain&#x20;

  &#x20;in order to work with AD

[**Hideez Client**](broken://pages/gZg9qEKxqyY9r90si0iO) **(desktop application)**

* can be installed centrally, .msi&#x20;
* is designed for Windows 10-11 only
* You can register the server address on all Сlients centrally&#x20;

[**Hideez Authenticator**](/hideez-client-app/mobile-authenticator) **(mobile app)**

* Compatible with Android and iOS devices
* Mobile sign-ins to any Windows account type (via RDP as well; passwordless TPM-based, password-based)
* Single sign-in option
* OTP generation

If you ordered a pilot project and successfully deployed your Hideez Enterprise Server, licenses will be issued for the required number of employees.

## Use scenarios

You can use Hideez Authenticator as only SSO method or you may try full functionality (which includes PC passwordless or password-based login).

There are 2 possible use scenarios:

* [**Windows login**](#using-the-full-functionality-of-hideez-authentication-service) (passwordless or password-based PC login)
* [**SSO use only**](#using-hideez-authenticator-for-sso-login)

### Using Hideez Authenticator for SSO login

#### Step 1

In a Hideez Group email, you received the server address and access. Please go to the server and add one employee. At this stage, it is enough to fill in only his or her name and leave the rest of the data blank.\
[How to add an Employee?](/hideez-enterprise-server/employees/how-to-add-an-employee)

#### Step 2

[Enable SSO for the employee](/hideez-enterprise-server/single-sign-on-settings/nastroika-polzovatelei). Administrators can log into the HES service and use the SSO service by default, but employees with user accounts cannot, so they first must have an explicit permission of the administrator.

#### Step 3

Install and set the Hideez Authenticator for your OS:

* Download the application - [App Store](https://apps.apple.com/us/app/hideez-mobile-authenticator/id1510948639), [Play Market](https://play.google.com/store/apps/details?id=com.hideez.hideezmobilekey\&hl=en\&gl=US).
* Primary setup guides - [iOS](https://authenticator.hideez.com/user-guide/ios-guide/mobile-app-primary-setup), [Android](https://authenticator.hideez.com/user-guide/android-guide/mobile-app-primary-setup).

#### Step 4

Enroll the Hideez Authenticator application on HES - [iOS](https://authenticator.hideez.com/user-guide/ios-guide/software-key-enrollment/sso-enrollment) and [Android](https://authenticator.hideez.com/user-guide/android-guide/software-key-enrollment/sso-enrollment) guides.

#### Step 5

Then you can login on HES using the Hideez Authenticator - [iOS](https://authenticator.hideez.com/user-guide/ios-guide/login-with-hideez-authenticator/sso-login) and [Android](https://authenticator.hideez.com/user-guide/android-guide/login-with-hideez-authenticator/sso-login) guides.

Also now you can use Hideez Authenticator for OTP generation - [iOS](https://authenticator.hideez.com/user-guide/ios-guide/otp-generation) and [Android](https://authenticator.hideez.com/user-guide/android-guide/otp-generation) guides.

### Using the full functionality of Hideez Authentication Service (Windows login scenario)

#### Step 1

Setup Hideez Authenticator for SSO login as described [above](#using-hideez-authenticator-for-sso-login) (steps 1-4).

#### Step 2

Now you have two options to use Hideez Authenticator for PC unlock:

* For AD on premises accounts is available passwordless authentication based on TPM technology (the most secure and highly recommended). For this option user does not have to know the account password.
* For all account types (local, Microsoft, AD on premises and Azure AD) is available password-based authentication. For this option user has to know the account login, password and domain (for AD accounts).

To enable passwordless authentication, please, follow next steps:

1. [Configure an Active Directory Certification Authority](https://authenticator.hideez.com/primary-setup-admin-guide/configuring-an-active-directory-certification-authority).
2. [Setup the HES for passwordless login](https://authenticator.hideez.com/primary-setup-admin-guide/hes-setup-for-passwordless-login).

#### Step 3

Install the Hideez Client on your workstation.&#x20;

If Hideez staff didn't give you any special version, then use the latest stable version, which can be downloaded [here](/product-updates/hideez-client-updates).&#x20;

Installation instructions are [here](/hideez-client-app/windows-deployment/set-up-hideez-client-app).

{% hint style="warning" %}
Note! You can install the Hideez Client version to work with internal Bluetooth **or** with an external Hideez Dongle. If you will not use Hideez Keys, it does not matter which option to choose.
{% endhint %}

#### Step 4

Enter the HES address in the Hideez Client.\
Approve the workstation on the server.\
[How to add and approve Workstations?](/hideez-enterprise-server/workstations/how-to-add-and-approve-workstations)

#### Step 5

To enroll the Hideez Authenticator for passwordless authentication follow this guides - [iOS](https://authenticator.hideez.com/user-guide/ios-guide/software-key-enrollment/pc-authorization-enrollment/enrollment-for-passwordless-pc-authorization), [Android](https://authenticator.hideez.com/user-guide/android-guide/software-key-enrollment/pc-authorization-enrollment/enrollment-for-passwordless-pc-authorization).

{% hint style="info" %}
Before setting up the application, please, ensure that:

* You are signed into the Windows domain account.
* Workstation has TPM 2.0 module.
  {% endhint %}

To enroll the Hideez Authenticator for password-based authentication (enable for local, Microsoft, AD on premises and Azure AD account types) follow this guides - [iOS](https://authenticator.hideez.com/user-guide/ios-guide/software-key-enrollment/pc-authorization-enrollment/enrollment-for-password-based-pc-authorization), [Android](https://authenticator.hideez.com/user-guide/android-guide/software-key-enrollment/pc-authorization-enrollment/enrollment-for-password-based-pc-authorization).

{% hint style="info" %}
For password-based accounts roaming feature is available. It means that you can enroll the Hideez Authenticator on one PC and then use this account on any other computer that has the same account.\
\
Read more - [iOS](https://authenticator.hideez.com/user-guide/ios-guide/software-key-enrollment/pc-authorization-enrollment/enrollment-for-password-based-pc-authorization/account-roaming), [Android](https://authenticator.hideez.com/user-guide/android-guide/software-key-enrollment/pc-authorization-enrollment/enrollment-for-password-based-pc-authorization/account-roaming).
{% endhint %}

#### Step 6

Then you can login to your PC using the Hideez Authenticator - [iOS](https://authenticator.hideez.com/user-guide/ios-guide/login-with-hideez-authenticator/pc-login) and [Android](https://authenticator.hideez.com/user-guide/android-guide/login-with-hideez-authenticator/pc-login) guides.

For passwordless unlock account also is available offline login via text code. You have to perform online login once and then 50 offline codes will be generated for you.\
Read more about this option - [iOS](https://authenticator.hideez.com/user-guide/ios-guide/login-with-hideez-authenticator/pc-login/passwordless-pc-login/offline-passwordless-login), [Android](https://authenticator.hideez.com/user-guide/android-guide/login-with-hideez-authenticator/pc-login/passwordless-pc-login/offline-passwordless-login).

#### Step 7

Also there is available PC lock option, read more about it via the links - [iOS](https://authenticator.hideez.com/user-guide/ios-guide/pc-lock), [Android](https://authenticator.hideez.com/user-guide/android-guide/pc-lock).

Read more about Hideez Authenticator features in [official guide](https://authenticator.hideez.com/).


# Passkeys

Passwordless SSO with Passkeys

### 1. Sign in to your Hideez server using your email and password

<figure><img src="https://content.gitbook.com/content/RdTysrljwe610dPFG7tE/blobs/nApSSy9RIRY6ewfFWmRk/unnamed%20(1)%20(1).jpg" alt="" width="375"><figcaption></figcaption></figure>

{% hint style="info" %}
**Note**: If you see the message “Your web application is running and waiting for your content,” the server is not ready yet. The process may take from 5 to 10 minutes. Once the server is ready, you will receive an email confirmation.
{% endhint %}

### **2. Create Passkeys:**

{% hint style="info" %}
**Passkeys** are a new way of signing in to your online accounts with a **biometric sensor** or PIN, eliminating the need for **passwords.**
{% endhint %}

* To create a passkey, go to the **Profile** page, then the  **FIDO2 Authenticators** section, and click **Add FIDO2 Authenticator**.

<div><figure><img src="https://content.gitbook.com/content/RdTysrljwe610dPFG7tE/blobs/hfccsaLoI7ESORI5IjhL/Screenshot_6%20(1).jpg" alt=""><figcaption></figcaption></figure> <figure><img src="https://content.gitbook.com/content/RdTysrljwe610dPFG7tE/blobs/Vuza45MuLwOo5tRtk7DJ/Screenshot_1%20(1).jpg" alt=""><figcaption></figcaption></figure></div>

* Following the on-screen steps, add a FIDO2 Authenticator, choosing between a **Cross-Platform key** (another device, like a phone or tablet) or a **Platform key** (current device).

&#x20;Adding a [**Cross-Platform key:**](/use-cases/passkey/sso-login-to-web-services-fido2-via-passkey-and-hideez-server-as-identity-provider)

<div><figure><img src="https://content.gitbook.com/content/RdTysrljwe610dPFG7tE/blobs/BFc1qv3kXAHqZAmFFhxE/Screenshot_14.jpg" alt="" width="466"><figcaption></figcaption></figure> <figure><img src="https://content.gitbook.com/content/RdTysrljwe610dPFG7tE/blobs/zzAdOb9Ct0QXhuSBSHuj/Screenshot_26.jpg" alt="" width="425"><figcaption></figcaption></figure> <figure><img src="https://content.gitbook.com/content/RdTysrljwe610dPFG7tE/blobs/wEXwE23FPql91iPPxpQY/Screenshot_27.jpg" alt="" width="422"><figcaption></figcaption></figure></div>

Adding a [**Platform key**](/hideez-enterprise-server/administration/platform-authentication-on-the-hes-server)

<div><figure><img src="https://content.gitbook.com/content/RdTysrljwe610dPFG7tE/blobs/ouMIczCty0i6qgfmbrMK/Screenshot_15.jpg" alt="" width="467"><figcaption></figcaption></figure> <figure><img src="https://content.gitbook.com/content/RdTysrljwe610dPFG7tE/blobs/IF4WKxSK1i5dNg6KzA7L/Screenshot_16.jpg" alt=""><figcaption></figcaption></figure> <figure><img src="https://content.gitbook.com/content/RdTysrljwe610dPFG7tE/blobs/P4sVwmY9OAh4fyeVoo8z/Screenshot_18.jpg" alt=""><figcaption></figcaption></figure></div>

{% hint style="info" %}
Note: Multiple devices can be added simultaneously.

&#x20;A **biometric sensor** or **Trusted Platform Module** **(TPM)** module must be present.
{% endhint %}

### 3. Configure Passwordless SS&#x4F;**:**

Hideez Server allows you to enable passwordless Single Sign-On (SSO) based on the SAML and OpenID Connect (OIDC) protocols. These protocols are employed to verify a user’s identity when an employee tries to access web or mobile applications.&#x20;

To configure the Hideez Server as an Identity Provider for passwordless SSO, go to Settings → Parameters, and proceed with [**SAML**](/hideez-enterprise-server/configuring-saml-protocol) or [**OIDC**](/hideez-enterprise-server/configuration-oidc-openid-connect) configuration as described in our user guide.

### **4. Add a New user:**

New users can be added through:

* [**Active Directory (On-Premises, Azure Ad)** ](/hideez-server-integration/microsoft-entra-id/import)
* [**Manually**](/hideez-enterprise-server/employees/how-to-add-an-employee)

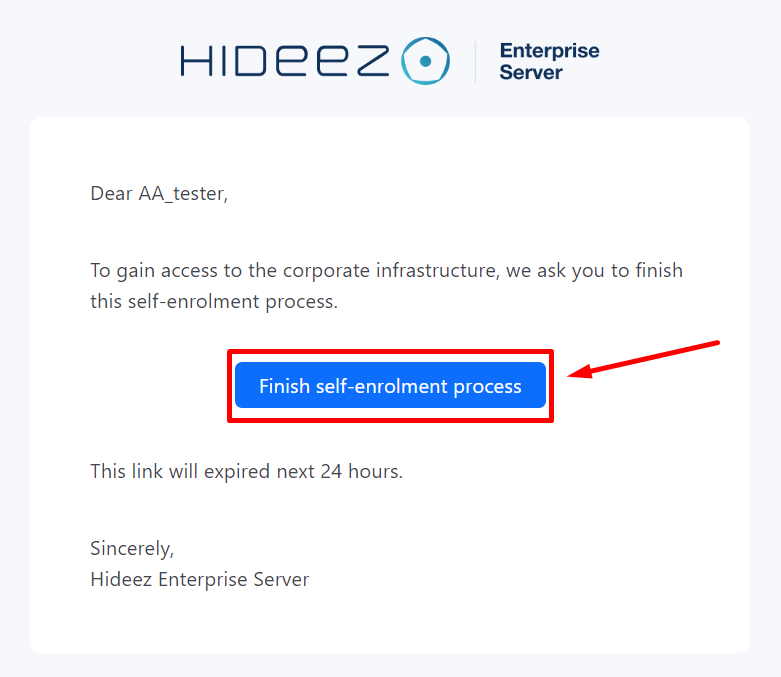
Upon receiving an email, users can configure their preferred login methods, such as a [**mobile application**](https://authenticator.hideez.com/user-guide/android-guide/login-with-hideez-authenticator/sso-login/sso-passwordless-login) or passkeys.

<div><figure><img src="https://content.gitbook.com/content/RdTysrljwe610dPFG7tE/blobs/pzpkFZF5EztYASON7Upd/Screenshot_11.jpg" alt="" width="375"><figcaption></figcaption></figure> <figure><img src="https://content.gitbook.com/content/RdTysrljwe610dPFG7tE/blobs/wagTSJiD0sXCrhsmiST7/image.png" alt="" width="266"><figcaption></figcaption></figure> <figure><img src="https://content.gitbook.com/content/RdTysrljwe610dPFG7tE/blobs/eF8QjiwNYl1ocaZmEVMo/Screenshot_10.jpg" alt="" width="358"><figcaption></figcaption></figure></div>

Additionally, the Hideez Server assumes that passwordless authentication can be employed alongside other methods

* [**Mobile Application**](/quick-start-guides/quick-start-guide-for-subscriptions/hideez-authenticator-guide) allows Passwordless SSO and PC login with Mobile App
* [**Hardware keys**](/quick-start-guides/quick-start-guide-for-subscriptions/hardware-key-guide) allow Passwordless SSO, PC logon & logoff, password-based authentication


# Guide for Hideez Enterprise Server on Cloud

### Step 0.  Sign in to your Admin account using your email and password.

Make sure to use the credentials of your **Administrator** account:

<div align="center"><figure><img src="https://content.gitbook.com/content/RdTysrljwe610dPFG7tE/blobs/d6KtcmViBtYot7MYi9l2/unnamed%20(1).jpg" alt="" width="375"><figcaption></figcaption></figure></div>

### Step 1. Enable multi-factor authentication for your Administrator account

We advocate for the adoption of additional security measures and are actively transitioning away from the reliance on login credentials for authentication. To enhance the security of your Administrator account, consider implementing the following authentication methods:

Go to **Profile** and set up an additional authentication method for the Admin's account:

<div><figure><img src="https://content.gitbook.com/content/RdTysrljwe610dPFG7tE/blobs/qYNKOK8RYn8qAWz1B7Mw/Screenshot_4.jpg" alt="" width="375"><figcaption></figcaption></figure> <figure><img src="https://content.gitbook.com/content/RdTysrljwe610dPFG7tE/blobs/zVqiynWPeTo2oBlNUrOP/Screenshot_5.jpg" alt="" width="375"><figcaption></figcaption></figure></div>

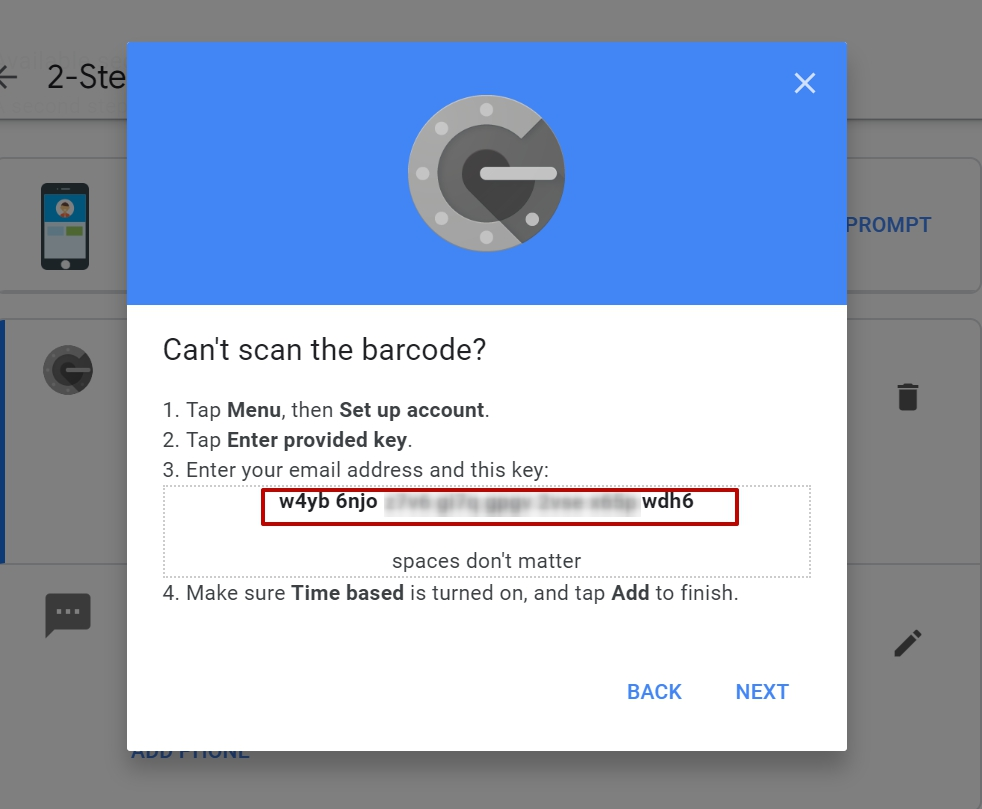
* [**OTP Authenticator (Login+Password+One Time Password)** ](https://enterprise.hideez.com/hideez-enterprise-server/administration/how-to-enable-two-factor-authentication-at-hideez-enterprise-server#enabling-for-admin-account)
* [**FIDO2 Authenticators (platform/cross-platform authentication by physical security keys, Passkey)**](/hideez-enterprise-server/administration/authorization-on-the-hes-server-via-a-fido-key)
* [**Hideez Authenticator (Android/IOS mobile app)**](/use-cases/hideez-authenticator-mobile-app)&#x20;

### Step 2. User Enrollment

#### [**1. Manual Enrollment**](/hideez-enterprise-server/employees/how-to-add-an-employee)

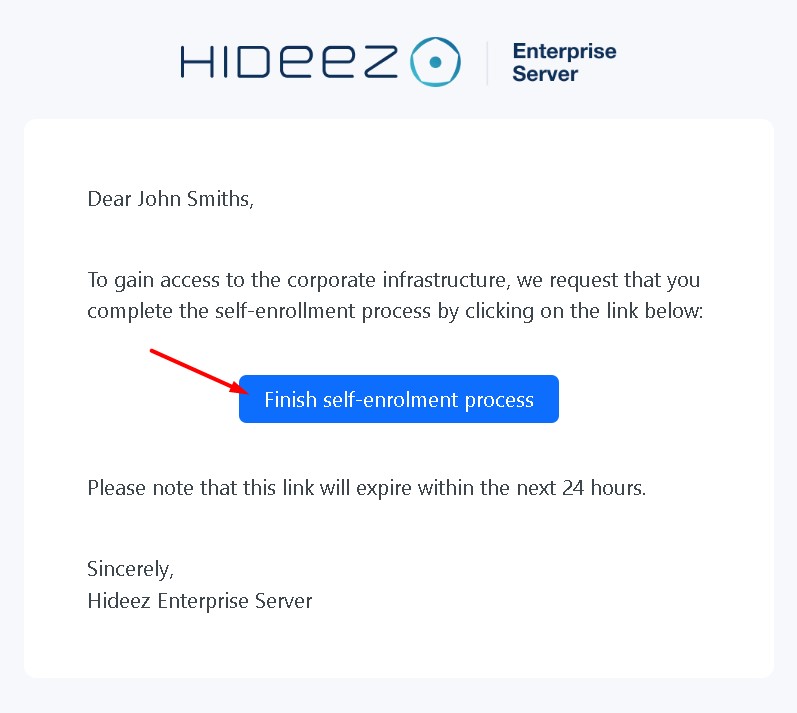
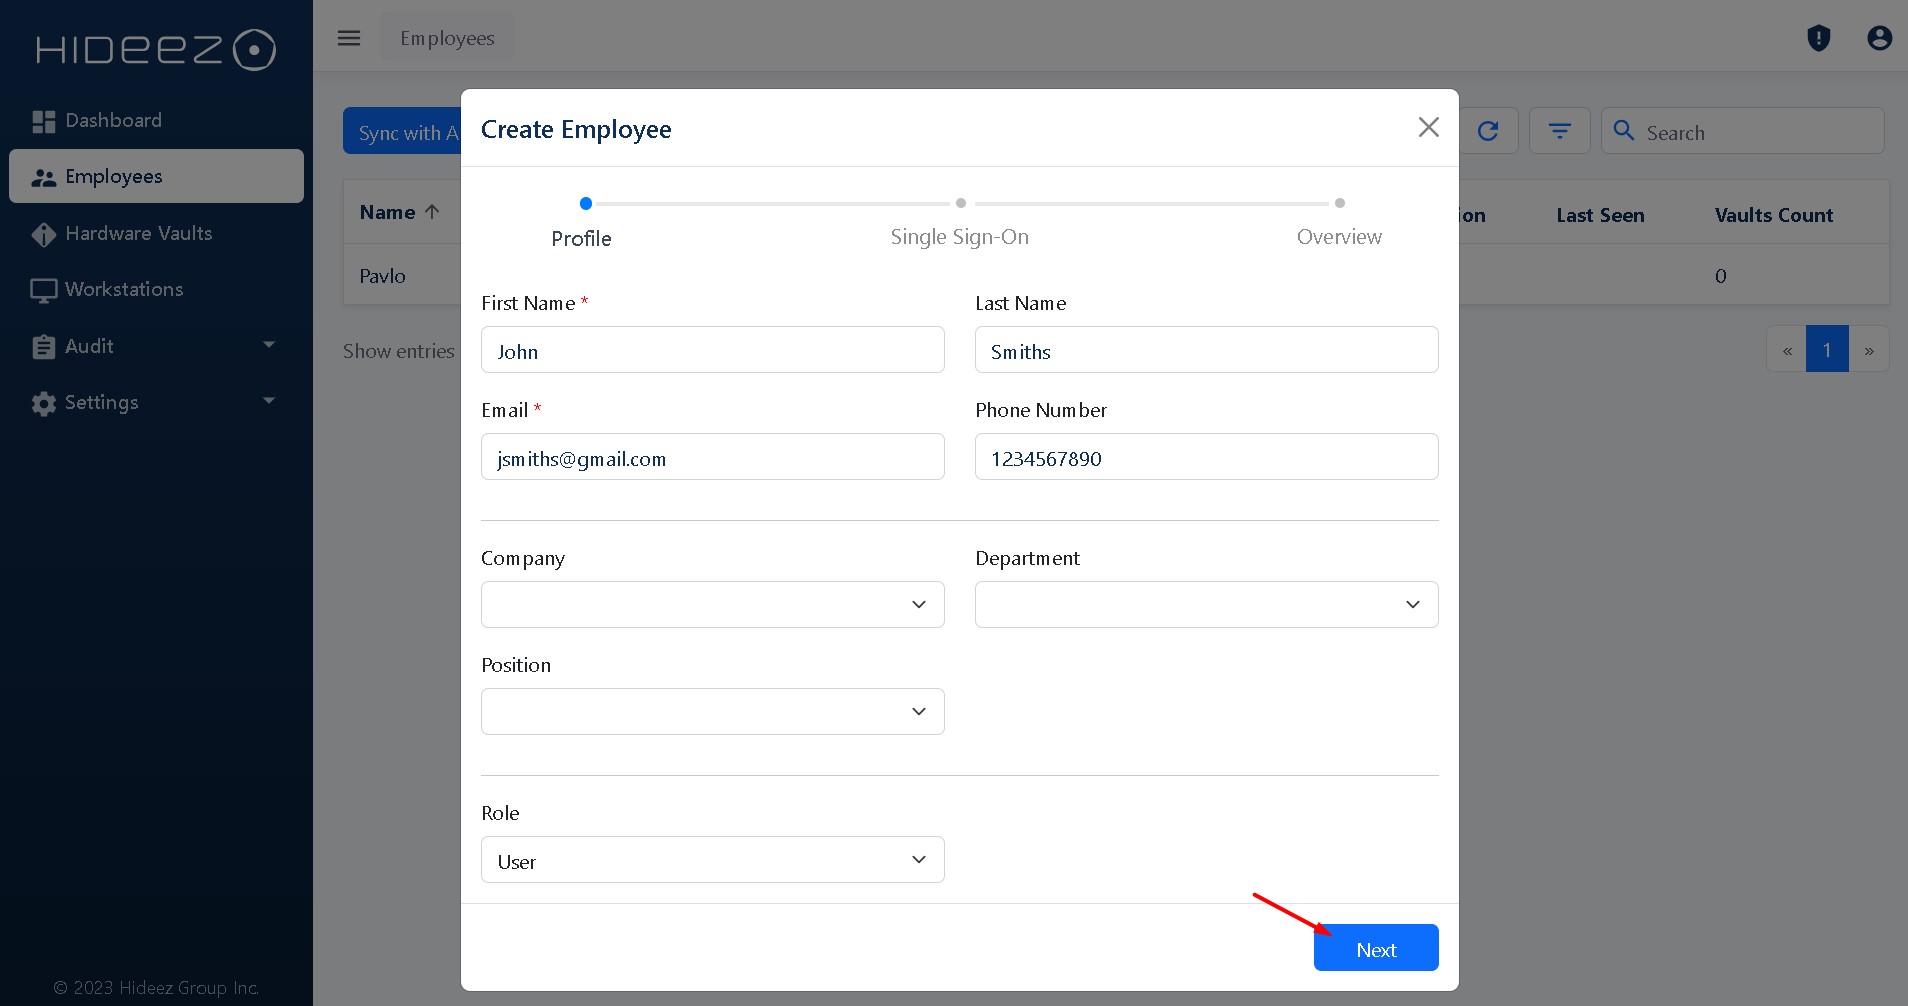
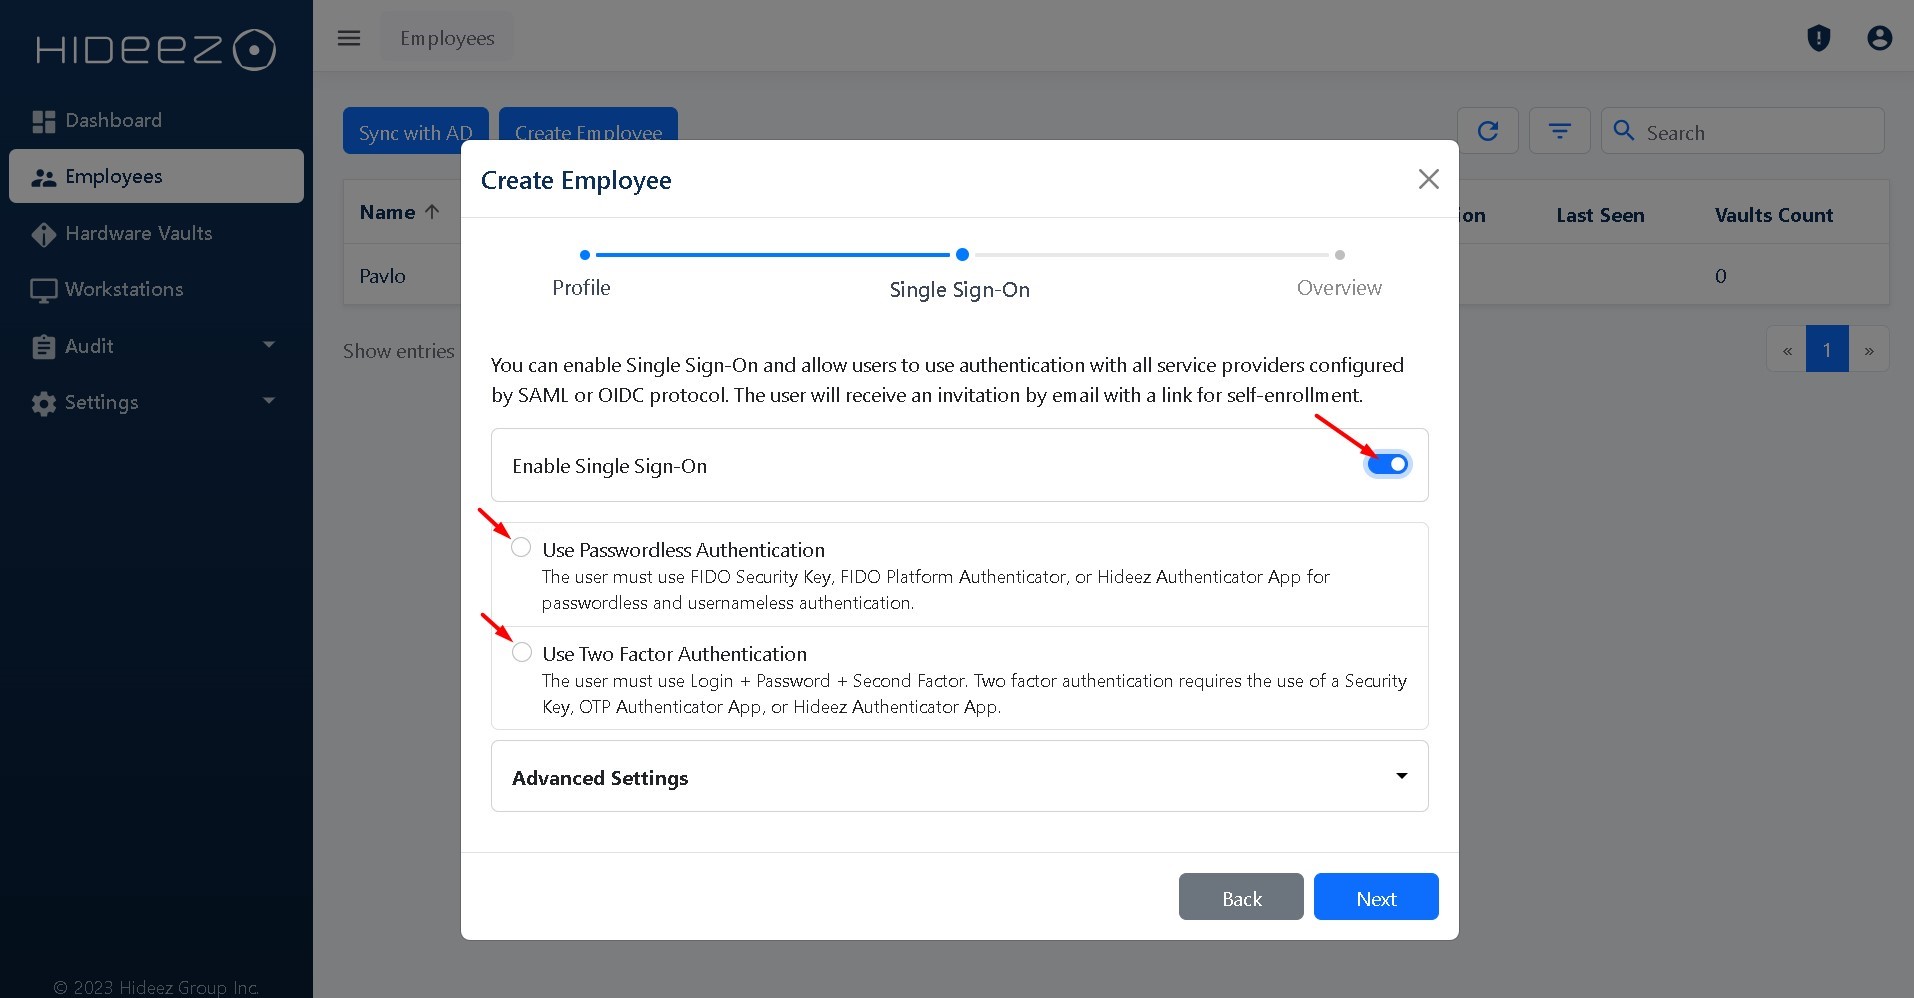
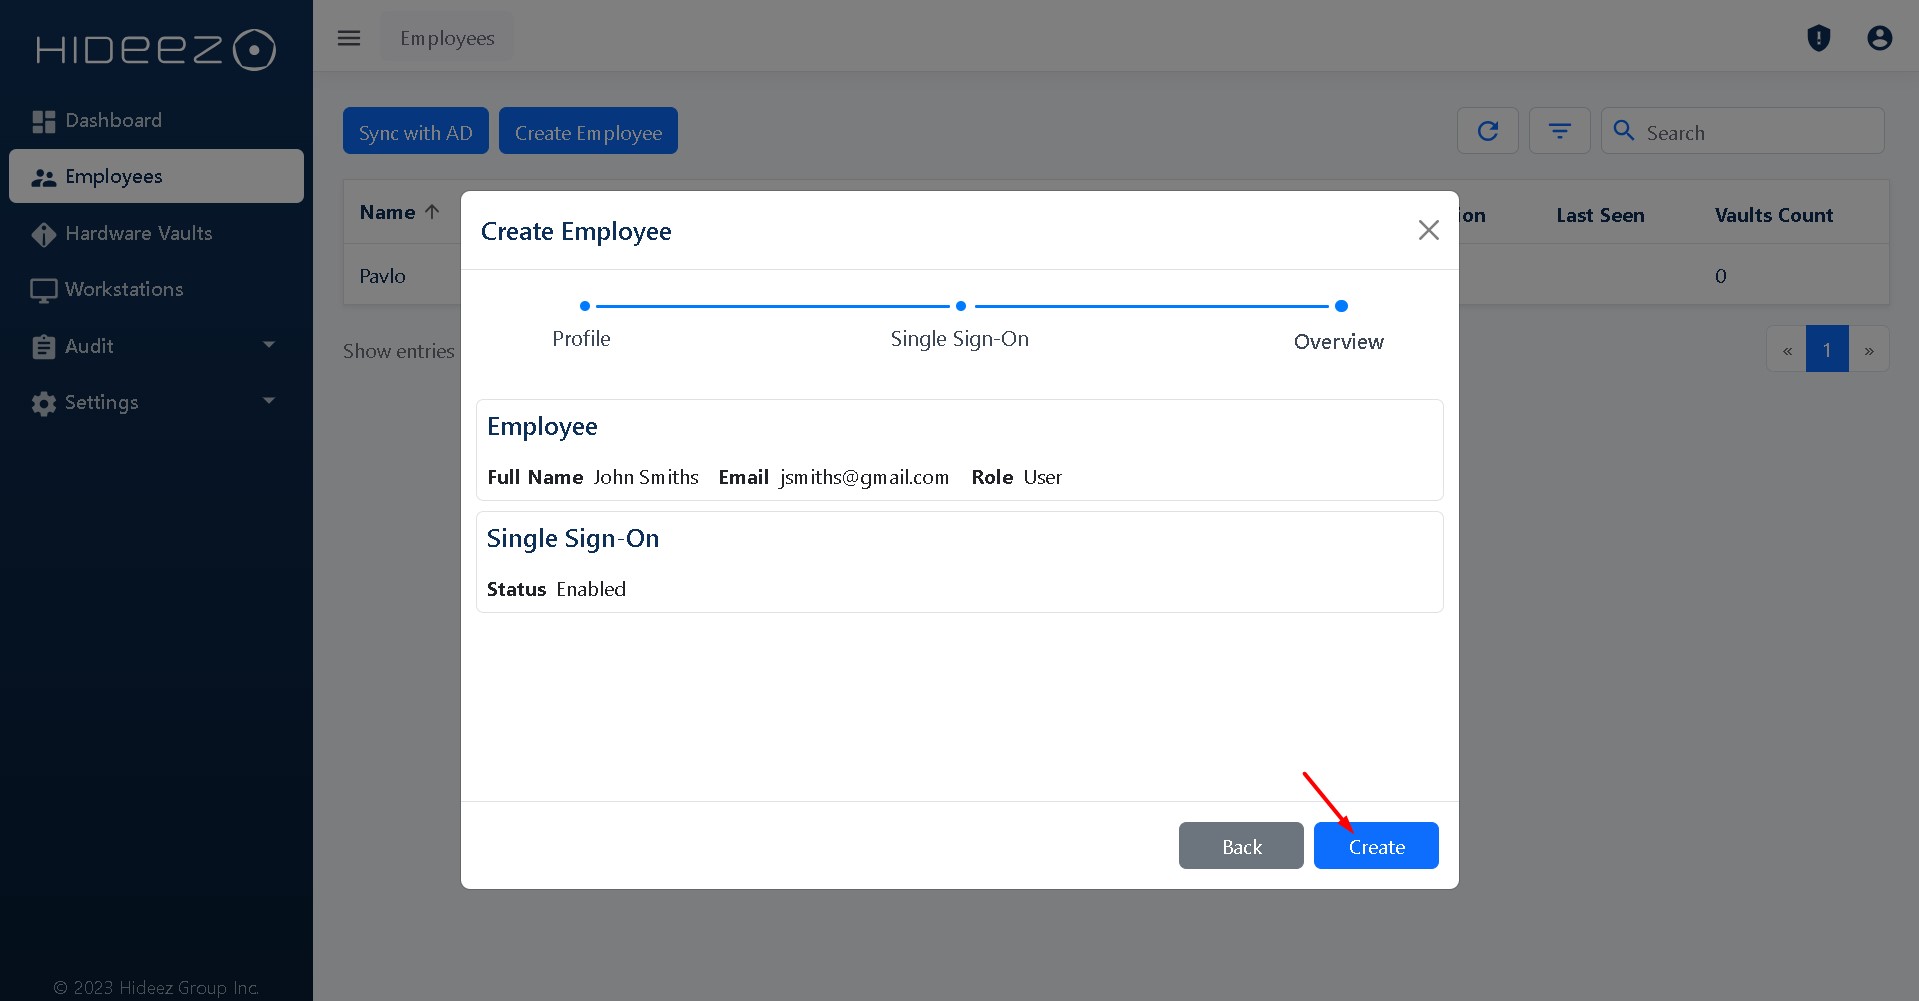
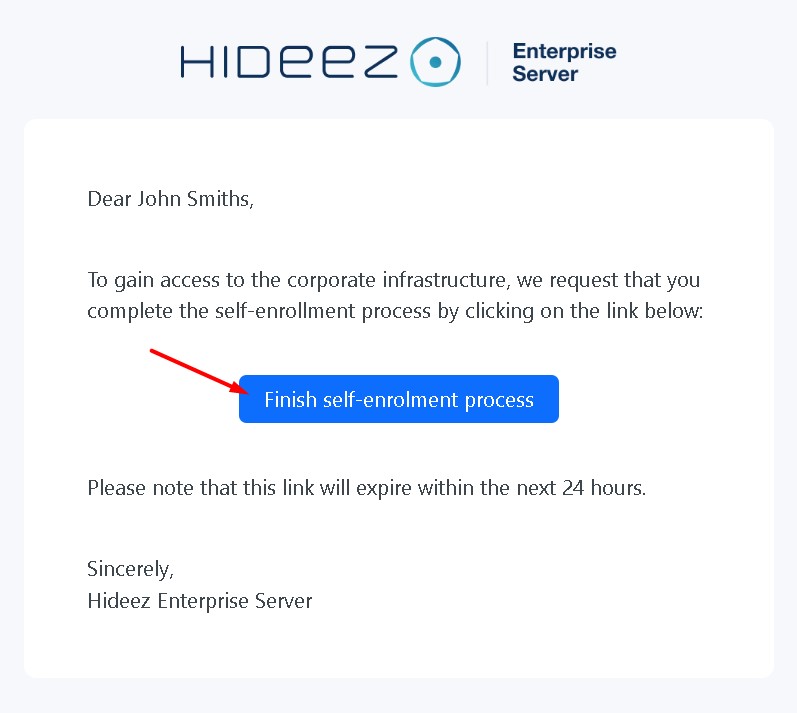
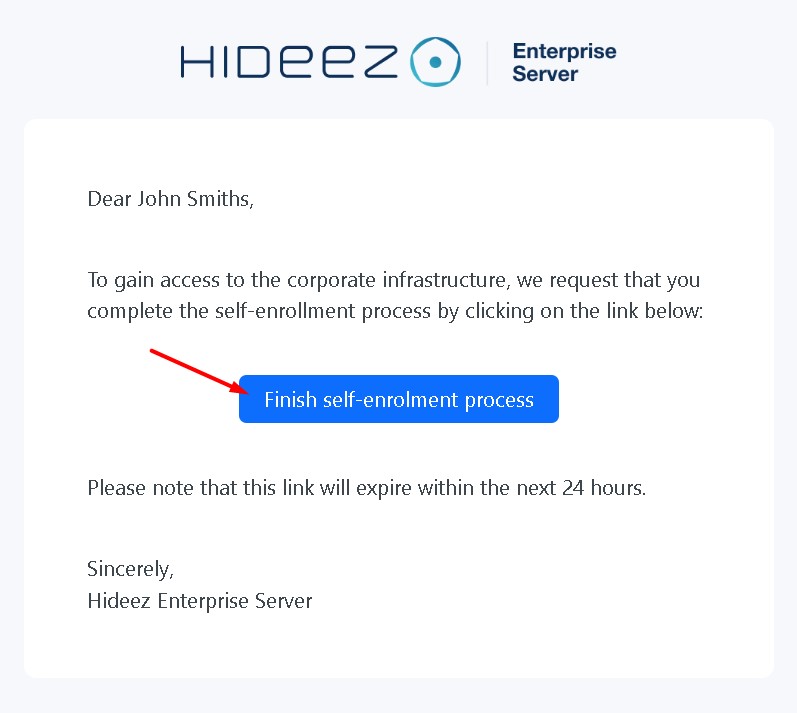
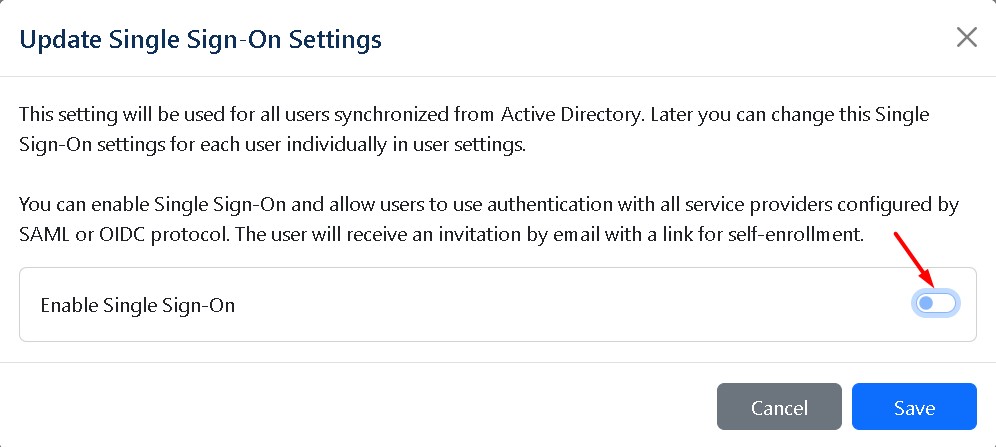
Send email invitations to employees, allowing them to self-enroll. You will need to **enable Single Sign-On (SSO)** for each employee and decide whether you want them to sign in without having to enter usernames and passwords at all, or simply add passwordless MFA to the traditional password-based authentication.

{% hint style="info" %}
**Please ensure that you use a valid email address for new employees. They must accept the invitation within 24 hours, as the link will expire otherwise.**
{% endhint %}

<div><figure><img src="https://content.gitbook.com/content/RdTysrljwe610dPFG7tE/blobs/N9LBn3aiKF4KwHUPHXAi/Screenshot_6.jpg" alt=""><figcaption></figcaption></figure> <figure><img src="https://content.gitbook.com/content/RdTysrljwe610dPFG7tE/blobs/ye0mFcHlKxGBMX7h1eG3/Screenshot_7.jpg" alt=""><figcaption></figcaption></figure> <figure><img src="https://content.gitbook.com/content/RdTysrljwe610dPFG7tE/blobs/BBNuM7QX3DhlUTbYLYE7/Screenshot_8.jpg" alt=""><figcaption></figcaption></figure> <figure><img src="https://content.gitbook.com/content/RdTysrljwe610dPFG7tE/blobs/twlq660Zsi2mIr1Zx9vZ/Screenshot_9.jpg" alt=""><figcaption></figcaption></figure></div>

{% hint style="success" %}
At this stage, the Administrator should choose one of the two SSO options :

1. **Passwordless Authentication:** This method eliminates the need for a traditional username and password. Employees will utilize one of the following options for authentication:

   * FIDO Security Key (e.g. Hideez Key, YubiKey)
   * Passkey or platform authenticator (e.g. native biometric authentication on Android devices, Touch ID / Face ID on iOS devices, Windows Hello)
   * Hideez Authenticator App

2. **Two-Factor Authentication:** In this case, the user will have to enter their username and password as usual, and then use one of the passwordless methods to complete the two-factor verification:
   * FIDO Security Key
   * Hideez Authenticator App
   * OTP Authenticator App (e.g. Microsoft Authenticator)
     {% endhint %}

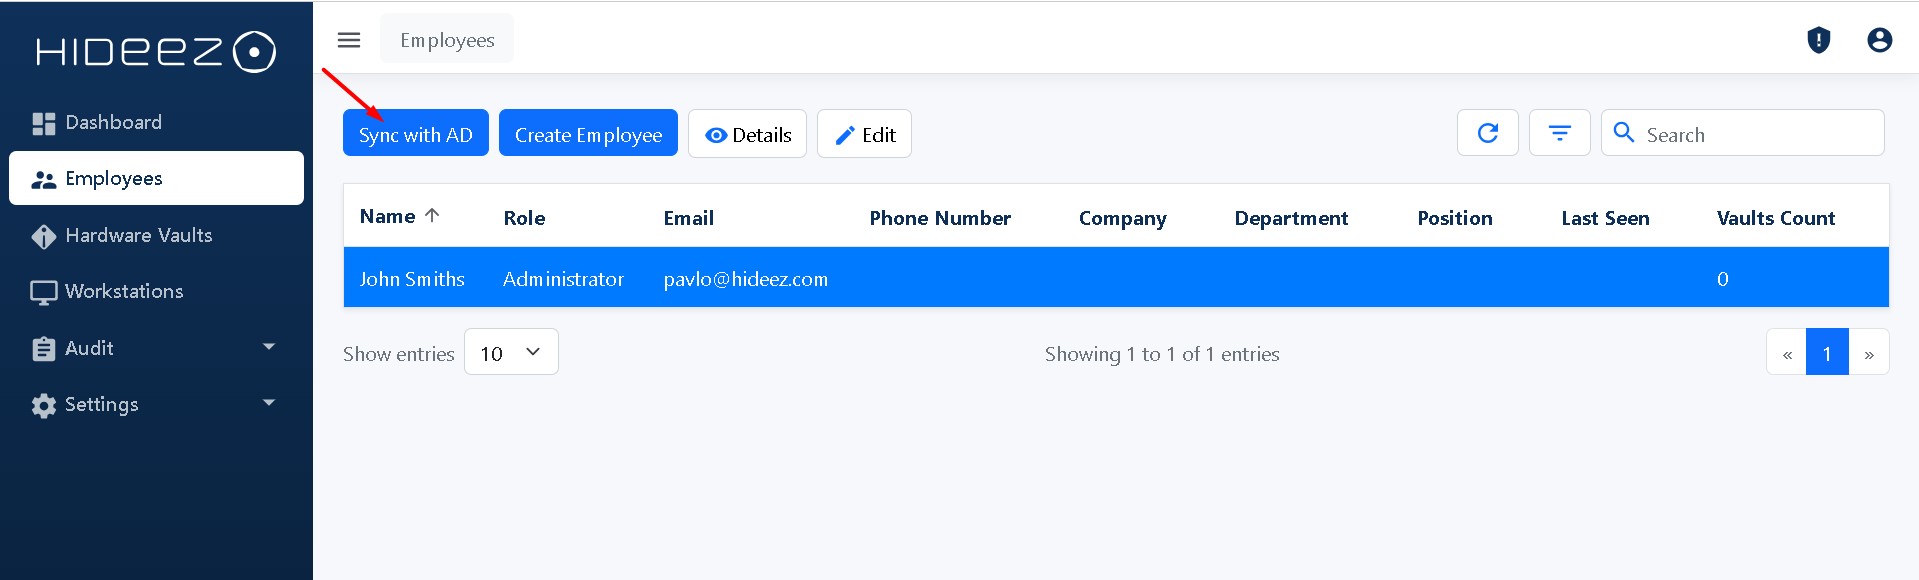
#### [**2. Importing employees from Active Directory**](/hideez-server-integration/microsoft-entra-id/import)

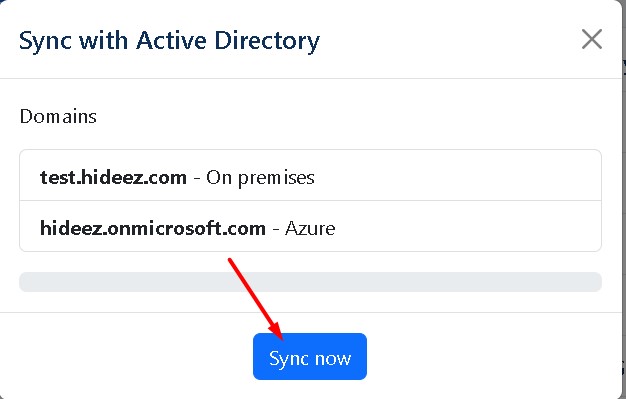
You can import up to users from your Active Directory, saving time and effort. Additionally, you can choose to change the domain password.

<div><figure><img src="https://content.gitbook.com/content/RdTysrljwe610dPFG7tE/blobs/LHSYRaVVdtBaVTLglfhk/Screenshot_16.jpg" alt=""><figcaption></figcaption></figure> <figure><img src="https://content.gitbook.com/content/RdTysrljwe610dPFG7tE/blobs/b4kPEdfQssJKH0GyOEiR/Screenshot_17.jpg" alt=""><figcaption></figcaption></figure></div>

{% hint style="warning" %}
Ensure that you provide the correct data while syncing your Active Directory.
{% endhint %}

### Step 3. Configuring SAML and OIDC

Hideez Server allows you to enable passwordless Single Sign-On (SSO) based on the SAML and OpenID Connect (OIDC) protocols. These protocols are utilized to verify a user’s identity when an employee tries to access web or mobile applications.  

To configure Hideez Server as an Identity Provider for passwordless SSO, go to **Settings → Parameters → SAML / OIDC**, and proceed with SAML or OIDC configuration:

* [**Configuring your server as an Identity Provider**](/hideez-enterprise-server/configuring-saml-protocol)

<figure><img src="https://content.gitbook.com/content/RdTysrljwe610dPFG7tE/blobs/brdHrzCDq5Og5VTIoL8W/Screenshot_20.jpg" alt="" width="375"><figcaption></figcaption></figure>

* [**Configuring OpenID Connect**](/hideez-enterprise-server/configuration-oidc-openid-connect)

<figure><img src="https://content.gitbook.com/content/RdTysrljwe610dPFG7tE/blobs/8CoDyPHOmacrFRDbOEFn/Screenshot_21.jpg" alt="" width="375"><figcaption></figcaption></figure>

### Step 4: Enable Passwordless Single Sign-On on the server using Passkeys or the Hideez Authenticator App.

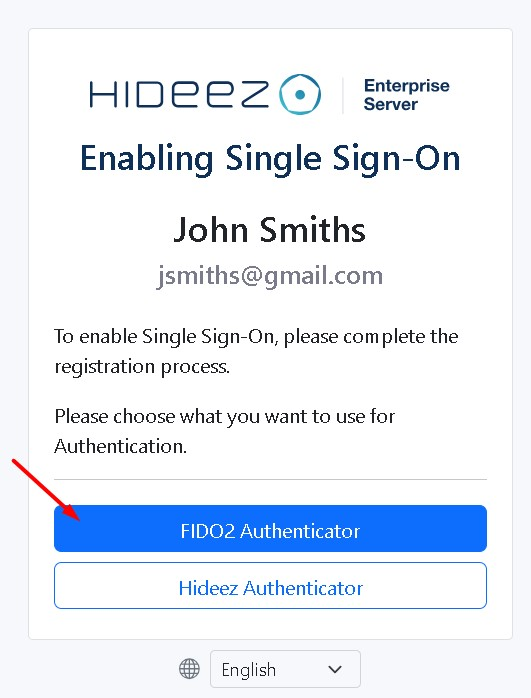
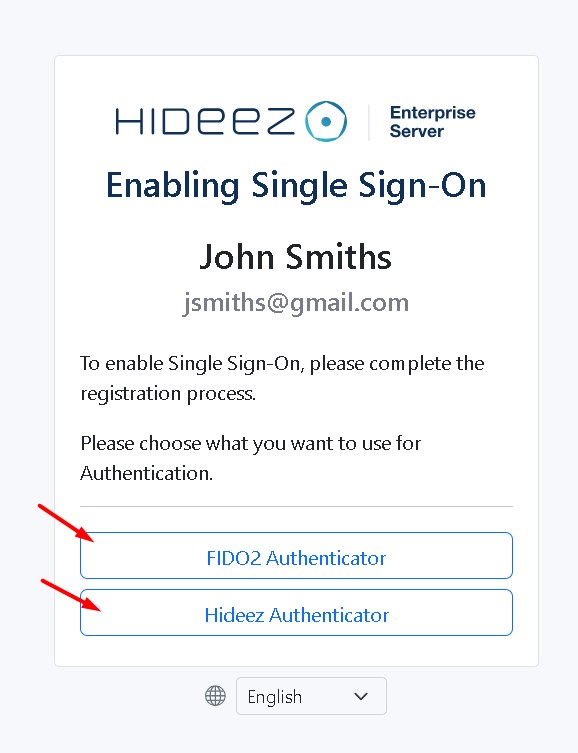
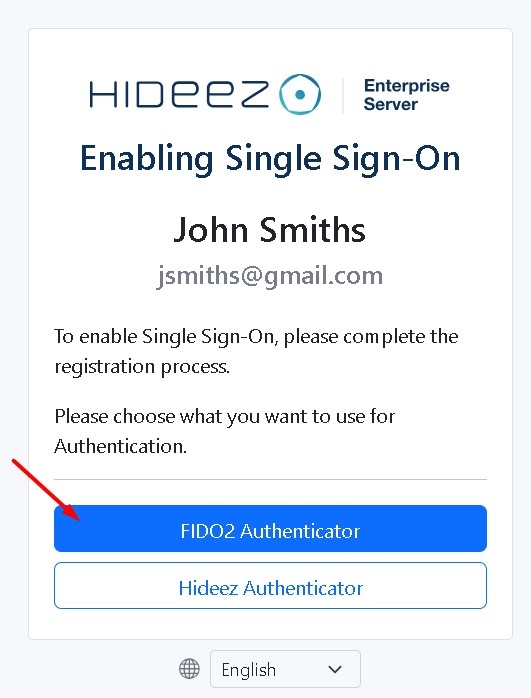
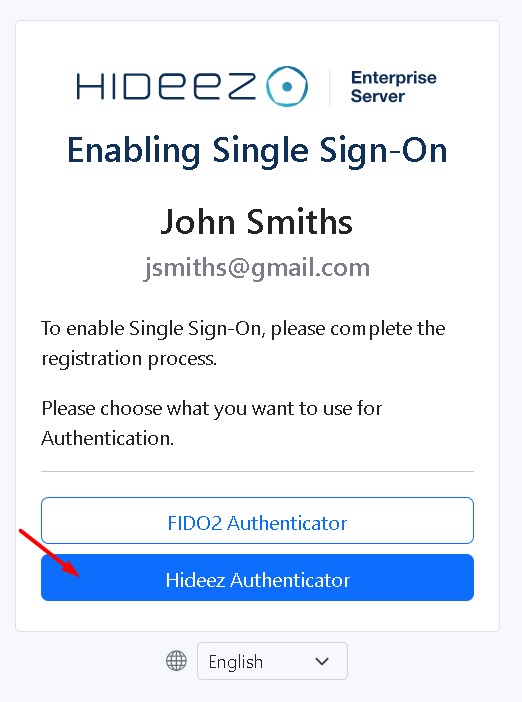
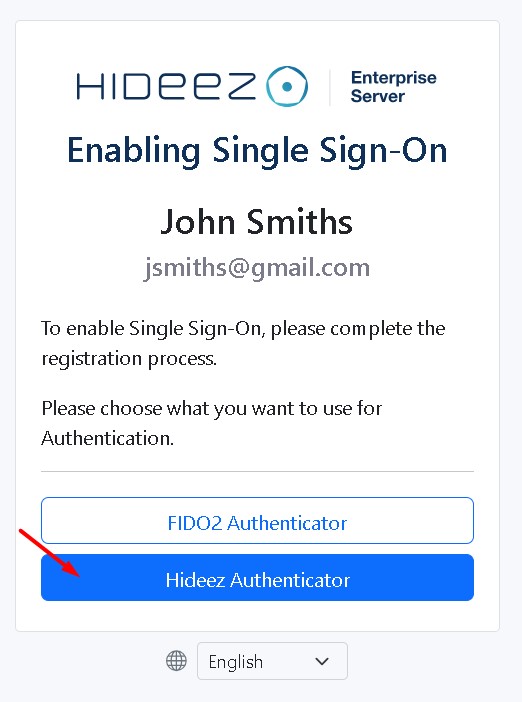
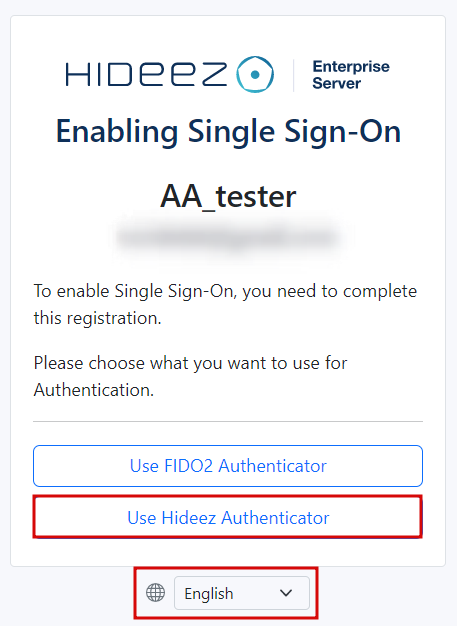
After employees have received the invitation letter, they are prompted to finish self-enrollment by choosing one of the available passwordless authentication methods:&#x20;

<div><figure><img src="https://content.gitbook.com/content/RdTysrljwe610dPFG7tE/blobs/UUtO0NCZi9jzDM7dAufa/Screenshot_11.jpg" alt="" width="188"><figcaption></figcaption></figure> <figure><img src="https://content.gitbook.com/content/RdTysrljwe610dPFG7tE/blobs/zezYjNxPeUOJSxWUWfY9/Screenshot_13.jpg" alt="" width="145"><figcaption></figcaption></figure></div>

#### [Method 1. ](/hideez-enterprise-server/administration/authorization-on-the-hes-server-via-a-fido-key)[FIDO2 Authenticator: Cross-platform or platform authenticators (Passkeys).](/hideez-enterprise-server/administration/authorization-on-the-hes-server-via-a-fido-key)&#x20;

They may include:

* Biometric authentication using Android devices;
* Touch ID / Face ID using iOS devices;
* Windows Hello;
* External security keys (like [**Hideez Key**](https://hideez.com/products/hideez-key-4) or YubiKey).

{% hint style="success" %}
**Cross-platform authenticators** can be used across different operating systems (Windows, macOS, Android, iOS, etc.). Examples include FIDO security keys (Passkey) and biometric methods like fingerprint or facial recognition, which are supported on a wide range of devices.

**Platform authenticators** are unique to a specific platform. For example, Windows Hello facial recognition for Windows-based devices and Touch ID for Apple devices.
{% endhint %}

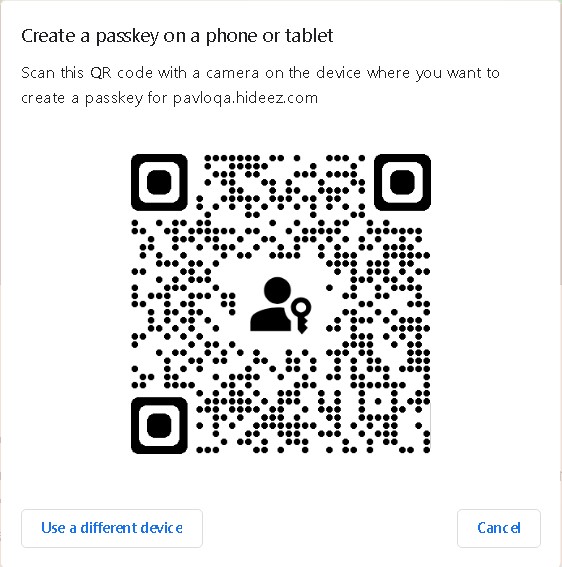
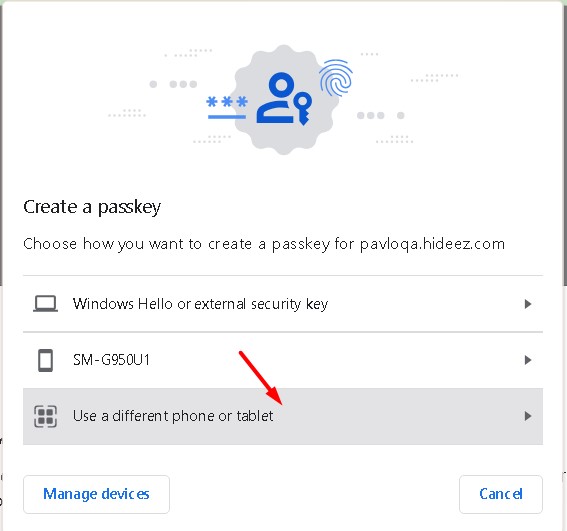
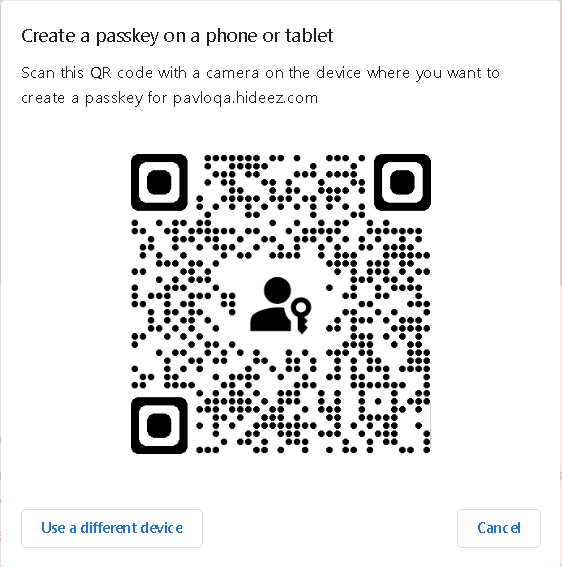
#### To create a Passkey on a smartphone or tablet, your employees will be prompted to scan the QR code on their PC:

<div><figure><img src="https://content.gitbook.com/content/RdTysrljwe610dPFG7tE/blobs/LYl3hMv01QtfpzU3hShG/image.png" alt="" width="266"><figcaption></figcaption></figure> <figure><img src="https://content.gitbook.com/content/RdTysrljwe610dPFG7tE/blobs/vPH7ohVJ4N1NddVrWW70/Screenshot_25.jpg" alt="" width="321"><figcaption></figcaption></figure> <figure><img src="https://content.gitbook.com/content/RdTysrljwe610dPFG7tE/blobs/yRaR6WYMbW4710Q5507b/Screenshot_26.jpg" alt=""><figcaption><p>Add a device</p></figcaption></figure> <figure><img src="https://content.gitbook.com/content/RdTysrljwe610dPFG7tE/blobs/gZ58KVXFVVUzMCirTFFq/Screenshot_27.jpg" alt=""><figcaption><p>Scan QR code</p></figcaption></figure></div>

#### [**Method 2**. **Hideez Authenticator app** ](https://app.gitbook.com/o/QqXoDzMCs5VyqgkjQYei/s/rcJTz3sbpSYYCf28s7qm/~/changes/33/quick-start-guides/guide-for-pilot-projects/hideez-authenticator-guide)

You can find our mobile app on [Google Play ](https://play.google.com/store/apps/details?id=com.hideez.hideezmobilekey\&hl=en\&gl=US)and the [App Store](https://apps.apple.com/tt/app/hideez-authenticator/id1510948639).&#x20;

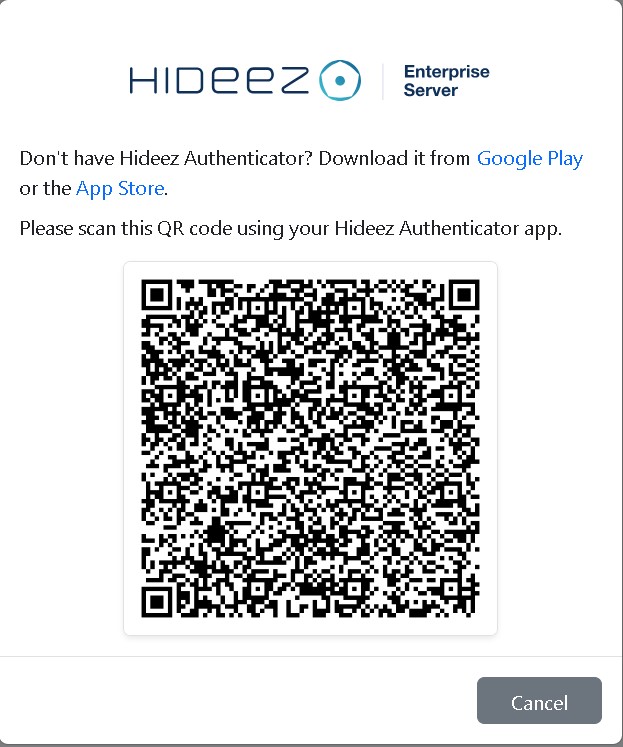
Hideez Authenticator enables passwordless Single Sign-On (SSO) through the use of one-time QR codes. This is particularly valuable for users with smartphones lacking biometric capabilities. The app serves as a substitute for biometric login methods while ensuring a secure passwordless experience.

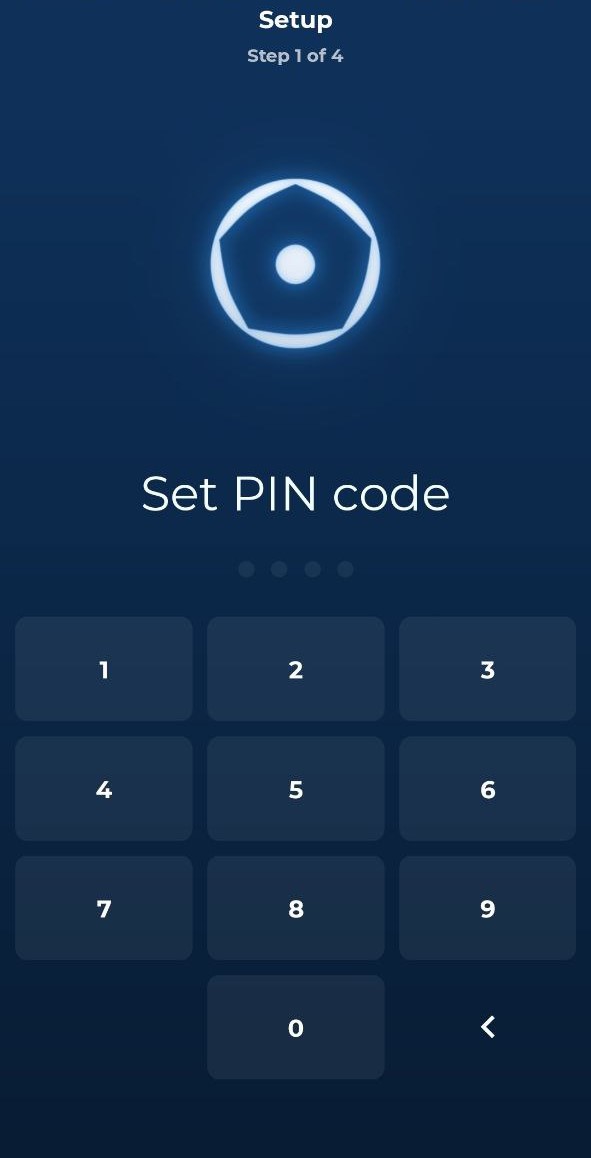
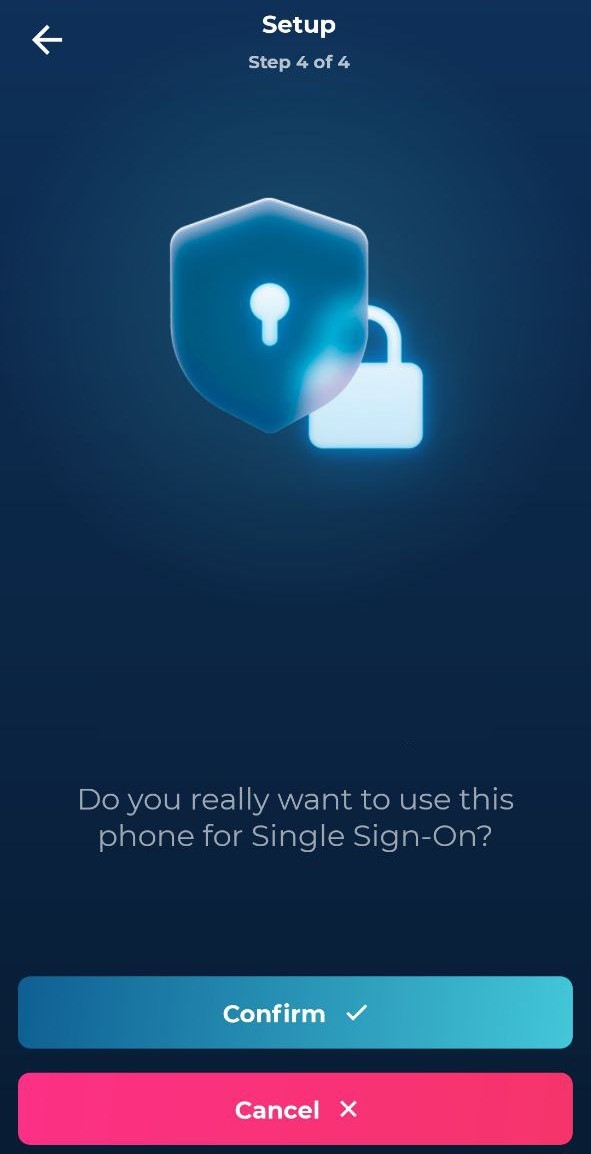
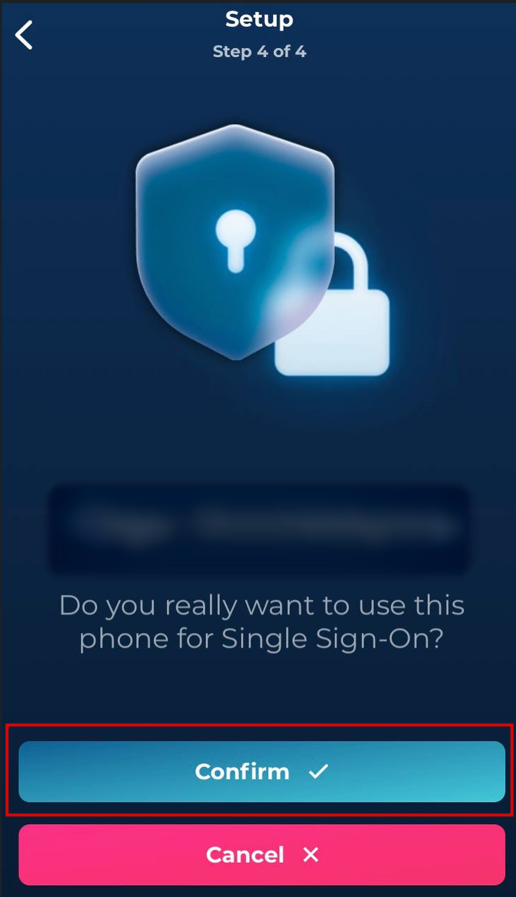
#### To activate Hideez Authenticator as an SSO method, an employee will have to follow the onscreen steps in the application:

<div><figure><img src="https://content.gitbook.com/content/RdTysrljwe610dPFG7tE/blobs/bwQmYzpp82tGFzRc2Fat/Screenshot_23.jpg" alt="" width="261"><figcaption></figcaption></figure> <figure><img src="https://content.gitbook.com/content/RdTysrljwe610dPFG7tE/blobs/3iBwqFXHKM8NmEv8A46u/Screenshot_31.jpg" alt="" width="156"><figcaption></figcaption></figure> <figure><img src="https://content.gitbook.com/content/RdTysrljwe610dPFG7tE/blobs/FNsyDj9CLenKseeoeNaW/photo_2023-10-30_02-01-41.jpg" alt="" width="148"><figcaption></figcaption></figure> <figure><img src="https://content.gitbook.com/content/RdTysrljwe610dPFG7tE/blobs/n5UcuQyYZWKNvZcoWGIj/photo_2023-10-30_02-20-10.jpg" alt="" width="148"><figcaption></figcaption></figure> <figure><img src="https://content.gitbook.com/content/RdTysrljwe610dPFG7tE/blobs/1tLrgS2RZGjvEzleWqhL/photo_2023-10-30_02-01-56.jpg" alt="" width="162"><figcaption></figcaption></figure> <figure><img src="https://content.gitbook.com/content/RdTysrljwe610dPFG7tE/blobs/8LVdMzrtFjy54Lb2zzAP/photo_2023-10-30_02-02-01.jpg" alt="" width="148"><figcaption></figcaption></figure></div>

{% hint style="success" %}
In addition to passwordless SSO, **Hideez Authenticator** allows users to enable **passwordless desktop login to Windows PCs**. This feature is described in [**Step 5.**](#step-5.-desktop-login-for-windows-pcs.)
{% endhint %}

After creating the user profile, employees can enhance security by adding more authentication methods. They can enroll additional devices (smartphones/tablets/laptops) as FIDO2 authenticators or register the Hideez Authenticator app.

### Step 5. Desktop login for Windows PCs.

You can utilize the Hideez Authenticator mobile app to unlock your PCs running on Windows 10/11. To do this, ensure the following three conditions are met:

1. [**Install the Hideez Client on your workstation.**](#1.-installation-hideez-client)
2. [**Authorize your workstation on your Hideez Server.**](#2.-authorize-your-workstation-on-your-trial-hideez-server.)
3. [**Enroll in Hideez Authenticator by scanning the QR code on your workstation.**](#3.-enroll-in-hideez-authenticator-by-scanning-the-qr-code-on-your-workstation.)

#### 1. Hideez Client Installation

* Download [**.exe**](/product-updates/hideez-client-updates)  or **.msi** ([**x86**](https://update.hideez.com/update/hideezclient/x86/clientsetup.msi), [**x64**](https://update.hideez.com/update/hideezclient/x64/clientsetup.msi)) installation file
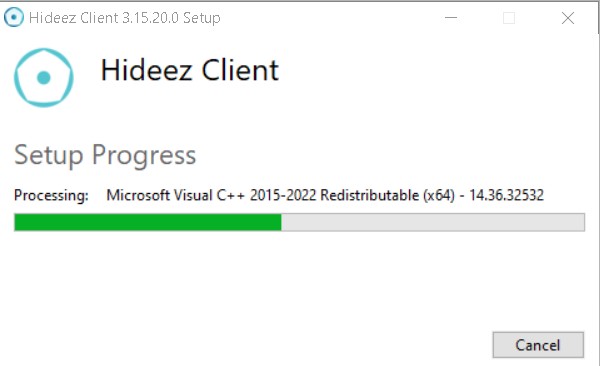
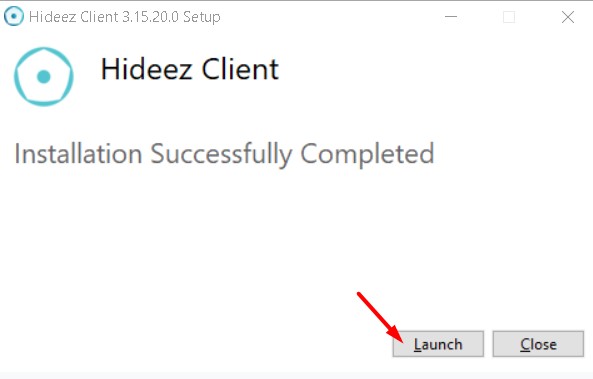
* Open and proceed with all steps, then click **Install:**

<div><figure><img src="https://content.gitbook.com/content/RdTysrljwe610dPFG7tE/blobs/LGoDxVwNKC95QlQfM5Rg/Screenshot_9.jpg" alt=""><figcaption></figcaption></figure> <figure><img src="https://content.gitbook.com/content/RdTysrljwe610dPFG7tE/blobs/viB2hOyoznqjQ5HFW74k/Screenshot_10.jpg" alt=""><figcaption></figcaption></figure></div>

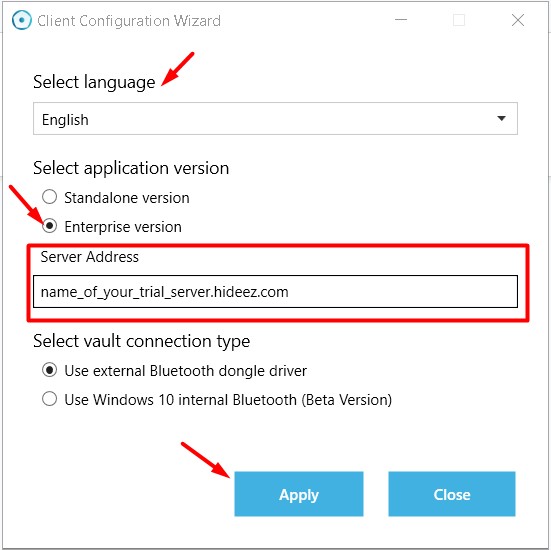
* Configure your Hideez Client in Wizard:

{% hint style="warning" %}
crucialThis step is very important to configure the Hideez Client on your Workstation
{% endhint %}

<div><figure><img src="https://content.gitbook.com/content/RdTysrljwe610dPFG7tE/blobs/LiQEplXPLEIEJmDiR4s3/Screenshot_12.jpg" alt="" width="276"><figcaption><p>Configure Hideez Client</p></figcaption></figure> <figure><img src="https://content.gitbook.com/content/RdTysrljwe610dPFG7tE/blobs/7YJdk3HeAoHqNwe8L4jI/Screenshot_13.jpg" alt=""><figcaption></figcaption></figure></div>

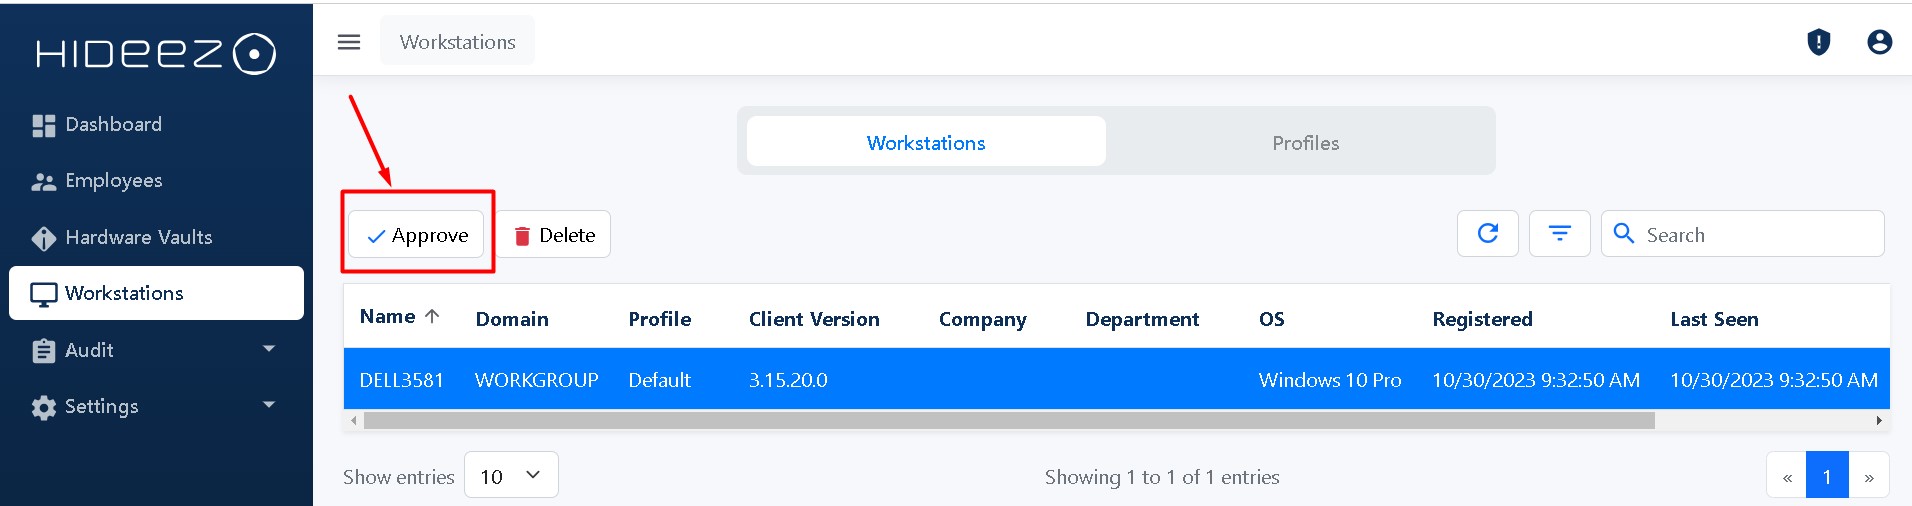
#### 2. Authorize your workstation on your Hideez Server.

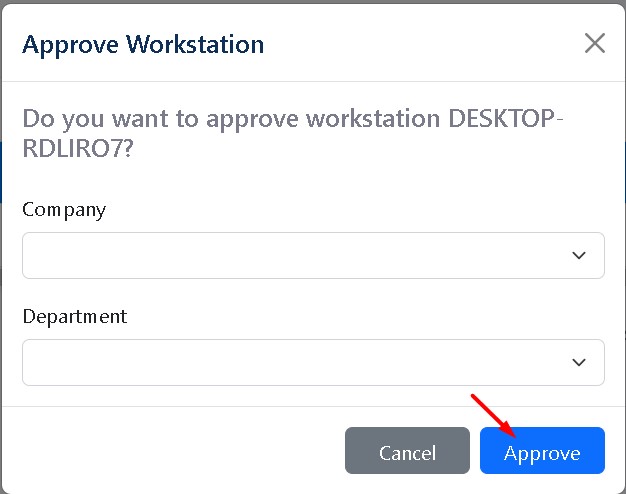
* Go to the section **Workstation** on your server, select Workstation, and click **Approve:**

<div><figure><img src="https://content.gitbook.com/content/RdTysrljwe610dPFG7tE/blobs/3rvq1YEYeYYYVElHlhCm/Screenshot_16.jpg" alt=""><figcaption></figcaption></figure> <figure><img src="https://content.gitbook.com/content/RdTysrljwe610dPFG7tE/blobs/em1svOzg4ECt8K4ADfRT/Screenshot_2.jpg" alt=""><figcaption></figcaption></figure></div>

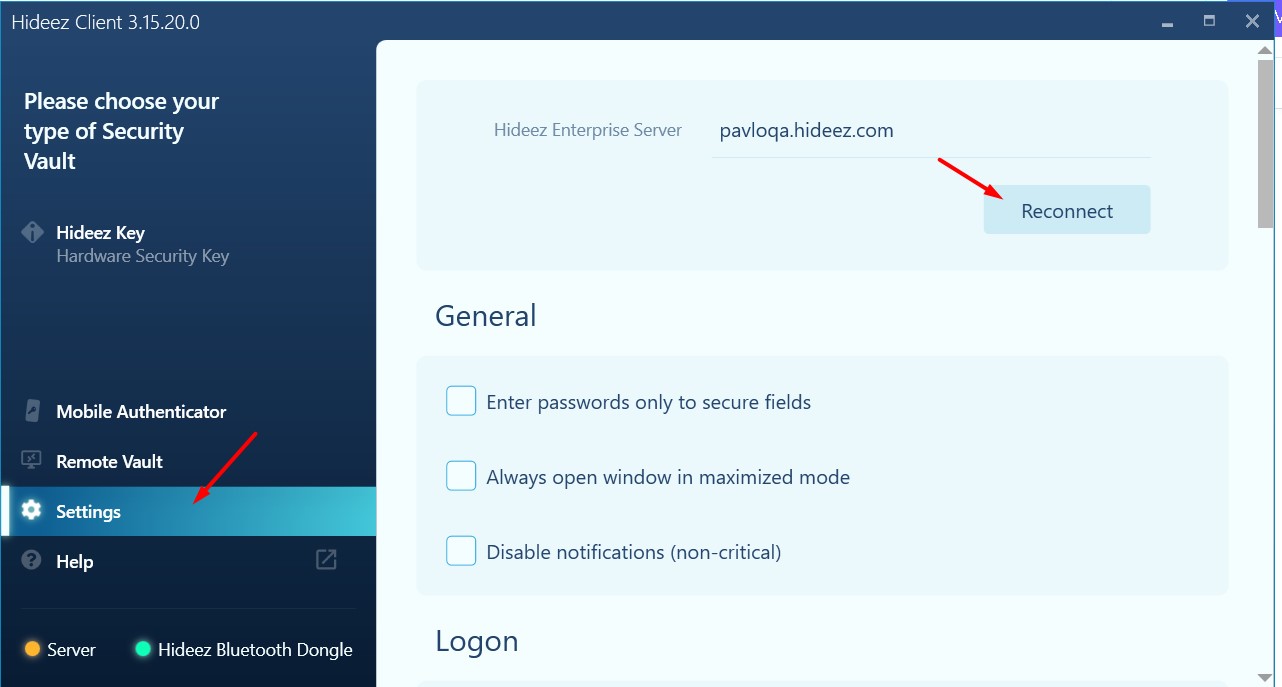
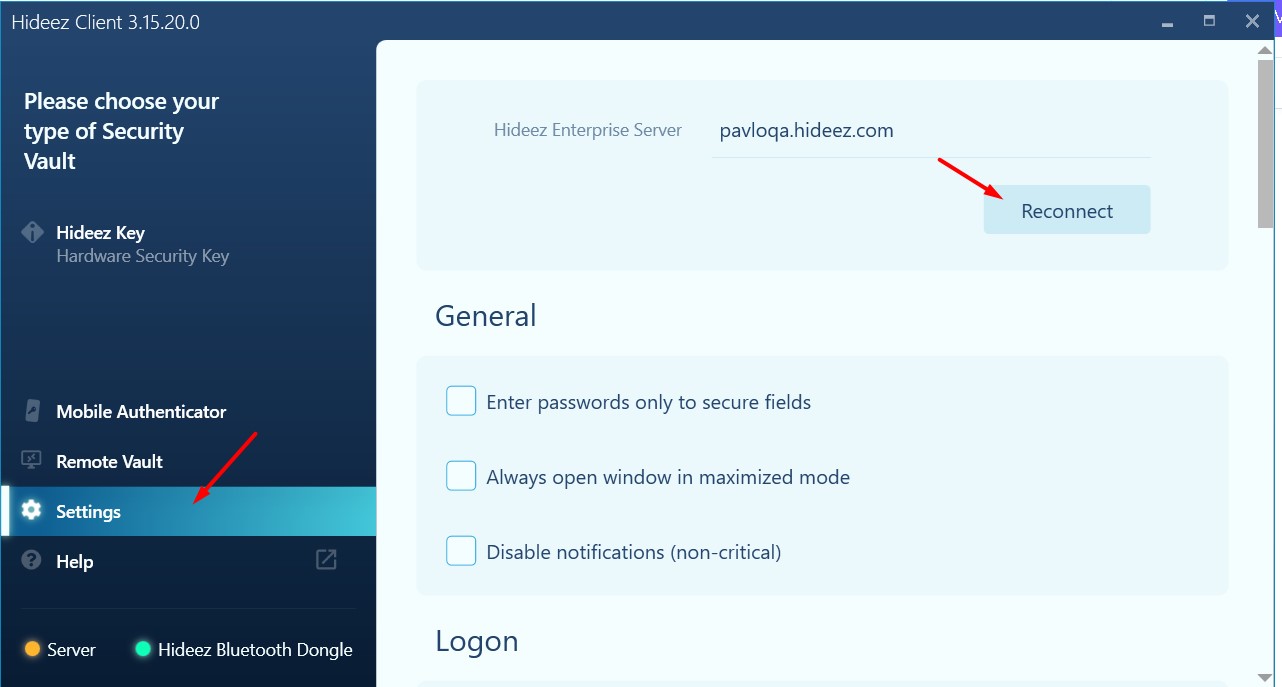
* **Restart** your PC or click **Reconnect** on Hideez Authenticator:&#x20;

<div><figure><img src="https://content.gitbook.com/content/RdTysrljwe610dPFG7tE/blobs/1RLPusn7hn7Tip6iaHrl/Screenshot_21.jpg" alt=""><figcaption></figcaption></figure> <figure><img src="https://content.gitbook.com/content/RdTysrljwe610dPFG7tE/blobs/ZOrSrgvMJpp8iCUWIOpz/Screenshot_22.jpg" alt=""><figcaption></figcaption></figure></div>

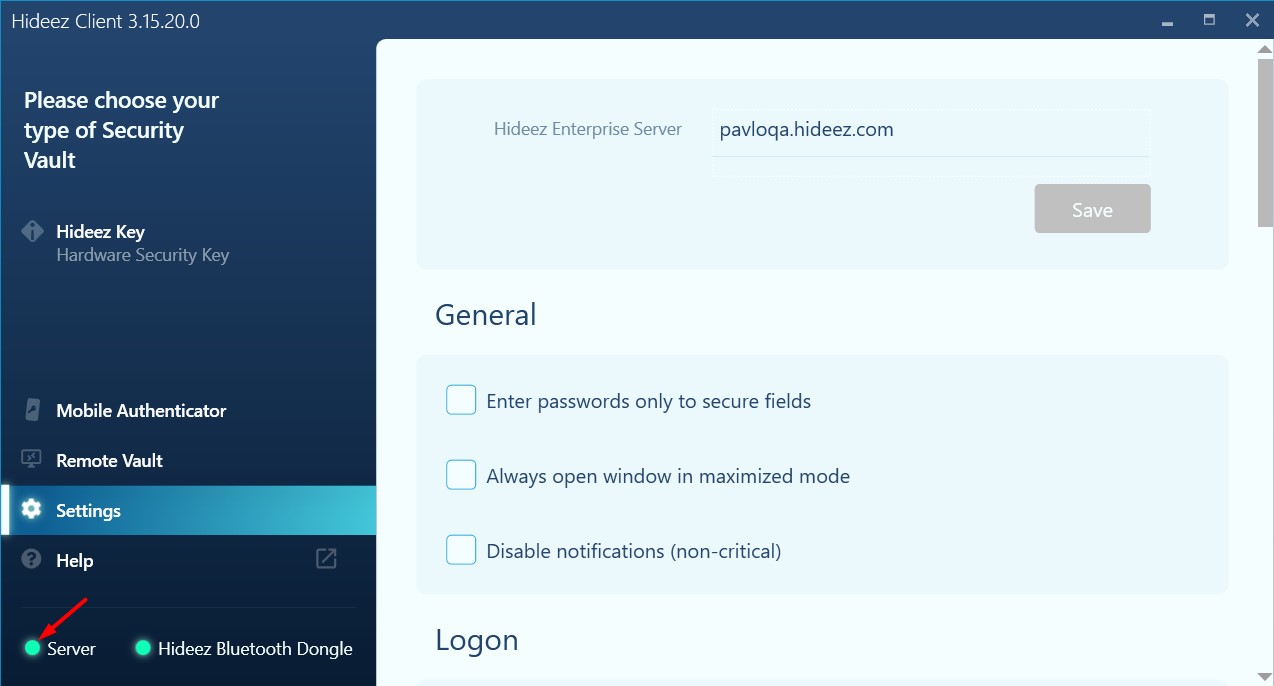
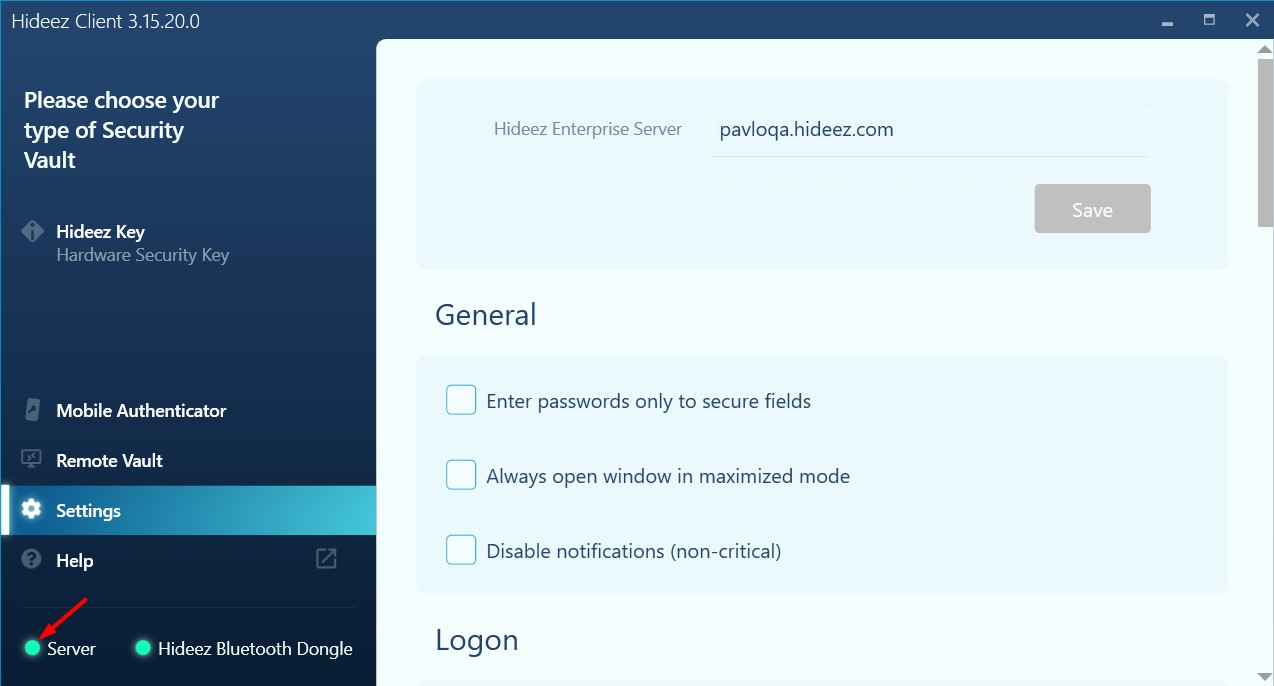
The indicator of connection of your server will have a green color:

<div><figure><img src="https://content.gitbook.com/content/RdTysrljwe610dPFG7tE/blobs/J8N3EX13oKmOVr7991O9/Screenshot_21.jpg" alt=""><figcaption></figcaption></figure> <figure><img src="https://content.gitbook.com/content/RdTysrljwe610dPFG7tE/blobs/FQxPw0xYnJjlHqGoGbt8/Screenshot_22.jpg" alt=""><figcaption></figcaption></figure></div>

#### 3. Enroll Hideez Authenticator by scanning the QR code on your workstation.

There are two methods for unlocking your PC using the Authenticator. Depending on the method, you'll need to use your Hideez Authenticator mobile app with the Hideez Client desktop program.

* [**Passwordless PC Authorization**](#enrollment-for-passwordless-pc-authorization)
* [**Password-based PC Authorization**](#enrollment-for-password-based-pc-authorization)

#### [**Enrollment for Passwordless PC Authorization**](https://authenticator.hideez.com/user-guide/android-guide/software-key-enrollment/pc-authorization-enrollment/enrollment-for-passwordless-pc-authorization)

{% hint style="warning" %}
That method requires config:&#x20;

* [Certification Authority (Microsoft Virtual Smart Card technology)](https://authenticator.hideez.com/primary-setup-admin-guide/configuring-an-active-directory-certification-authority)
* [Server setup for passwordless login](https://authenticator.hideez.com/primary-setup-admin-guide/hes-setup-for-passwordless-login)

The workstation should have:&#x20;

* Domain user account
* TPM 2.0 module
  {% endhint %}

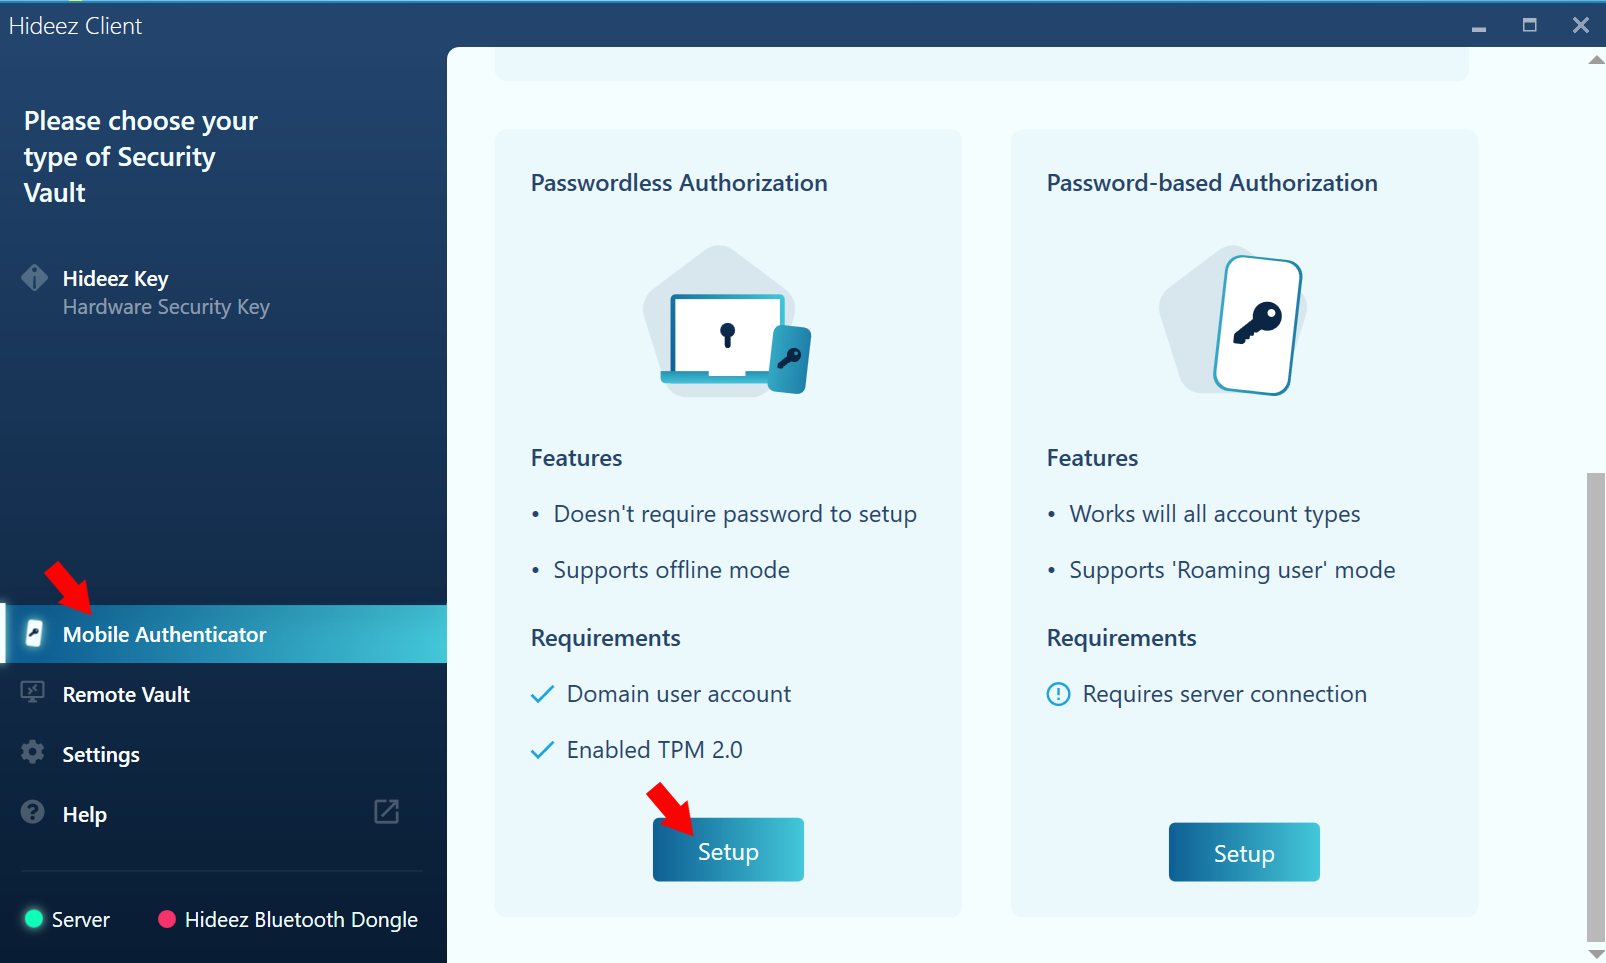
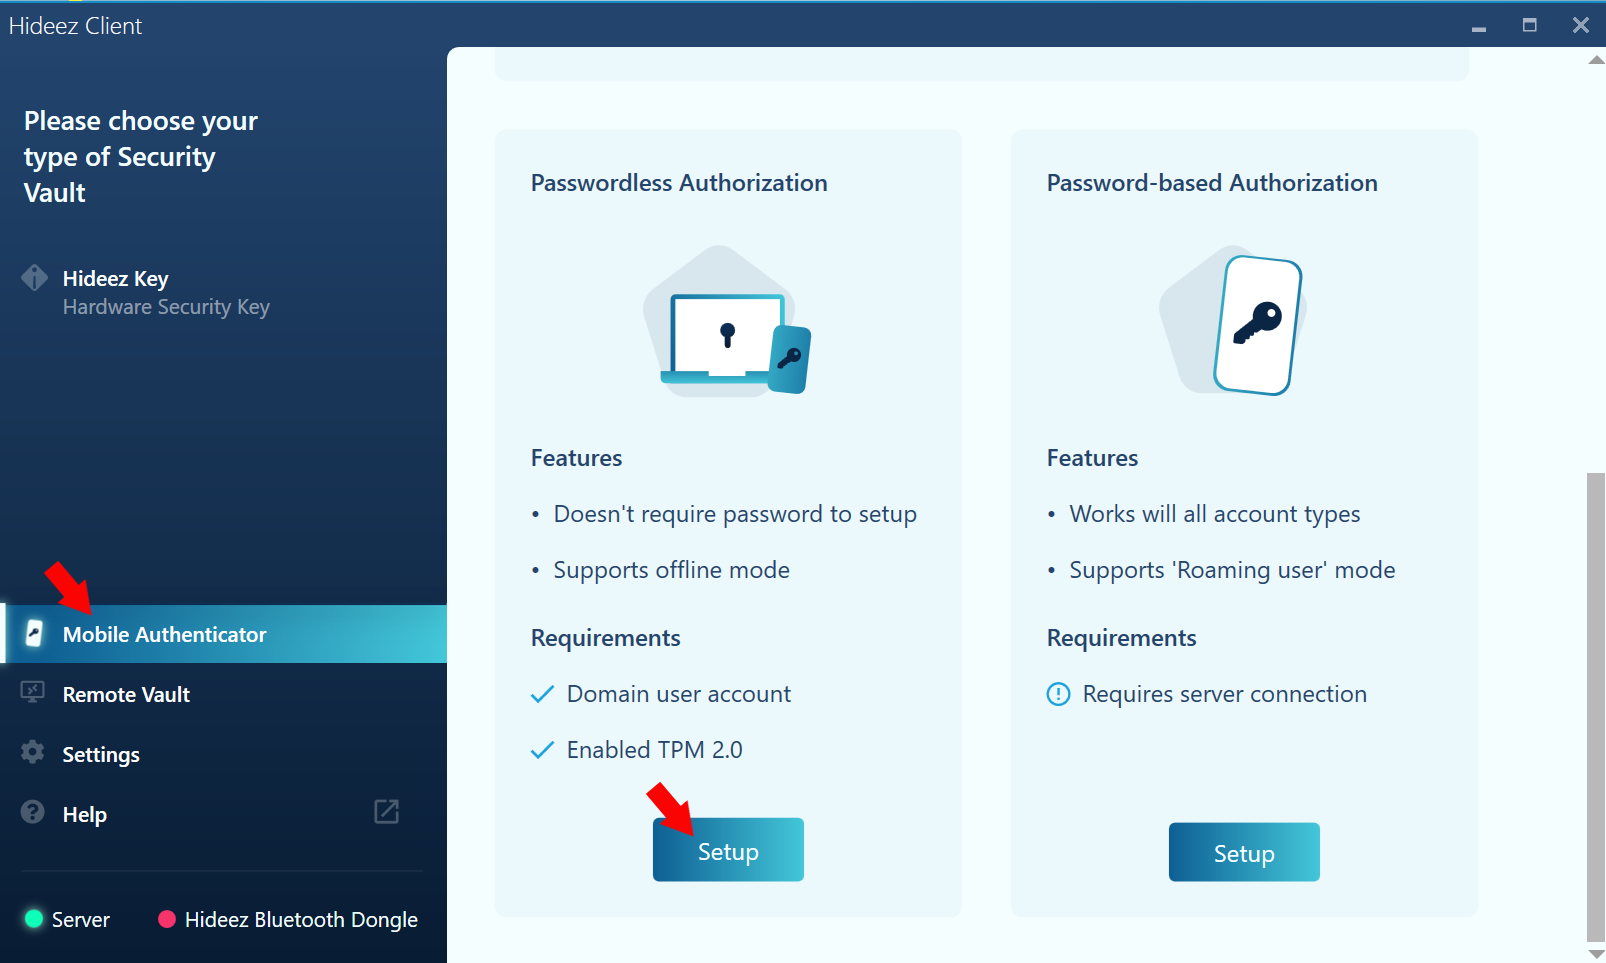
1. Open **Hideez Client→Mobile Authenticator→ Passwordless Authorization-> Setup**
2. Open **Hideez Authenticator** and select the QR scanner.
3. Scan the QR code on the computer by smartphone.
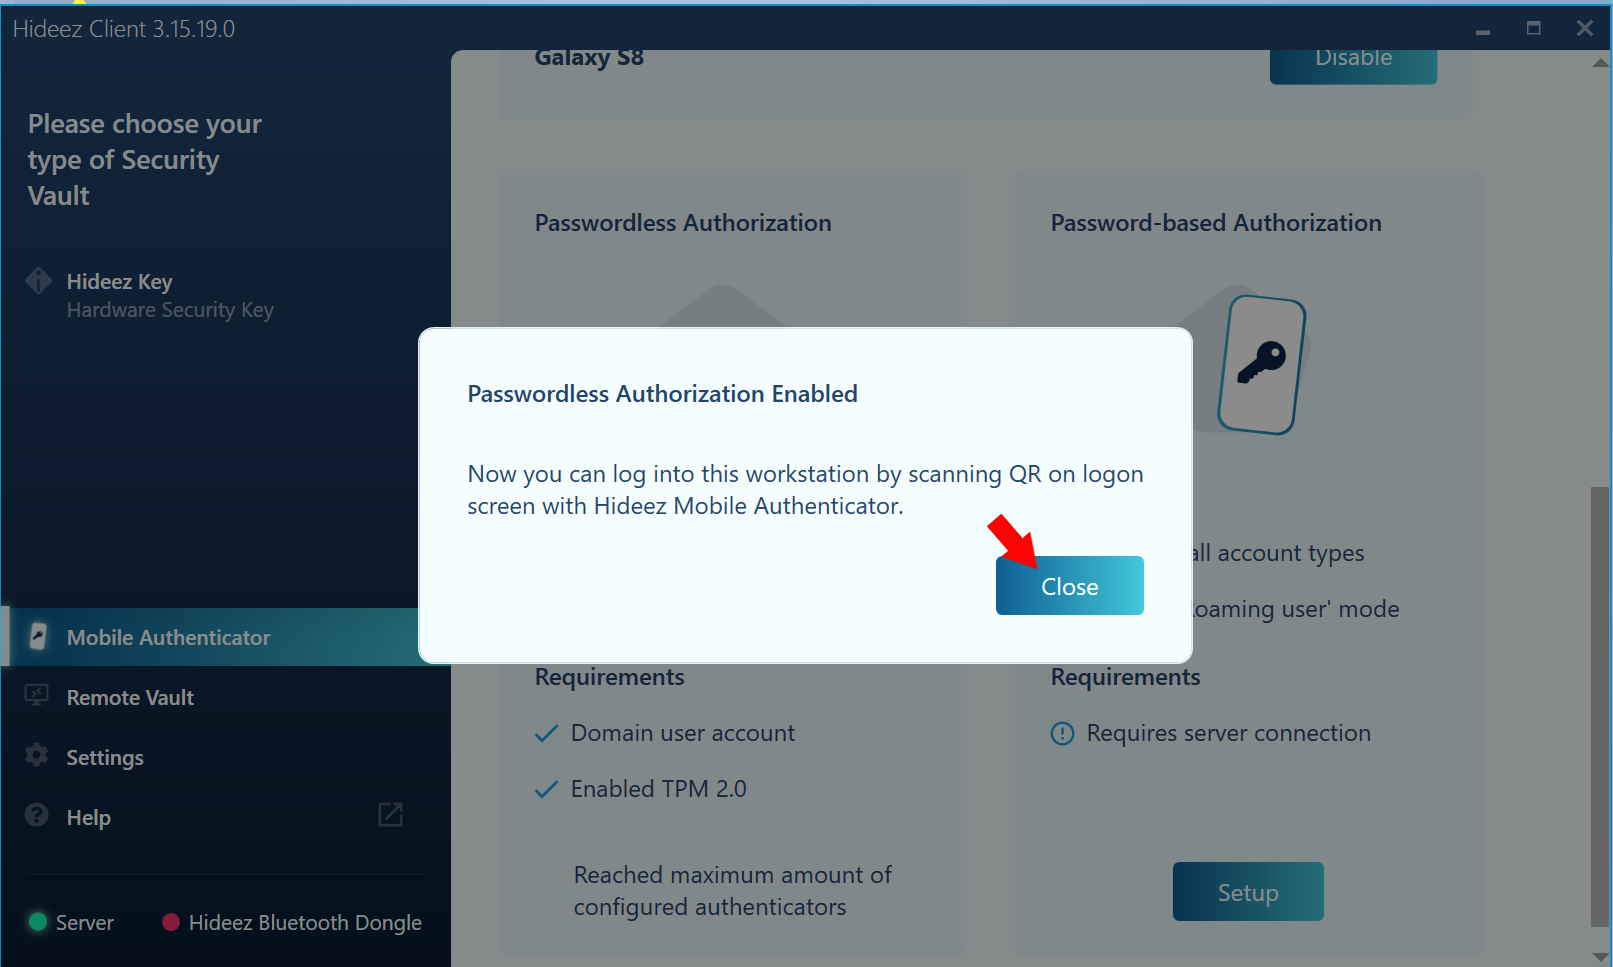
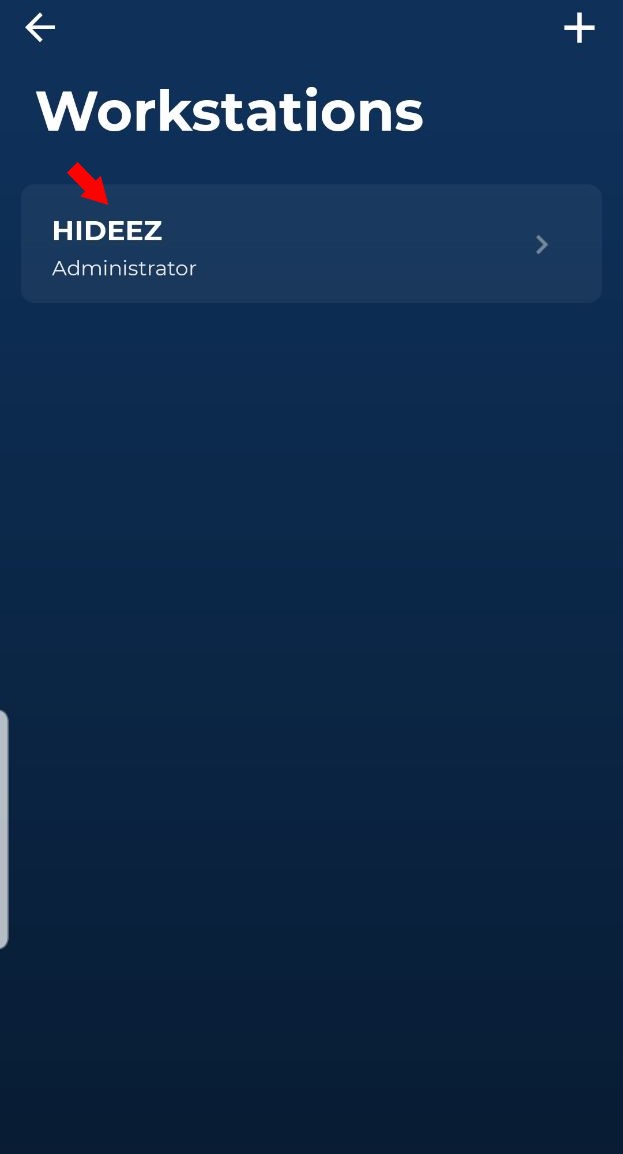
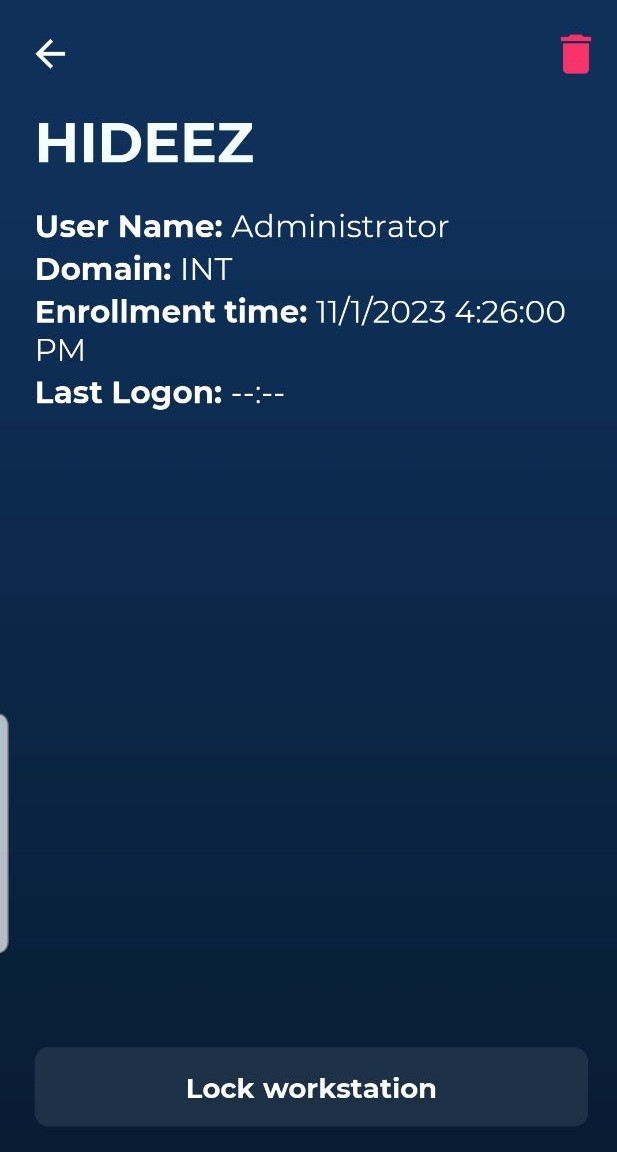
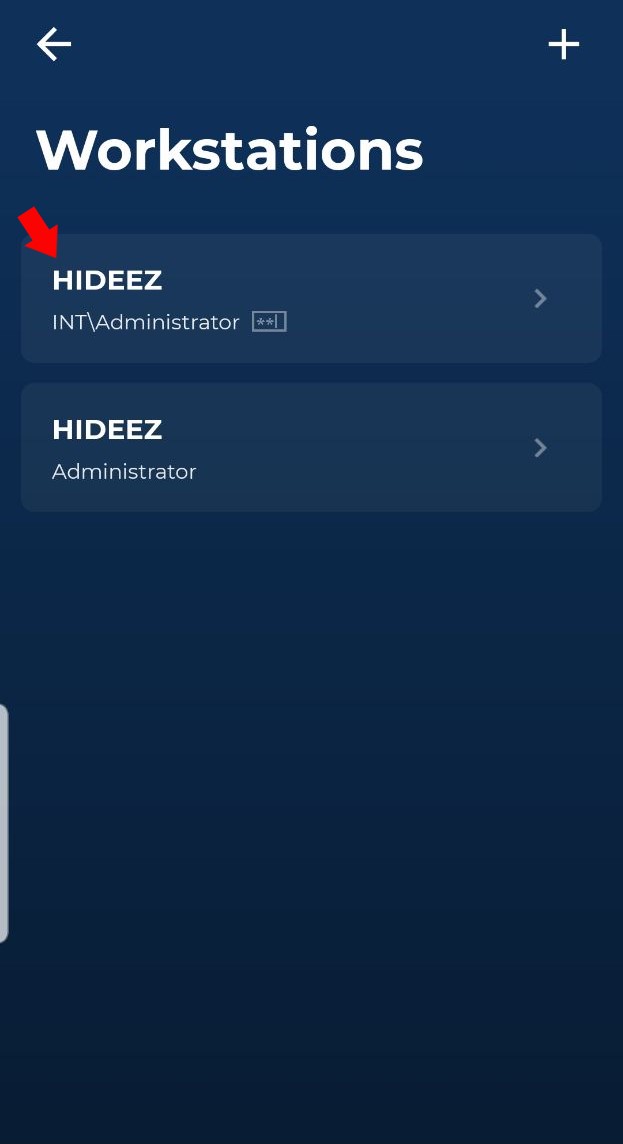
4. Confirm action on **Hideez Authenticator** and wait until the account is created. The account will appear in the section **Accounts→ Workstation**.&#x20;

<div><figure><img src="https://content.gitbook.com/content/RdTysrljwe610dPFG7tE/blobs/iWMQ0PGiAD2sYrunerBp/%D0%97%D0%BD%D1%96%D0%BC%D0%BE%D0%BA%20%D0%B5%D0%BA%D1%80%D0%B0%D0%BD%D0%B0%202023-11-01%20153111.png" alt="" width="375"><figcaption></figcaption></figure> <figure><img src="https://content.gitbook.com/content/RdTysrljwe610dPFG7tE/blobs/2lQ8xN1dkBxy3ScXX2vw/%D0%97%D0%BD%D1%96%D0%BC%D0%BE%D0%BA%20%D0%B5%D0%BA%D1%80%D0%B0%D0%BD%D0%B0%202023-11-01%20153551.png" alt="" width="375"><figcaption></figcaption></figure> <figure><img src="https://content.gitbook.com/content/RdTysrljwe610dPFG7tE/blobs/f4RRtc4IohC83Cld59mt/photo_2023-11-01_16-27-19.jpg" alt="" width="312"><figcaption></figcaption></figure> <figure><img src="https://content.gitbook.com/content/RdTysrljwe610dPFG7tE/blobs/J7HBMDGDCUyRWrCzC0qz/photo_2023-11-01_16-27-17.jpg" alt="" width="309"><figcaption></figcaption></figure></div>

{% hint style="success" %}

#### **Passwordless PC Authorization a**llows you to unlock the Workstation when it is offline using codes. Learn more about this feature at [this link](https://authenticator.hideez.com/user-guide/android-guide/login-with-hideez-authenticator/pc-login/passwordless-pc-login/offline-passwordless-login).

{% endhint %}

#### [**Enrollment for Password-based PC Authorization**](https://authenticator.hideez.com/user-guide/android-guide/software-key-enrollment/pc-authorization-enrollment/enrollment-for-password-based-pc-authorization)

1. Open **Hideez Client→Mobile Authenticator→ Password-bassed Authorization→ Setup**
2. Open **Hideez Authenticator** and select the QR scanner.
3. Scan the QR code on the computer using a smartphone.
4. Confirm action on **Hideez Authenticator**&#x20;
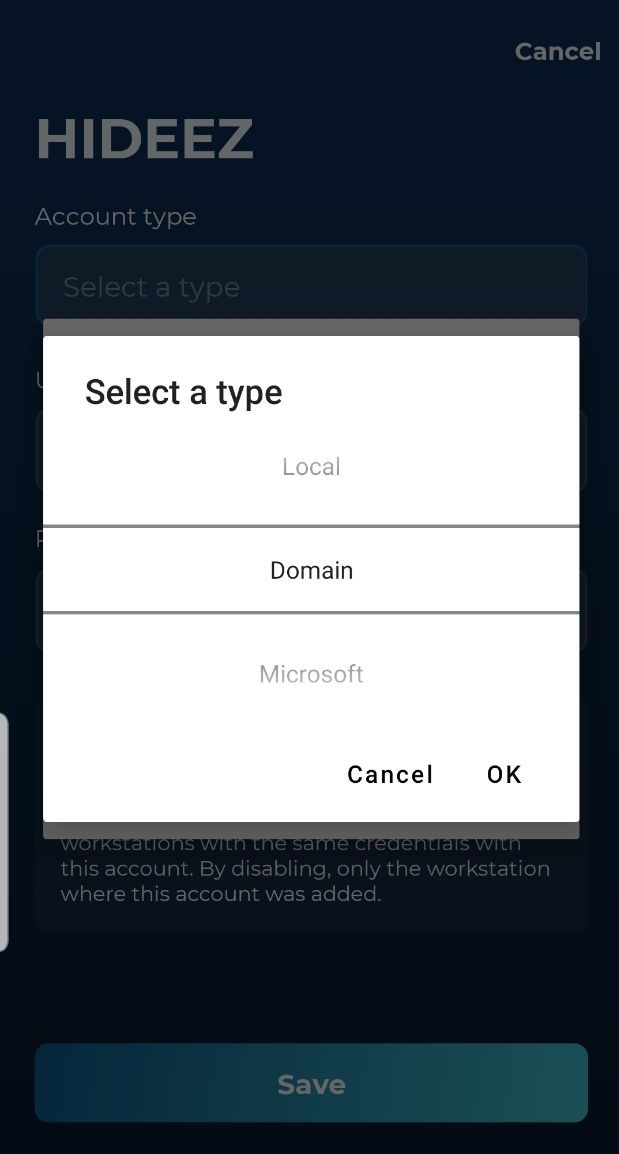
5. Choose **Account type** and put **User name**, **Domain**, **Password, and** click **Safe.**&#x54;he account will appear in the section **Accounts→ Workstation**.&#x20;

<div><figure><img src="https://content.gitbook.com/content/RdTysrljwe610dPFG7tE/blobs/c7H0VXwKAq9BRsmFqAEA/%D0%97%D0%BD%D1%96%D0%BC%D0%BE%D0%BA%20%D0%B5%D0%BA%D1%80%D0%B0%D0%BD%D0%B0%202023-11-01%20153111.png" alt="" width="375"><figcaption></figcaption></figure> <figure><img src="https://content.gitbook.com/content/RdTysrljwe610dPFG7tE/blobs/G3IpXuLGfamCQlN4k3I2/photo_2023-11-01_17-22-56.jpg" alt="" width="155"><figcaption></figcaption></figure> <figure><img src="https://content.gitbook.com/content/RdTysrljwe610dPFG7tE/blobs/VzGSOEn3aGAKk4qwFXnk/photo_2023-11-02_13-49-09.jpg" alt="" width="156"><figcaption></figcaption></figure></div>

{% hint style="info" %}
The process of enrolling Hideez Authenticator for unlocking the Workstation is the same for both the Android and IOS platforms.
{% endhint %}

#### Unlock Workstation by Hideez Authenticator

1. Open **Hideez Authenticator.**
2. Scan the QR code on the log screen.
3. Select an account on the **Hideez Authenticator app.**

{% hint style="warning" %}
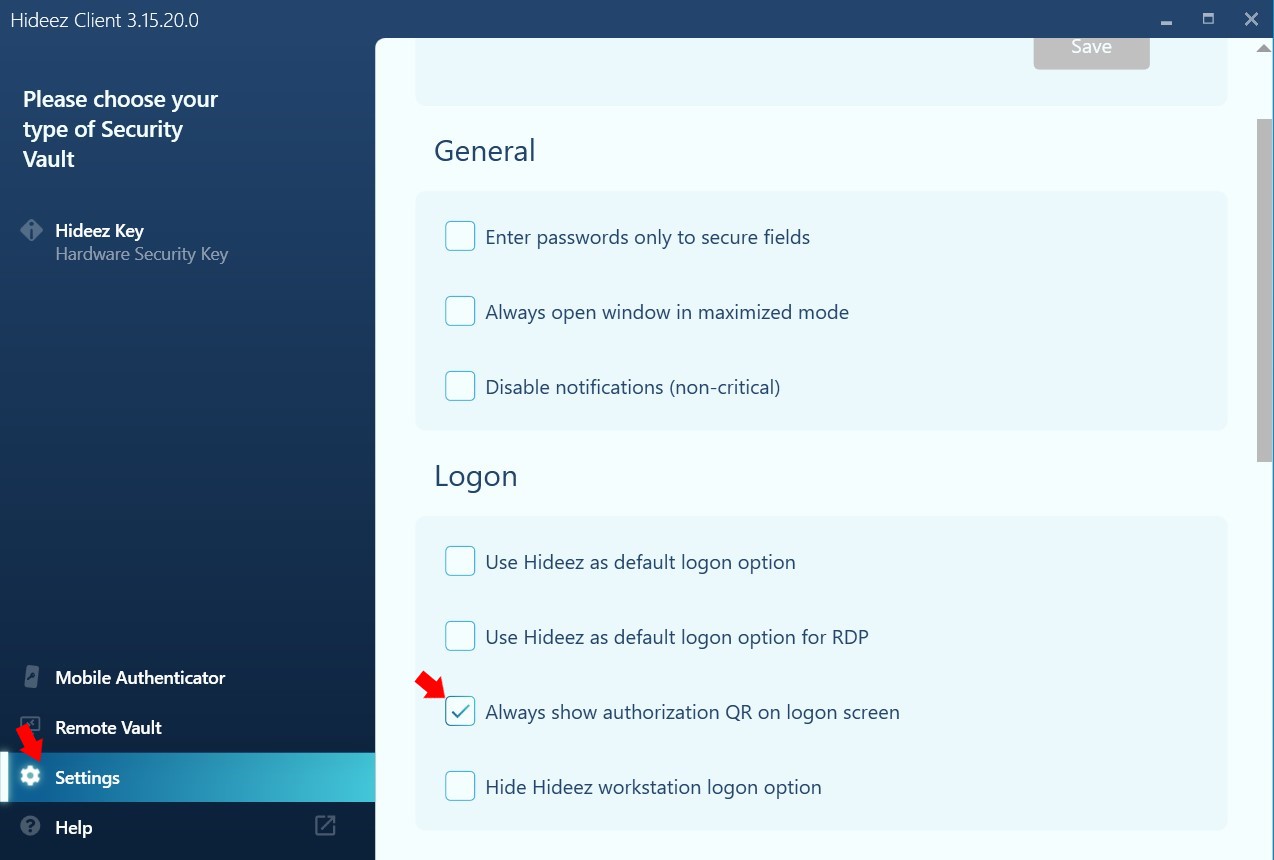
Please, make sure that you enable to display QR code on the log on screen of your Workstation.&#x20;

In the Hideez Client, open **Settings -> Logon** section -> **Always shows authorization QR on logon screen:**                           &#x20;
{% endhint %}

<figure><img src="https://content.gitbook.com/content/RdTysrljwe610dPFG7tE/blobs/7oaFLCFd9EyFqgxdBBpP/Screenshot_3.jpg" alt="" width="563"><figcaption></figcaption></figure>

{% hint style="info" %}
**If you have any questions on the deployment or configuring HES, please contact our Customer Care team at** [**support@hideez.com**](mailto:support@hideez.com)**. We’ll be happy to help!**
{% endhint %}


# Passkeys

Passwordless SSO with Passkeys

### 1. Sign in to your Hideez server using your email and password

<figure><img src="https://content.gitbook.com/content/RdTysrljwe610dPFG7tE/blobs/nApSSy9RIRY6ewfFWmRk/unnamed%20(1)%20(1).jpg" alt="" width="375"><figcaption></figcaption></figure>

{% hint style="info" %}
**Note**: If you see the message “Your web application is running and waiting for your content,” the server is not ready yet. The process may take from 5 to 10 minutes. Once the server is ready, you will receive an email confirmation.
{% endhint %}

### **2. Create Passkeys:**

{% hint style="info" %}
**Passkeys** are a new way of signing in to your online accounts with a **biometric sensor** or PIN, eliminating the need for **passwords.**
{% endhint %}

* To create a passkey, go to the **Profile** page, then the  **FIDO2 Authenticators** section, and click **Add FIDO2 Authenticator**.

<div><figure><img src="https://content.gitbook.com/content/RdTysrljwe610dPFG7tE/blobs/hfccsaLoI7ESORI5IjhL/Screenshot_6%20(1).jpg" alt=""><figcaption></figcaption></figure> <figure><img src="https://content.gitbook.com/content/RdTysrljwe610dPFG7tE/blobs/Vuza45MuLwOo5tRtk7DJ/Screenshot_1%20(1).jpg" alt=""><figcaption></figcaption></figure></div>

* Following the on-screen steps, add a FIDO2 Authenticator, choosing between a **Cross-Platform key** (another device, like a phone or tablet) or **Platform key** (current device).

&#x20;Adding a [**Cross-Platform key:**](/use-cases/passkey/sso-login-to-web-services-fido2-via-passkey-and-hideez-server-as-identity-provider)

<div><figure><img src="https://content.gitbook.com/content/RdTysrljwe610dPFG7tE/blobs/BFc1qv3kXAHqZAmFFhxE/Screenshot_14.jpg" alt="" width="466"><figcaption></figcaption></figure> <figure><img src="https://content.gitbook.com/content/RdTysrljwe610dPFG7tE/blobs/zzAdOb9Ct0QXhuSBSHuj/Screenshot_26.jpg" alt="" width="425"><figcaption></figcaption></figure> <figure><img src="https://content.gitbook.com/content/RdTysrljwe610dPFG7tE/blobs/wEXwE23FPql91iPPxpQY/Screenshot_27.jpg" alt="" width="422"><figcaption></figcaption></figure></div>

Adding a [**Platform key**](/hideez-enterprise-server/administration/platform-authentication-on-the-hes-server)

<div><figure><img src="https://content.gitbook.com/content/RdTysrljwe610dPFG7tE/blobs/ouMIczCty0i6qgfmbrMK/Screenshot_15.jpg" alt="" width="467"><figcaption></figcaption></figure> <figure><img src="https://content.gitbook.com/content/RdTysrljwe610dPFG7tE/blobs/IF4WKxSK1i5dNg6KzA7L/Screenshot_16.jpg" alt=""><figcaption></figcaption></figure> <figure><img src="https://content.gitbook.com/content/RdTysrljwe610dPFG7tE/blobs/P4sVwmY9OAh4fyeVoo8z/Screenshot_18.jpg" alt=""><figcaption></figcaption></figure></div>

{% hint style="info" %}
Note: Multiple devices can be added simultaneously.

&#x20;A **biometric sensor** or **Trusted Platform Module** **(TPM)** module must be present.
{% endhint %}

### 3. Configure Passwordless SS&#x4F;**:**

Hideez Server allows you to enable passwordless Single Sign-On (SSO) based on the SAML and OpenID Connect (OIDC) protocols. These protocols are employed to verify a user’s identity when an employee tries to access web or mobile applications.&#x20;

To configure the Hideez Server as an Identity Provider for passwordless SSO, go to Settings → Parameters, and proceed with [**SAML**](/hideez-enterprise-server/configuring-saml-protocol) or [**OIDC**](/hideez-enterprise-server/configuration-oidc-openid-connect) configuration as described in our user guide.

### **4. Add a New user:**

New users can be added through:

* [**Active Directory (On-Premises, Azure Ad)** ](/hideez-server-integration/microsoft-entra-id/import)
* [**Manually**](/hideez-enterprise-server/employees/how-to-add-an-employee)

Upon receiving an email, users can configure their preferred login methods, such as a [**mobile application**](https://authenticator.hideez.com/user-guide/android-guide/login-with-hideez-authenticator/sso-login/sso-passwordless-login) or passkeys.

<div><figure><img src="https://content.gitbook.com/content/RdTysrljwe610dPFG7tE/blobs/pzpkFZF5EztYASON7Upd/Screenshot_11.jpg" alt="" width="375"><figcaption></figcaption></figure> <figure><img src="https://content.gitbook.com/content/RdTysrljwe610dPFG7tE/blobs/wagTSJiD0sXCrhsmiST7/image.png" alt="" width="266"><figcaption></figcaption></figure> <figure><img src="https://content.gitbook.com/content/RdTysrljwe610dPFG7tE/blobs/eF8QjiwNYl1ocaZmEVMo/Screenshot_10.jpg" alt="" width="358"><figcaption></figcaption></figure></div>

{% hint style="warning" %}
Please note that in the trial version of the server, you can use a **maximum of 15 users**.
{% endhint %}

Additionally, the Hideez Server assumes that passwordless authentication can be employed alongside other methods

* [**Mobile Application**](/quick-start-guides/guide-for-hideez-enterprise-server-on-cloud/mobile-app) allows Passwordless SSO and PC login with Mobile App
* [**Hardware keys**](/quick-start-guides/guide-for-hideez-enterprise-server-on-cloud/hideez-key) allow Passwordless SSO, PC logon & logoff, password-based authentication


# Mobile app

Passwordless SSO and PC logon with Mobile App

### 1. Sign in to your Hideez server using your email and password

<figure><img src="https://content.gitbook.com/content/RdTysrljwe610dPFG7tE/blobs/nApSSy9RIRY6ewfFWmRk/unnamed%20(1)%20(1).jpg" alt="" width="375"><figcaption></figcaption></figure>

{% hint style="info" %}
**Note**: If you see the message “Your web application is running and waiting for your content,” the server is not ready yet. The process may take from 5 to 10 minutes. Once the server is ready, you will receive an email confirmation.
{% endhint %}

### **2. Install the Hideez Authenticator app:**

* In the user profile, go to “Add Hideez Authenticator.”

<div><figure><img src="https://content.gitbook.com/content/RdTysrljwe610dPFG7tE/blobs/zQjbBrFpQrqAxh9VoSNn/Screenshot_6.jpg" alt=""><figcaption></figcaption></figure> <figure><img src="https://content.gitbook.com/content/RdTysrljwe610dPFG7tE/blobs/33cZESRpFdpej4ZzB7F3/Screenshot_3.jpg" alt=""><figcaption></figcaption></figure></div>

* Select your operating system (Android or iOS), scan the QR code, and proceed to download and install the application.
* Follow the on-screen steps within the mobile app to complete the setup.

<div><figure><img src="https://content.gitbook.com/content/RdTysrljwe610dPFG7tE/blobs/sbJsPr7xOMGsk49jJEdM/image.png" alt="" width="148"><figcaption></figcaption></figure> <figure><img src="https://content.gitbook.com/content/RdTysrljwe610dPFG7tE/blobs/fn1aLD2tZIvisWntBGyj/photo_2023-10-30_02-20-10.jpg" alt="" width="148"><figcaption></figcaption></figure> <figure><img src="https://content.gitbook.com/content/RdTysrljwe610dPFG7tE/blobs/gOLh5AudsmlUoc2kZSag/photo_2023-10-30_02-02-01.jpg" alt="" width="148"><figcaption></figcaption></figure></div>

### 3. Configure Passwordless SSO

Hideez Server allows you to enable passwordless Single Sign-On (SSO) based on the SAML and OpenID Connect (OIDC) protocols. These protocols are employed to verify a user’s identity when an employee tries to access web or mobile applications.&#x20;

To configure the Hideez Server as an Identity Provider for passwordless SSO, go to Settings → Parameters, and proceed with [**SAML**](/hideez-enterprise-server/configuring-saml-protocol) or [**OIDC**](/hideez-enterprise-server/configuration-oidc-openid-connect) configuration as described in our user guide.

### 4. Configure computer login with Hideez Client

* Download [**.exe**](/product-updates/hideez-client-updates)  or **.msi** ([**x86**](https://update.hideez.com/update/hideezclient/x86/clientsetup.msi), [**x64**](https://update.hideez.com/update/hideezclient/x64/clientsetup.msi)) and install the Hideez Client on the computer.
* Select the Enterprise version of the program.
* Set your server address in the Hideez Client.&#x20;
* Select integration only with the mobile app.&#x20;

{% hint style="info" %}
**The address of your server is specified on your** [**Hideez portal**](https://portal.hideez.com/) **or your Server**
{% endhint %}

<div><figure><img src="https://content.gitbook.com/content/RdTysrljwe610dPFG7tE/blobs/VEeA4g17SrRsLoZP7Glr/Screenshot_20%20(1).jpg" alt=""><figcaption></figcaption></figure> <figure><img src="https://content.gitbook.com/content/RdTysrljwe610dPFG7tE/blobs/CEWm5sTY13rBZ7l6P4jp/Screenshot_22.jpg" alt=""><figcaption></figcaption></figure></div>

* After installing the program on your computer, your workstation will appear in the list for confirmation on the dashboard of your server

<figure><img src="https://content.gitbook.com/content/RdTysrljwe610dPFG7tE/blobs/hEzd3XgemNWtpFDMvY5q/Screenshot_24.jpg" alt="" width="563"><figcaption></figcaption></figure>

* Go to the section **Workstation** on your server, select Workstation, and click **Approve**

<figure><img src="https://content.gitbook.com/content/RdTysrljwe610dPFG7tE/blobs/VKwba6FmDwUUsGZ63kkm/Screenshot_28.jpg" alt=""><figcaption></figcaption></figure>

* Within the Hideez Client, select “Mobile Authenticator” as the chosen authentication method.

<figure><img src="https://content.gitbook.com/content/RdTysrljwe610dPFG7tE/blobs/j7dGH85CGae1E4VcuTbF/%D0%97%D0%BD%D1%96%D0%BC%D0%BE%D0%BA%20%D0%B5%D0%BA%D1%80%D0%B0%D0%BD%D0%B0%202023-11-01%20153111.png" alt="" width="375"><figcaption></figcaption></figure>

* Follow the provided steps to complete the configuration for computer login.

{% hint style="warning" %}
**Please note, that for Passwordless PC Authorization Administrator has to configure:**

* [**Configuring an Active Directory Certification Authority**](broken://pages/vX96OUUdft00v3EkCowf)
* [**HES setup for passwordless login**](broken://pages/cqkUyy88MNkg6sFwrhOc)
  {% endhint %}

### **5. Add New Users:**

New users can be added through:

* [**Active Directory (On-Premises, Azure Ad)** ](/hideez-server-integration/microsoft-entra-id/import)
* [**Manually**](/hideez-enterprise-server/employees/how-to-add-an-employee)

Upon receiving an email, users can configure their preferred login methods, such as a mobile application or passkeys.&#x20;

<div><figure><img src="https://content.gitbook.com/content/RdTysrljwe610dPFG7tE/blobs/zbwAiJZ0xNh8PN6oq8Ku/Screenshot_11.jpg" alt="" width="375"><figcaption></figcaption></figure> <figure><img src="https://content.gitbook.com/content/RdTysrljwe610dPFG7tE/blobs/oqFPLvBmGXHgLnJ6Pc5Y/Screenshot_23.jpg" alt="" width="261"><figcaption></figcaption></figure> <figure><img src="https://content.gitbook.com/content/RdTysrljwe610dPFG7tE/blobs/wxscxQKgoV4rbbUaopH5/photo_2023-10-30_02-02-01.jpg" alt="" width="148"><figcaption></figcaption></figure></div>

{% hint style="warning" %}
Please note that in the trial version of the server, you can use a **maximum of 15 users**.
{% endhint %}

Additionally, the Hideez Server assumes that passwordless authentication can be employed alongside other methods

* [**Passkeys** ](/quick-start-guides/guide-for-hideez-enterprise-server-on-cloud/passkeys)allow Passwordless SSO authentication&#x20;
* [**Hardware keys**](/quick-start-guides/guide-for-hideez-enterprise-server-on-cloud/hideez-key) allow Passwordless SSO, PC logon & logoff, password-based authentication


# Hideez Key

Passwordless SSO, PC Logon & Logoff, Password-Based Authentication

### 1. Sign in to your Hideez server using your email and password

Log in to your Hideez Server using your email and password.

{% hint style="info" %}
Note: If you see the message “Your web application is running and waiting for your content,” the server is still initializing. This may take 5–10 minutes. You’ll receive an email confirmation once it’s ready.
{% endhint %}

<figure><img src="https://content.gitbook.com/content/RdTysrljwe610dPFG7tE/blobs/KTpf51g1KlSI4abhe7Dv/unnamed%20(1).jpg" alt="" width="375"><figcaption></figcaption></figure>

### **2. Add Hideez Key to the Server**

* Go to **Hardware Vaults → Add Hardware Vaults**.
* Enter the **serial numbers** of the Hideez Keys (found on the device or packaging)
* Click **Add**.

{% hint style="info" %}
**Tip:** If other users have physical keys, their serial numbers must also be added manually by the administrator.
{% endhint %}

<div><figure><img src="https://content.gitbook.com/content/RdTysrljwe610dPFG7tE/blobs/s32q0fJveToro2GGgbSL/Screenshot_37.jpg" alt="" width="375"><figcaption></figcaption></figure> <figure><img src="https://content.gitbook.com/content/RdTysrljwe610dPFG7tE/blobs/n5MF9ns3OhPqBJENf8DE/Screenshot_7.jpg" alt="" width="312"><figcaption></figcaption></figure> <figure><img src="https://content.gitbook.com/content/RdTysrljwe610dPFG7tE/blobs/k2mENzCRdMa2hTWlTq9Q/IMG_20240124_154042.jpg" alt="" width="375"><figcaption></figcaption></figure></div>

### 3. Configure Passwordless SSO

Hideez Server supports passwordless SSO using **SAML** and **OpenID Connect (OIDC)** protocols.

To configure:

* Go to **Settings → Parameters**.
* Follow the [SAML ](https://enterprise.hideez.com/hideez-enterprise-server/configuring-saml-protocol)or [OIDC](https://enterprise.hideez.com/hideez-enterprise-server/configuration-oidc-openid-connect) setup steps as described in the **User Guide**.

### 4. Configure Login and Logout from PC

* Download and install the Hideez Client ([**.exe**](/product-updates/hideez-client-updates) or .msi for [**x86**](https://update.hideez.com/update/hideezclient/x86/clientsetup.msi)**/**[**x64**](https://update.hideez.com/update/hideezclient/x64/clientsetup.msi)).
* During installation, select the **Enterprise** version.
* Enter your **Hideez Server address** in the client.
* Choose the appropriate **connection type** for your Hideez Key.

<figure><img src="https://content.gitbook.com/content/RdTysrljwe610dPFG7tE/blobs/E0kx24Fw0xsz48BwAwrm/Screenshot_30.jpg" alt=""><figcaption></figcaption></figure>

Once installed:

* The workstation will appear under the **Workstations** section on the server dashboard.
* Go to **Workstations**, select your workstation, and click **Approve**.

<figure><img src="https://content.gitbook.com/content/RdTysrljwe610dPFG7tE/blobs/hEzd3XgemNWtpFDMvY5q/Screenshot_24.jpg" alt="" width="375"><figcaption></figcaption></figure>

<figure><img src="https://content.gitbook.com/content/RdTysrljwe610dPFG7tE/blobs/VKwba6FmDwUUsGZ63kkm/Screenshot_28.jpg" alt=""><figcaption></figcaption></figure>

* Assign the key to the user and copy the **Activation Code**.

<div><figure><img src="https://content.gitbook.com/content/RdTysrljwe610dPFG7tE/blobs/7gLkGqJcpL8pBK0JamgV/Screenshot_9.jpg" alt=""><figcaption></figcaption></figure> <figure><img src="https://content.gitbook.com/content/RdTysrljwe610dPFG7tE/blobs/a43dPnNEq6ZIoOj2AnRc/Screenshot_17.jpg" alt=""><figcaption></figcaption></figure> <figure><img src="https://content.gitbook.com/content/RdTysrljwe610dPFG7tE/blobs/H8e4TqhTRONYwDr2d4G2/Screenshot_19.jpg" alt=""><figcaption></figcaption></figure></div>

* Create a **Windows user account** that will be used to log into the PC.

<div><figure><img src="https://content.gitbook.com/content/RdTysrljwe610dPFG7tE/blobs/BOLt1UGYRE0nRsvvRCLN/Screenshot_20.jpg" alt=""><figcaption></figcaption></figure> <figure><img src="https://content.gitbook.com/content/RdTysrljwe610dPFG7tE/blobs/uzyFeTozI9scjfeZEKkv/Screenshot_24.jpg" alt=""><figcaption></figcaption></figure></div>

**To pair the Hideez Key via Bluetooth:**<br>

* Go to **Start → Settings → Devices → Bluetooth & other devices**, then select your Hideez Key from the list.

<div><figure><img src="https://content.gitbook.com/content/RdTysrljwe610dPFG7tE/blobs/EUI8eRWlqytcm4VS6I7S/Screenshot_32.jpg" alt=""><figcaption></figcaption></figure> <figure><img src="https://content.gitbook.com/content/RdTysrljwe610dPFG7tE/blobs/8rTDoq3FOJdv7A8APgUP/Screenshot_33.jpg" alt=""><figcaption></figcaption></figure> <figure><img src="https://content.gitbook.com/content/RdTysrljwe610dPFG7tE/blobs/tc26XuDH7PfwArNH1JRQ/Screenshot_35.jpg" alt=""><figcaption></figcaption></figure> <figure><img src="https://content.gitbook.com/content/RdTysrljwe610dPFG7tE/blobs/IshwMVHBy4LK6AcMsekE/Screenshot_36.jpg" alt=""><figcaption></figcaption></figure></div>

If using a **Hideez Dongle**:

* Plug it into a USB port and ensure it is selected as the Bluetooth adapter.

<figure><img src="https://1669663611-files.gitbook.io/~/files/v0/b/gitbook-x-prod.appspot.com/o/spaces%2FRdTysrljwe610dPFG7tE%2Fuploads%2Fschg9B6QD8pl1ssdOq8W%2Fimage.png?alt=media&amp;token=6b15fc64-091e-41bc-b421-2b82a391f34d" alt=""><figcaption></figcaption></figure>

* Enter the **Activation Code** in the Hideez Client to activate the key.

<figure><img src="https://content.gitbook.com/content/RdTysrljwe610dPFG7tE/blobs/kXQf7MhZK34OmsgMTXwI/Screenshot_30.jpg" alt="" width="375"><figcaption></figcaption></figure>

To enable **Proximity Login/Logout**:

* Go to **Workstations → Workstation Profiles**, select a profile, and click **Edit**.
* On the **Employees** page, add the workstation to the corresponding employee profile.

<div><figure><img src="https://content.gitbook.com/content/RdTysrljwe610dPFG7tE/blobs/SNu8OHvkeG32LNwSUDdp/Screenshot_38.jpg" alt=""><figcaption></figcaption></figure> <figure><img src="https://content.gitbook.com/content/RdTysrljwe610dPFG7tE/blobs/tsezk3CGdXxdAUxspdRN/Screenshot_39.jpg" alt=""><figcaption></figcaption></figure></div>

{% hint style="info" %}
To enable **Proximity Unlock**, you need to add the workstation for it on the Employee page

&#x20;            <img src="https://content.gitbook.com/content/RdTysrljwe610dPFG7tE/blobs/4DU1BiC0pIKTpXaxAiIr/Screenshot_40.jpg" alt="" data-size="original">
{% endhint %}

### 5. Configure Additional Features (Optional)

You can enable additional features for your Hideez Key:

* [**Password management.**](/hideez-client-app/account-management/account-creation)
* Integration of [**One-Time Passwords (OTP)**](https://enterprise.hideez.com/hideez-client-app/account-management/account-creation#hideez-client-as-a-one-time-password-otp-generator) as an additional authentication factor.

### **6. Add New Users:**

New users can be added via:

* [**Entra ID**](https://enterprise.hideez.com/hideez-server-integration/microsoft-entra-id/import)
* [**Active Directory (On-Premises)**](https://enterprise.hideez.com/hideez-server-integration/active-directory-on-premises/import-and-sync-users-from-active-directory-on-premises)
* [**Manually**](/hideez-enterprise-server/employees/how-to-add-an-employee)

{% hint style="info" %}
**Note:** If users have physical Hideez Keys, their serial numbers must be added [manually](/hideez-enterprise-server/hardware-vaults/how-to-add-hideez-key-into-the-server) by the administrator.
{% endhint %}

Once invited, users will receive an email and can choose their preferred login method:

* [**The mobile Application**](/quick-start-guides/guide-for-hideez-enterprise-server-on-cloud/mobile-app) allows Passwordless SSO and PC login.
* [**Passkeys** ](/quick-start-guides/guide-for-hideez-enterprise-server-on-cloud/passkeys)allow Passwordless SSO.

<div><figure><img src="https://content.gitbook.com/content/RdTysrljwe610dPFG7tE/blobs/pzpkFZF5EztYASON7Upd/Screenshot_11.jpg" alt="" width="375"><figcaption></figcaption></figure> <figure><img src="https://content.gitbook.com/content/RdTysrljwe610dPFG7tE/blobs/wagTSJiD0sXCrhsmiST7/image.png" alt="" width="266"><figcaption></figcaption></figure> <figure><img src="https://content.gitbook.com/content/RdTysrljwe610dPFG7tE/blobs/eF8QjiwNYl1ocaZmEVMo/Screenshot_10.jpg" alt="" width="358"><figcaption></figcaption></figure></div>

{% hint style="warning" %}
**Please note:** The trial version of the server supports up to **4 users**.\
Hideez Server allows passwordless authentication to be used alongside other authentication methods.
{% endhint %}


# Hideez Authenticator Mobile App

Use cases - Hideez Authenticator Mobile App

{% hint style="info" %}
**The application also supports multi-accounts, allowing you to add multiple accounts for users registered on the Hideez Enterprise Server within a single domain, as well as accounts from different Hideez servers in various domains. This is particularly convenient if you have multiple Hideez servers or multiple accounts on one server. This means you can also unlock workstations connected to different servers.**
{% endhint %}


# Passwordless PC login

Hideez Authenticator App Use Cases - Passwordless PC login

{% hint style="info" %}
The Hideez Authenticator app supports **multi-accounts**, allowing you to manage multiple user accounts registered on Hideez Enterprise Server (HES) within a single domain, or from different Hideez servers in various domains. This is particularly useful if you manage multiple servers or have multiple accounts on one server. It also allows unlocking workstations connected to different servers.
{% endhint %}

### Prerequisites

Before setting up passwordless PC login with the Hideez Authenticator, make sure that:

* The **enterprise version of the Hideez Client** is installed on your PC.
* The PC is **connected to Hideez Enterprise Server (HES)**.
* The **workstation is approved** by the administrator.
* You are signed in to a domain account using **Active Directory (on-prem) or Entra ID**.
* Your workstation has a **TPM 2.0 module**.
* You have the **Hideez Authenticator app** installed on your iOS or Android smartphone.

{% hint style="info" %}
&#x20;Passwordless login is supported for both **Active Directory (on-prem)** and **Entra ID** accounts.
{% endhint %}

### **Step 1: Enroll the Software Key in Hideez Client**

Before you can use the Hideez Authenticator for passwordless PC login, the enterprise version of the [**Hideez Client**](https://update.hideez.com/update/hideezclient/clientsetup.exe) must be installed on your computer.

Ensure that:

1. **Client Connection**:
   * [The client is connected to Hideez Server](/hideez-client-app/application-interface/general-settings), [and the workstation is approved.](/hideez-enterprise-server/workstations/workstations-management)
   * You are signed into an Active Directory or Entra ID domain account.
   * The workstation has a **TPM 2.0 module** installed.

2. **Setup Passwordless Authenticator**:

   * Navigate to the **Mobile Authenticator** section and click the **"Setup"** button under the **Passwordless Authenticator** subsection.

   <figure><img src="https://1669663611-files.gitbook.io/~/files/v0/b/gitbook-x-prod.appspot.com/o/spaces%2FRdTysrljwe610dPFG7tE%2Fuploads%2FORgNrD9zsKQaT2N4Ju7z%2Fimage.png?alt=media&amp;token=657ae5d6-f86b-48b3-b620-1650af9e31df" alt="" width="563"><figcaption></figcaption></figure>

3. **Scan QR Code**:
   * Open the **Scanner** section in the Hideez Authenticator app and scan the QR code displayed on the Hideez Client.

{% hint style="info" %}
Alternatively, you can open the scanner by going to **Accounts > Workstation** in the app. The scanner will look like this:
{% endhint %}

4. **Confirm Enrollment**:

* Confirm the enrollment on the Hideez Authenticator app.

<div><figure><img src="https://1669663611-files.gitbook.io/~/files/v0/b/gitbook-x-prod.appspot.com/o/spaces%2FRdTysrljwe610dPFG7tE%2Fuploads%2FLG0S5in7yh2iyyiiuRST%2Fimage.png?alt=media&amp;token=84f1a17e-ad34-44c0-8f75-a62c79f35ef0" alt="" width="205"><figcaption></figcaption></figure> <figure><img src="https://1669663611-files.gitbook.io/~/files/v0/b/gitbook-x-prod.appspot.com/o/spaces%2FRdTysrljwe610dPFG7tE%2Fuploads%2FTXAEiLdkJ33kEOjPb06z%2Fimage.png?alt=media&amp;token=435379be-7cb3-42c1-b4a6-d0aad4487505" alt="" width="205"><figcaption></figcaption></figure></div>

5. **Enrollment Complete**:

* The enrollment process will begin, and once completed, you are ready to use passwordless login.

<figure><img src="https://1669663611-files.gitbook.io/~/files/v0/b/gitbook-x-prod.appspot.com/o/spaces%2FRdTysrljwe610dPFG7tE%2Fuploads%2Ffggyt44Mkpd8ku1AUkZF%2Fimage.png?alt=media&amp;token=08e7955c-6eaf-4bd2-a8a0-025af6e9a48d" alt="" width="563"><figcaption></figcaption></figure>

{% hint style="info" %}
**Note**: If the validity period of the certificate for passwordless enrollment expires, you can follow the guide on re-enrolling Hideez Authenticator. More details can be found for passwordless PC unlock for **iOS** or **Android**.
{% endhint %}

### **Step 2: Login with Hideez Authenticator**

1. **Select Hideez Key User**:

   * At the lock screen of the PC, choose the **"Hideez Key"** user.

   <figure><img src="https://1669663611-files.gitbook.io/~/files/v0/b/gitbook-x-prod.appspot.com/o/spaces%2FRdTysrljwe610dPFG7tE%2Fuploads%2FdmnnWO4SbT79So1sIew3%2Fimage.png?alt=media&amp;token=a645b741-c4be-4046-82cf-52e542da24ba" alt="" width="563"><figcaption></figcaption></figure>
2. **Scan QR Code**:
   * Open the **Hideez Authenticator** app on your smartphone and scan the QR code displayed on the lock screen.
3. **Confirm Login**:

   * Confirm the login request on the Hideez Authenticator.
   * The workstation name and account name will be displayed for verification.

   <figure><img src="https://1669663611-files.gitbook.io/~/files/v0/b/gitbook-x-prod.appspot.com/o/spaces%2FRdTysrljwe610dPFG7tE%2Fuploads%2FRBnZHayiNjIlt1mBuxxj%2Fimage.png?alt=media&amp;token=e0ddb4bc-3402-4f78-9579-5d20287bf03e" alt="" width="256"><figcaption></figcaption></figure>

{% hint style="info" %}
**Note**: Some devices allow you to scan the QR code directly from the smartphone camera, which will redirect you to the Hideez Authenticator app automatically.
{% endhint %}

### **Offline Login**

In case you have no internet connection, refer to the specific guide on [logging in without internet access.](/hideez-authenticator-app/user-guide/login-with-hideez-authenticator/pc-login/offline-passwordless-login)


# Password-based PC login

### Step 1: Enroll the software key in the Hideez Client

1. [An enterprise version](https://update.hideez.com/update/hideezclient/clientsetup.exe) of the client must be installed on the computer. Ensure that:
   * [The Client is connected to the HES](/hideez-client-app/application-interface/general-settings), [workstation is approved](/hideez-enterprise-server/workstations/workstations-management).
2. Input HES address at the Settings section.\
   \
   ![](https://content.gitbook.com/content/RdTysrljwe610dPFG7tE/blobs/kPL9xY7KHS3UnZvFtsCn/image.png)<br>
3. Go to the Mobile Authenticator section and click "Setup" button under the Password-based Authenticator subsection.\
   \
   ![](https://content.gitbook.com/content/RdTysrljwe610dPFG7tE/blobs/jwzaM013iPpUb52kNB7O/image.png)<br>
4. Open Scanner section at the Hideez Authenticator and scan the QR code from Hideez Client.\
   \
   ![](https://content.gitbook.com/content/RdTysrljwe610dPFG7tE/blobs/GxqzGJwgUTbZyFrhFcSg/image.png)\
   \
   Also you can open this scanner from the "Profile > Workstation" section.\
   \
   ![](https://content.gitbook.com/content/RdTysrljwe610dPFG7tE/blobs/JuYg8t4mjoDQ3sMgKwwN/image.png)\
   \
   In this case scanner will look like this:\
   \
   ![](https://content.gitbook.com/content/RdTysrljwe610dPFG7tE/blobs/fEuoc6J5WJUqLMRAhpzd/image.png)\
   \
   ![](https://content.gitbook.com/content/RdTysrljwe610dPFG7tE/blobs/E7h4D9dJ2R1BuCqouvWJ/image.png)<br>
5. Confirm enrollment on Hideez Authenticator. Select account type (Local/Domain/Microsoft/AzureAD) and fill in all the fields. Then tap the "Save" button.\
   \
   ![](https://content.gitbook.com/content/RdTysrljwe610dPFG7tE/blobs/Zdg5XirMwwie4pOidhsK/image.png) ![](https://content.gitbook.com/content/RdTysrljwe610dPFG7tE/blobs/FC0nMoa3f7qJd1MJr8Co/image.png)\
   \
   ![](https://content.gitbook.com/content/RdTysrljwe610dPFG7tE/blobs/CITYTusU4mhDDzV16Z1X/image.png) ![](https://content.gitbook.com/content/RdTysrljwe610dPFG7tE/blobs/jz1b4i1tmDgGByvgi4P7/image.png)

In [this](/hideez-authenticator-app/user-guide/software-key-enrollment/pc-authorization-enrollment/enrollment-for-password-based-pc-authorization/account-roaming) article you can find the guide on how to use one password-based unlock account for any PC.

You can find more on enrollment for password-based PC unlock - [*iOS*](https://authenticator.hideez.com/user-guide/ios-guide/software-key-enrollment/pc-authorization-enrollment/enrollment-for-password-based-pc-authorization), [*Android*](https://authenticator.hideez.com/user-guide/android-guide/software-key-enrollment/pc-authorization-enrollment/enrollment-for-password-based-pc-authorization).

### Step 2: Login with Hideez Authenticator

1. Assure that in the Hideez Client settings in the "General" section "Always show authorization QR on logon screen" parameter is enabled.\
   \
   ![](https://content.gitbook.com/content/RdTysrljwe610dPFG7tE/blobs/LkQ05HhVgRPTQgua6FyH/image.png)<br>
2. Choose the "Hideez Key" user at the lock screen.\
   \
   ![](https://content.gitbook.com/content/RdTysrljwe610dPFG7tE/blobs/V5id3KJ0Y9f2qgl7AW5g/image.png)<br>
3. Open Hideez Authenticator App and scan the QR code from the lock screen.\
   \
   ![](https://content.gitbook.com/content/RdTysrljwe610dPFG7tE/blobs/n7Gvdh2TiilCSV6NQL9u/image.png)\
   \
   ![](https://content.gitbook.com/content/RdTysrljwe610dPFG7tE/blobs/Ew7yaWPZ7YmGQx8CXudY/image.png)<br>
4. Confirm the login at the Hideez Authenticator.\
   1 - workstation name, 2 - account name.\
   \
   ![](https://content.gitbook.com/content/RdTysrljwe610dPFG7tE/blobs/gnQBeVv4jocVYKRGMake/image.png)

{% hint style="success" %}
Also, for some devices it is possible to scan the code directly from the smartphone camera, this will redirect you to Hideez Authenticator.
{% endhint %}


# SSO login to Webservises (FIDO2) via mobile app

{% hint style="info" %}
The Hideez Authenticator app supports **multi-accounts**, allowing you to manage multiple user accounts registered on the Hideez Enterprise Server (HES) within a single domain, as well as accounts from different Hideez servers across various domains. This is especially useful if you have multiple servers or multiple accounts on one server. Additionally, you can unlock workstations connected to different servers using the same app.
{% endhint %}

#### **Step 1: Enroll the Software Key on HES**

1. **Check Your Email**:

   * Open the email from HES in your inbox.
   * Follow the link provided in the email.

   <figure><img src="https://content.gitbook.com/content/RdTysrljwe610dPFG7tE/blobs/iFPTKLAWraAzNARSyIjo/image.png" alt="" width="375"><figcaption></figcaption></figure>

2. **Initiate Enrollment**:

   * Click the **"Use Hideez Authenticator"** button.

   <figure><img src="https://content.gitbook.com/content/RdTysrljwe610dPFG7tE/blobs/SSJHyRDCBYzn1GiWMO1R/image.png" alt="" width="375"><figcaption></figcaption></figure>

   * Optionally, you can change the display language here.

3. **Download the App**:

   * Download the **Hideez Authenticator** for your operating system from either Google Play or the App Store using the provided links.

4. **Scan the QR Code**:
   * Open the **Hideez Authenticator** app on your phone.
   * Scan the QR code displayed on the HES interface.

5. **Confirm Enrollment**:
   * Confirm the Single Sign-On (SSO) enrollment on the **Hideez Authenticator** app.

{% hint style="info" %}
**Note**: If you have already registered a security key for SSO, follow the specific registration guides for [iOS](https://authenticator.hideez.com/user-guide/ios-guide/software-key-enrollment/sso-enrollment/sso-enrollment-user-account#if-you-already-registered-security-key-for-sso-you-can-register-mobile-app-following-this-steps) or [Android](https://authenticator.hideez.com/user-guide/android-guide/software-key-enrollment/sso-enrollment/sso-enrollment-user-account#if-you-already-registered-security-key-for-sso-you-can-register-mobile-app-following-this-steps) to add the mobile app.
{% endhint %}

#### **Step 2: Sign in with Hideez Authenticator**

1. **Start Login Process**:
   * On the web browser, click the **"Sign in with a Hideez Authenticator App"** button.
2. **Scan the QR Code**:
   * Open the **Hideez Authenticator** app.
   * Scan the QR code displayed in the browser.
3. **Confirm Login**:

   * Confirm the login request on the **Hideez Authenticator** app.

   <figure><img src="https://content.gitbook.com/content/RdTysrljwe610dPFG7tE/blobs/o6Ff5NyfQIadyVl7XCS4/image.png" alt="" width="188"><figcaption></figcaption></figure>

{% hint style="info" %}
**Note**: Some devices allow you to scan the code directly with the smartphone camera, which will redirect you to the **Hideez Authenticator** app.
{% endhint %}


# Using Hideez Authenticator as your passwordless authentication method for SSO

### Step 1: Enroll the software key on HES

To use Hideez Authenticator first you need to enroll the mobile app on Hideez Enterprise Server (HES). To do this, follow simple steps:

1. Open your HES and go to the "Profile" section.\
   \
   ![](https://content.gitbook.com/content/RdTysrljwe610dPFG7tE/blobs/OcVgOzn5K3AqXbbVh55q/image.png)\
   \
   ![](https://content.gitbook.com/content/RdTysrljwe610dPFG7tE/blobs/kR2k6nWrk2k7V2KjioyG/image.png)<br>
2. Go to the "Mobile App" section and click the "Register Hideez Authenticator" button.\
   \
   ![](https://content.gitbook.com/content/RdTysrljwe610dPFG7tE/blobs/gnn8P3hosZ6GFTLrfrtj/image.png)\
   \
   Here you can download Hideez Authenticator for your OS from Google Play or App Store via corresponding links.\
   \
   ![](https://content.gitbook.com/content/RdTysrljwe610dPFG7tE/blobs/VeisAudIFEHt2TrYM96x/image.png)<br>
3. Open Hideez Authenticator and scan the QR code on HES.\
   \
   ![](https://content.gitbook.com/content/RdTysrljwe610dPFG7tE/blobs/Fo1J9ySwL7GY8443hZn7/image.png)<br>
4. Confirm SSO enrollment on Hideez Authenticator.\
   \
   ![](https://content.gitbook.com/content/RdTysrljwe610dPFG7tE/blobs/hEwU1SG0Vo9tj4gShMkw/image.png)<br>
5. That is all set. Now you can login on HES with the Hideez Authenticator.\
   \
   ![](https://content.gitbook.com/content/RdTysrljwe610dPFG7tE/blobs/PJPrLjzJRuANmq0jR04M/image.png)

### Step 2: Sign in with Hideez Authenticator

1. Click at the web browser the "Sign in with a Hideez Authenticator App" button.\
   \
   ![](https://content.gitbook.com/content/RdTysrljwe610dPFG7tE/blobs/8NwUFNNnDXPdi3N4UcJp/image.png)<br>
2. Open Hideez Authenticator App and scan the QR code.\
   \
   ![](https://content.gitbook.com/content/RdTysrljwe610dPFG7tE/blobs/E15WUq6ZtuS7LDPxz6Ge/image.png)\
   \
   ![](https://content.gitbook.com/content/RdTysrljwe610dPFG7tE/blobs/OkPAUuOS4rQrZM3a82C3/image.png)<br>
3. Confirm the login at the Hideez Authenticator.\
   \
   ![](https://content.gitbook.com/content/RdTysrljwe610dPFG7tE/blobs/RPjTbyJZmuFawF3L7U8D/image.png)

{% hint style="success" %}
Also, for some devices it is possible to scan the code directly from the smartphone camera, this will redirect you to Hideez Authenticator.
{% endhint %}


# Using Hideez Authenticator as your two-factor authentication method for SSO

### Step 1: Enroll the software key on HES

1. Open the email from the HES in your mailbox and follow the link in it.<br>

   ![](https://content.gitbook.com/content/RdTysrljwe610dPFG7tE/blobs/JRlSVzNiDWp5qk4KrPQE/image.png)<br>
2. Follow the screen guide and set the password. Also here you can change the display language.\
   \
   ![](https://content.gitbook.com/content/RdTysrljwe610dPFG7tE/blobs/HuCW4aSeVWvRiZJM8Kz8/image.png)\
   \
   ![](https://content.gitbook.com/content/RdTysrljwe610dPFG7tE/blobs/RgWZzZfjI3KSIGTjQ54x/image.png)<br>
3. Then click the "Use Hideez Authenticator" button.\
   \
   ![](https://content.gitbook.com/content/RdTysrljwe610dPFG7tE/blobs/PdpaDzQApPkoQMxA6seW/image.png)<br>
4. Here you can download Hideez Authenticator for your OS from Google Play or App Store via corresponding links.\
   \
   ![](https://content.gitbook.com/content/RdTysrljwe610dPFG7tE/blobs/sBNHT4Y3vLcklOJDqowB/image.png)<br>
5. Open Hideez Authenticator and scan the QR code on HES.\
   \
   ![](https://content.gitbook.com/content/RdTysrljwe610dPFG7tE/blobs/twOGPFLdq18W1LbEcYOH/image.png)<br>
6. Confirm SSO enrollment on Hideez Authenticator.\
   \
   ![](https://content.gitbook.com/content/RdTysrljwe610dPFG7tE/blobs/o6Ff5NyfQIadyVl7XCS4/image.png)

### Step 2: Sign in with Hideez Authenticator

1. Type your email and click the "Next" button.\
   \
   ![](https://content.gitbook.com/content/RdTysrljwe610dPFG7tE/blobs/9DDI9QAQVYpUH3lMPsok/image.png)<br>
2. Type your password and click the "Next" button.\
   \
   ![](https://content.gitbook.com/content/RdTysrljwe610dPFG7tE/blobs/uqqetHo11avQqhHvYs61/image.png)<br>
3. Click the "Hideez Authenticator App" button.\
   \
   ![](https://content.gitbook.com/content/RdTysrljwe610dPFG7tE/blobs/Lr71wVQRjoypRS26RU2T/image.png)<br>
4. Open Hideez Authenticator App and scan the QR code.\
   \
   ![](https://content.gitbook.com/content/RdTysrljwe610dPFG7tE/blobs/dgpzG2WEyWJvDCiD3JDN/image.png)\
   \
   ![](https://content.gitbook.com/content/RdTysrljwe610dPFG7tE/blobs/yt457HOK9WNEQ6rjDsqF/image.png)<br>
5. Confirm the login at the Hideez Authenticator.\
   \
   ![](https://content.gitbook.com/content/RdTysrljwe610dPFG7tE/blobs/0z9TE9vtDKQm3k1AaY5L/image.png)

{% hint style="success" %}
Also, for some devices it is possible to scan the code directly from the smartphone camera, this will redirect you to Hideez Authenticator.
{% endhint %}


# Using Hideez Authenticator as your two-factor authentication method for SSO

### Step 1: Enroll the software key on HES

To use Hideez Authenticator first you need to enroll the mobile app on Hideez Enterprise Server (HES). To do this, follow simple steps:

1. Open your HES and go to the "Profile" section.\
   \
   ![](https://content.gitbook.com/content/RdTysrljwe610dPFG7tE/blobs/OcVgOzn5K3AqXbbVh55q/image.png)\
   \
   ![](https://content.gitbook.com/content/RdTysrljwe610dPFG7tE/blobs/kR2k6nWrk2k7V2KjioyG/image.png)<br>
2. Go to the "Mobile App" section and click the "Register Hideez Authenticator" button.\
   \
   ![](https://content.gitbook.com/content/RdTysrljwe610dPFG7tE/blobs/6cq9GqF2mOVBL96BAZHn/image.png)\
   \
   Here you can download Hideez Authenticator for your OS from Google Play or App Store via corresponding links.\
   \
   ![](https://content.gitbook.com/content/RdTysrljwe610dPFG7tE/blobs/FpAM1Z87mbUmBtg8woS1/image.png)<br>
3. Open Hideez Authenticator and scan the QR code on HES.\
   \
   ![](https://content.gitbook.com/content/RdTysrljwe610dPFG7tE/blobs/Fo1J9ySwL7GY8443hZn7/image.png)<br>
4. Confirm SSO enrollment on Hideez Authenticator.\
   \
   ![](https://content.gitbook.com/content/RdTysrljwe610dPFG7tE/blobs/hEwU1SG0Vo9tj4gShMkw/image.png)<br>
5. That is all set. Now you can login on HES with the Hideez Authenticator.\
   \
   ![](https://content.gitbook.com/content/RdTysrljwe610dPFG7tE/blobs/fn2y1AZ4ywvobtcwIqdG/image.png)

### Step 2: Sign in with Hideez Authenticator

1. Type your email and click the "Next" button.\
   \
   ![](https://content.gitbook.com/content/RdTysrljwe610dPFG7tE/blobs/9DDI9QAQVYpUH3lMPsok/image.png)<br>
2. Type your password and click the "Next" button.\
   \
   ![](https://content.gitbook.com/content/RdTysrljwe610dPFG7tE/blobs/uqqetHo11avQqhHvYs61/image.png)<br>
3. Click the "Hideez Authenticator App" button.\
   \
   ![](https://content.gitbook.com/content/RdTysrljwe610dPFG7tE/blobs/Lr71wVQRjoypRS26RU2T/image.png)<br>
4. Open Hideez Authenticator App and scan the QR code.\
   \
   ![](https://content.gitbook.com/content/RdTysrljwe610dPFG7tE/blobs/dgpzG2WEyWJvDCiD3JDN/image.png)\
   \
   ![](https://content.gitbook.com/content/RdTysrljwe610dPFG7tE/blobs/yt457HOK9WNEQ6rjDsqF/image.png)<br>
5. Confirm the login at the Hideez Authenticator.\
   \
   ![](https://content.gitbook.com/content/RdTysrljwe610dPFG7tE/blobs/0z9TE9vtDKQm3k1AaY5L/image.png)

{% hint style="success" %}
Also, for some devices it is possible to scan the code directly from the smartphone camera, this will redirect you to Hideez Authenticator.
{% endhint %}


# SSO Between Windows User Account with Hideez Authenticator app and Office 365

## Use Case:

A user logs into a Windows 10/11 workstation using their Entra ID or Active Directory (AD) account via a QR code and the Hideez Authenticator mobile application (Android or iOS). The user then accesses Outlook on the web through Microsoft Edge and is automatically signed in to their mailbox without needing to re-authenticate.

Note: If the Office 365 login policy requires Multi-Factor Authentication (MFA), a second factor will still be prompted.

## Prerequisites

* Windows 10/11 workstation with Secure Boot and TPM 2.0 enabled
* Workstation joined to the AD domain (for a hybrid scenario)
* If joined to an AD domain, hybrid identity with Entra ID must be properly configured

## Configuration Steps

### 1. Workstation Joined to Entra ID

1. &#x20; Create a user account in Entra ID
2. Register the workstation with the Entra ID account:
   1. On the workstation, go to **Settings → Accounts → Access work or school**<br>

<figure><img src="https://lh7-rt.googleusercontent.com/docsz/AD_4nXdxx-I7Yvn1SiV_zQsetVKlVZwWtUE47IJ9qWW3vqEXanYjQL7KKHby5iLuJTCFBlJ0kqaaeDJQskUd6oWTXHJ0Mtr4unyNGOO_0SouqlUN277y7qkQXpoBrVWdejNzOOH9ViL_-fHGQRCKXcKrI5w?key=QU2iF3nmbgM2sAWJ_h6uCg" alt="" width="563"><figcaption></figcaption></figure>

&#x20;b. Click the plus (+) button and enter the Entra ID account credentials<br>

<figure><img src="https://lh7-rt.googleusercontent.com/docsz/AD_4nXcDLiDSkL1zsNqPK-siZvcYaNzTmuScDvpWohqTb4I-7DsuYunoRWBgtDIdrHQ_FZJKmxJ5dv1ik9aeON7Ik8euBjtG7xO7Xg5O43VJTHmF0TCsdg9MXeSpz8Yb_uHYysRGBb8lT6In18BtwtUGJVE?key=QU2iF3nmbgM2sAWJ_h6uCg" alt="" width="375"><figcaption></figcaption></figure>

c. Restart the workstation and log in using the Entra ID account

d. Open Microsoft Edge and test SSO with Office 365

e. Set up the Hideez Client to allow login via QR code under the Entra ID account<br>

<figure><img src="https://lh7-rt.googleusercontent.com/docsz/AD_4nXdXw2VsotX61viDZqzVgJZRcWlezXF68h72GoQ-PJ6Ulmr7uFXfFtg92SXoHBYcJcoRnxzHP--ZGSe79JdEa5F1xScYc9K0Uw5vRQbyZduLkWPLjKXSYCRc6NHxqkrAb0-2LpSu4q62GneC81lDNP0?key=QU2iF3nmbgM2sAWJ_h6uCg" alt="" width="563"><figcaption></figcaption></figure>

f. Re-test Office 365 SSO in Microsoft Edge

### 2. Workstation Joined to Active Directory (AD)

#### a. Configure hybrid identity with Entra Connect:

* Deploy Entra Connect Sync on the domain controller
* Set up synchronization of users and groups

#### b. Enable device synchronization in Entra Connect Sync<br>

<figure><img src="https://lh7-rt.googleusercontent.com/docsz/AD_4nXeXOPe005ITRXDcNI6qhzOYLZ_eyzyGzFRpZxQpHyJvTOJmRLZ09dR2n2ydRntlqhHOwSauHC31X2R9_eb7aUpCfKE7cGoZQpu4CMeSLpd-N6vHpB-6j78FZvBO84MvpyOvtcrONV9JR5KFyGNDNsY?key=QU2iF3nmbgM2sAWJ_h6uCg" alt="" width="563"><figcaption></figcaption></figure>

<figure><img src="https://lh7-rt.googleusercontent.com/docsz/AD_4nXcEn4rp8TZXYiSmaEkqHQ1Ne85Pmo9y0U92EiJBNCu4mWw93AJ-gsPPjgKOjx7aKFcLwr0U1gmnRFsgsGiBPXhuFbR8_3Vf5zD_7G-JN2c1rGuYaBH12D1EniunImiXO3MzBp1EL6qjuLOVKPYWYL8?key=QU2iF3nmbgM2sAWJ_h6uCg" alt="" width="563"><figcaption></figcaption></figure>

<figure><img src="https://lh7-rt.googleusercontent.com/docsz/AD_4nXfVq83kDyMpzEMhImGuLfYBTZCuGrYbBqnydToXh1gzTGmGaziw24zdwuer5IAMk7OwqofRSGE5_gwX75JTXIW8okv--YUbaqHQn2swSlXOni220UU54c67j5cIgC8EC9hPLxu6Nw6bMtH3fX2rAsc?key=QU2iF3nmbgM2sAWJ_h6uCg" alt="" width="563"><figcaption></figcaption></figure>

<figure><img src="https://lh7-rt.googleusercontent.com/docsz/AD_4nXf9O707rFS6IeHchw4ZRfLBCr4QTBaxiEwr6Rmqz1W05z6747HDrTS94saxi5f-yuBEkxtbYo_v_PMX-AzdOh_cuyi0Au_H30Z91lku3m5jWKczAiS-QL-ZEhpdXpTs-OdRqw033hI0-UVimabv0S4?key=QU2iF3nmbgM2sAWJ_h6uCg" alt="" width="563"><figcaption></figcaption></figure>

<figure><img src="https://lh7-rt.googleusercontent.com/docsz/AD_4nXdjRkh4ZRgJLmZ9FXVNsbjn9tAJh-oOpeSi3zB67xbZU1MI9kCqiFtXjZzopIRpWp1ypLhv5e1nNUPP0iXrupJuzI5GPQZ-8i-2xUxTgQmH2_I7pDnuoeKWih3V6WaO1OHDRKPIDlmguaTKI733Le4?key=QU2iF3nmbgM2sAWJ_h6uCg" alt="" width="563"><figcaption></figcaption></figure>

Check in the **Microsoft Entra admin center** status of “Seamless single sign-on”  is “**Enabled**”

<figure><img src="https://lh7-rt.googleusercontent.com/docsz/AD_4nXebEH797W1_0P9_1vGvR0HrBcnpxe2REyAQeBha92QpS-4aplkBnRNd6zb9PF-Ojx8UzXHi8MYGbbBe-sh6La5AzjxRPvV-5uyrMGfmNXmtF3V-rBSVh1EGGloIpp5n-lBcDd6JDH1YWOyF6HgZVVA?key=QU2iF3nmbgM2sAWJ_h6uCg" alt=""><figcaption></figcaption></figure>

#### c. Set Group Policy on the workstation to enable automatic device registration with Entra ID.

Run **Local Group Policy Editor** and navigate to **Computer Configuration > Administrative Templates > Windows Components > Device Registration**

<figure><img src="https://lh7-rt.googleusercontent.com/docsz/AD_4nXetGjRSdi6aBmQlWpgVDliURtDSy-60FKeZjlfmNokXkxmbefUABQ2QglILvO7fpLAFMh9SQZSAEfwysTpDHQqBb4CpUvaun-HFxYvWTo2wIGRq67X_l_5ldUXm9kMglnvq4a-cUBWST1ADWXNmpjM?key=QU2iF3nmbgM2sAWJ_h6uCg" alt=""><figcaption></figcaption></figure>

{% hint style="info" %}
**Note:** Device registration may take time or fail due to various issues. Troubleshooting may require log analysis and use of the following commands:

* dsregcmd /status - Look for AzureAdJoined to be set to YES
* dsregcmd /debug /leave
  {% endhint %}

Entra ID device registration is essential for SSO. Issues with TPM or Secure Boot can prevent successful registration also. Manual registration is also possible (refer to Step 1b).\
It’s also possible to check the device registration in the appropriate user profile in Entra ID.\
&#x20;

<figure><img src="https://lh7-rt.googleusercontent.com/docsz/AD_4nXcD6Bs7CTXGp1VQuE1SiJNLU3IEIxkyGHhNM5qfUtY_Gqa_LFSWfLvzef_HfZgaKg2Vsris3i1bHeJNBlD0DPwOR8zt_RCp0veoyOXCIwLOqDsvP-nnZ7fY4u1cMfPkB1jizo2dxfeEM1I96flJ4XM?key=QU2iF3nmbgM2sAWJ_h6uCg" alt=""><figcaption></figcaption></figure>

#### d. Disable MFA for the Entra ID account (if seamless login is required without a second factor)

<figure><img src="https://lh7-rt.googleusercontent.com/docsz/AD_4nXd9qPy7upRcwYOBuIsG0u2YVeNyUa5OGUYyPB8vO_q6sR_YCpoKTSdQroyy2wk13OeWH-V9LengJk6UtMz837TcAmpXVjbeu_bsC3yx6m-NLXtMm5d6O_k6NWaUhW2YpIQCcfRlTRLjZ-JwBCfvIg?key=QU2iF3nmbgM2sAWJ_h6uCg" alt=""><figcaption></figcaption></figure>

#### e. Test Office 365 SSO in Microsoft Edge


# OTP generation by Hideez Authenticator App for 2FA

Hideez Authenticator allows user to generate One-Time Passwords for [Two-Factor Authentication](https://fidoalliance.org/specs/u2f-specs-master/fido-u2f-overview.html) mechanism.

To use OTP generation feature first you have to [enroll your Hideez Authenticator on HES](/use-cases/hideez-authenticator-mobile-app/using-hideez-authenticator-as-your-two-factor-authentication-method-for-sso).

## Set up two-factor authentication for your Gmail account

### Step 1: Enable two-factor authentication according to [Google’s instructions](https://support.google.com/accounts/answer/1066447?hl=en\&co=GENIE.Platform%3DAndroid\&oco=0).&#x20;

### Step 2: Open a secret key to generate OTP passwords in the account data.

To do this, go to account editing mode and&#x20;

**OR**&#x20;

when setting up Google Authenticator, click **CAN'T SCAN IT?**\
&#x20;&#x20;

![](https://content.gitbook.com/content/RdTysrljwe610dPFG7tE/blobs/QRk1MUQCEYLwenvs1cI4/5.jpg)

<figure><img src="https://content.gitbook.com/content/RdTysrljwe610dPFG7tE/blobs/qOevRhfANg2JYFn1Mq1y/image.png" alt=""><figcaption></figcaption></figure>

### Step 3: Add OTP account

You can add an OTP secret either by scanning a QR code or manually.

1. Open the "Accounts" section.\
   \
   ![](https://content.gitbook.com/content/RdTysrljwe610dPFG7tE/blobs/SLtNwgttxxlxEEXS4SDm/image.png)<br>
2. Tap the "+" button.\
   \
   ![](https://content.gitbook.com/content/RdTysrljwe610dPFG7tE/blobs/pRipiM5RFR1cN2O4fH7l/image.png)<br>
3. Then you can either scan QR code from the Google account settings or enter it manually:<br>
   * Scan a QR code:\
     \
     ![](https://content.gitbook.com/content/RdTysrljwe610dPFG7tE/blobs/mCtt922URKef7iz4RYY1/image.png)<br>
   * Tap "Add manually" button:\
     \
     ![](https://content.gitbook.com/content/RdTysrljwe610dPFG7tE/blobs/SJ0akGJ7EQHmhhSRTex3/image.png)\
     \
     Type the account name and secret key in the corresponding fields.\
     \
     ![](https://content.gitbook.com/content/RdTysrljwe610dPFG7tE/blobs/14s0zrMz1v4Zi7b0LzXk/image.png)\
     \
     You also can provide advanced parameters such as a OTP length, Hash Algorithm and valid period. Just switch the "Advanced options" trigger to set them up.\
     \
     ![](https://content.gitbook.com/content/RdTysrljwe610dPFG7tE/blobs/xM0lk3fIrTVcOdMvKG8d/image.png) ![](https://content.gitbook.com/content/RdTysrljwe610dPFG7tE/blobs/JlGU1MrCPuJ9lGUcB4wK/image.png)\
     \
     Tap the "Add" button.\
     \
     ![](https://content.gitbook.com/content/RdTysrljwe610dPFG7tE/blobs/wyKyPHsrAz498DFVoy8u/image.png)

### Step 4: Confirm OTP in your Google account

1. Then click on the **Next** button. Enter OTP that is displayed in Hideez Authenticator, "Accounts" section.\
   \
   ![](https://content.gitbook.com/content/RdTysrljwe610dPFG7tE/blobs/KsxwEnPuTaNfNcJLo46P/image.png) ![](https://content.gitbook.com/content/RdTysrljwe610dPFG7tE/blobs/WuSnPdNyAejsRgH8dO9n/image.png)<br>
2. Click **Verify**.\
   \
   ![](https://content.gitbook.com/content/RdTysrljwe610dPFG7tE/blobs/5Ck2s39ULJf2HHAjS3H7/image.png)

## Sign in to your Gmail account with two-factor authentication

### Step 1: Visit the <https://mail.google.com/> account login page

### Step 2: Enter your credentials (login and password)

### Step 3: Choose Google Authenticator app second-factor authentication method

Indicate whether you want to always pass two-factor authentication on this computer or not - clear or leave the checkbox **Don’t ask again on this computer** and also select **Try another way** and **Get a verification code from the Google Authenticator App:**

<figure><img src="https://content.gitbook.com/content/RdTysrljwe610dPFG7tE/blobs/BX2zO95Q99wsLaDHirlA/image.png" alt=""><figcaption></figcaption></figure>

<figure><img src="https://content.gitbook.com/content/RdTysrljwe610dPFG7tE/blobs/iPEYikcIY08Tipx9uxwc/image.png" alt=""><figcaption></figcaption></figure>

### **Step 4: Enter OTP code**

Enter OTP that is displayed in Hideez Authenticator, "Accounts" section and click the **Next** button.\
\
![](https://content.gitbook.com/content/RdTysrljwe610dPFG7tE/blobs/KsxwEnPuTaNfNcJLo46P/image.png) ![](https://content.gitbook.com/content/RdTysrljwe610dPFG7tE/blobs/fxMEhVNGy1wjg7KF46aJ/image.png)

You can find more on OTP generation in Hideez Authenticator - [*iOS*](https://authenticator.hideez.com/user-guide/ios-guide/otp-generation), [*Android*](https://authenticator.hideez.com/user-guide/android-guide/otp-generation).


# RDP login by Hideez Authenticator App

Hideez Authenticator App Use Cases - RDP login by Hideez Authenticator App

{% hint style="info" %}
Logging in through **Hideez Authenticator** for **RDP (Remote Desktop Protocol)** enhances security and simplifies access to remote PCs.

There are two ways to log in to an RDP session using **Hideez Authenticator**:

1. **Scanning a QR code on the local workstation** in the Remote Desktop Connection client. This enables passwordless login or password-based login.
2. **Scanning a QR code on the remote PC screen**. This option requires a pre-created password-based account on the remote workstation.
   {% endhint %}

## **Login by Scanning a QR Code on the Local Workstation**

{% hint style="info" %}
**Requirements:**

* A workstation with Windows 10/11, with **Hideez Client** installed and connected to **Hideez Server**.
* For passwordless login, the local PC must be part of an **On-Prem AD (On-Premises Active Directory)** domain and have **TPM 2.0 (Trusted Platform Module 2.0)**.
* A registered **Hideez Authenticator** application on the server.
* An account for passwordless unlocking of the local workstation.
  {% endhint %}

### **Steps for Login by Scanning a QR Code on the Local Workstation:**

#### **1. Create an Account in Hideez Authenticator:**

* Register an account for logging in with credentials from the remote PC on the main PC by scanning a QR code using the **Hideez Authenticator** app.
* Both login methods are available: passwordless and password-based.
* If you plan to use passwordless login, ensure that the main PC has a TPM module and a domain account (this is not required for the remote PC).

#### **2. Connect via RDP:**

* Open the **Windows RDP client** on the main PC and specify the address of the remote computer.

<figure><img src="https://1669663611-files.gitbook.io/~/files/v0/b/gitbook-x-prod.appspot.com/o/spaces%2FRdTysrljwe610dPFG7tE%2Fuploads%2FHCsTUs8z9PEYNeYaZOpQ%2Fimage.png?alt=media&amp;token=3de78b57-32eb-4e75-b14a-efb171033b0c" alt="" width="455"><figcaption></figcaption></figure>

#### **3. Set Up Authentication:**

* Click **Connect**, then choose **More choices**.

<figure><img src="https://1669663611-files.gitbook.io/~/files/v0/b/gitbook-x-prod.appspot.com/o/spaces%2FRdTysrljwe610dPFG7tE%2Fuploads%2FELc5uAZaJ5U7Qk1OJxry%2Fimage.png?alt=media&amp;token=e0a9d283-d75b-41e0-ae8d-3f25a07961c8" alt="" width="333"><figcaption></figcaption></figure>

**4. Select Hideez Key for Authentication:**

* Choose the **Hideez Key** option for authentication.

<figure><img src="https://1669663611-files.gitbook.io/~/files/v0/b/gitbook-x-prod.appspot.com/o/spaces%2FRdTysrljwe610dPFG7tE%2Fuploads%2FmjQsPAXK2DjUfndEAbst%2Fimage.png?alt=media&amp;token=faddf65c-ffb0-4186-b4cb-e5edab7b8403" alt="" width="326"><figcaption></figcaption></figure>

**5. Show QR Code:**

* Click the **Show QR code** button to generate a QR code for scanning.

**6. Scan the QR Code:**

* Open the **Hideez Authenticator** app on your mobile device and scan the QR code displayed on the screen.

<figure><img src="https://1669663611-files.gitbook.io/~/files/v0/b/gitbook-x-prod.appspot.com/o/spaces%2FRdTysrljwe610dPFG7tE%2Fuploads%2Fvm9PYWL9uFnZqdAWf9z9%2Fimage.png?alt=media&amp;token=4531e6f9-f94b-4f10-ab2d-616ef77942ab" alt="" width="351"><figcaption></figcaption></figure>

**7. Confirm Login:**

* In the **Hideez Authenticator** app, confirm the login by selecting:

  * The workstation name (should match the main PC).
  * The account name.

  <figure><img src="https://1669663611-files.gitbook.io/~/files/v0/b/gitbook-x-prod.appspot.com/o/spaces%2FRdTysrljwe610dPFG7tE%2Fuploads%2FZfjQ5jfPrBzYcQMqxsdP%2Fimage.png?alt=media&amp;token=6ab2b385-ea7f-4728-a444-53f9a6bbb9b7" alt="" width="305"><figcaption></figcaption></figure>

{% hint style="info" %}
**Note:** Some devices allow scanning the QR code directly with the camera, which will automatically redirect you to the **Hideez Authenticator** app for confirmation.
{% endhint %}

## **Login to the Remote Workstation by Scanning a QR Code on the Remote PC Screen**

{% hint style="info" %}
**Requirements:**

* A remote workstation with Windows 10/11, with **Hideez Client** installed and connected to the server.
* A registered **Hideez Authenticator** application on the server.
* An account for unlocking the remote workstation.
* Supported account types: local, domain, Microsoft, **On-Prem AD (On-Premises Active Directory)**, **Azure AD**.
  {% endhint %}

### **Steps for Login by Scanning a QR Code on the Remote Workstation:**

**1. Log into the Remote Workstation and Create a Password-Based Account:**

* Open the **Hideez Authenticator** app and scan the QR code to set up the account.

**2. Open the Remote Desktop Connection Client:**

* Enter the name or IP address of the computer you want to unlock.

<figure><img src="https://1669663611-files.gitbook.io/~/files/v0/b/gitbook-x-prod.appspot.com/o/spaces%2FRdTysrljwe610dPFG7tE%2Fuploads%2FJL3Qr6uuJLRyzJdz2u6Y%2Fimage.png?alt=media&amp;token=7e31b332-3ca4-42f7-8e04-ff627ca7a296" alt="" width="407"><figcaption></figcaption></figure>

**3. Scan the QR Code:**

* In the **Hideez Authenticator** app on your mobile device, open the QR code scanner and scan the QR code displayed on the lock screen of the remote workstation.

<figure><img src="https://1669663611-files.gitbook.io/~/files/v0/b/gitbook-x-prod.appspot.com/o/spaces%2FRdTysrljwe610dPFG7tE%2Fuploads%2FlHxof2rlRGh1trqLdfwq%2Fimage.png?alt=media&amp;token=da3789ae-f371-4379-9ff8-8c661d9f41a1" alt="" width="563"><figcaption></figcaption></figure>

**4. Confirm Login to the Workstation in Hideez Authenticator:**

* In the **Hideez Authenticator** app, confirm the login by selecting:

  * The workstation name (should match the main PC).
  * The account name.

  <figure><img src="https://1669663611-files.gitbook.io/~/files/v0/b/gitbook-x-prod.appspot.com/o/spaces%2FRdTysrljwe610dPFG7tE%2Fuploads%2FcUTWLwzoafu6WHGUzeHR%2Fimage.png?alt=media&amp;token=33ab7a78-dbb5-421d-9990-d35ae9aeaeb2" alt="" width="305"><figcaption></figcaption></figure>

{% hint style="info" %}
**Note:** If the QR code does not appear on the lock screen during the Remote Desktop Connection session, use a configuration file with the parameter `enablecredsspsupport:i:0` enabled. [Refer to our troubleshooting guide for additional settings.](/faq/how-tos/enable-qr-code-display-for-hideez-authenticator-on-the-lock-screen-of-a-windows-remote-workstation)
{% endhint %}

{% hint style="success" %}

#### **Compatibility**

This login method is compatible with Windows and macOS operating systems for all account types.
{% endhint %}


# Remote PC lock

Starting from version 1.2.9 you also can block your Windows account if you enrolled your Authenticator for PC login (both [passwordless](/use-cases/hideez-authenticator-mobile-app/passwordless-pc-login) or [password-based](/use-cases/hideez-authenticator-mobile-app/password-based-pc-login)).

Just go to the account that you signed in to and tap the "Lock Workstation" button. Workstation will be locked.

That is how this button looks like for the passwordless accounts:

![](https://content.gitbook.com/content/RdTysrljwe610dPFG7tE/blobs/bef4ArzjtZoTamlfInGA/image.png)

That is how this button looks like for the password-based accounts:

![](https://content.gitbook.com/content/RdTysrljwe610dPFG7tE/blobs/ejVvzvqKbN6Z8oxInM5p/image.png)

You can find more on remote PC lock - [*iOS*](https://authenticator.hideez.com/user-guide/ios-guide/pc-lock), [*Android*](https://authenticator.hideez.com/user-guide/android-guide/pc-lock).


# Hideez Key


# Proximity Lock

Hideez use cases – PC Lock

Hideez Key uses the proximity mechanism to lock your computer.

As soon as you have moved a sufficient distance from the workstation, it is blocked. You do not need to do this manually.&#x20;

The “sufficient” distance is determined by the signal level from the Hideez Key. As soon as the signal level becomes less than 20-30%. (by default), the workstation automatically locks.

{% hint style="warning" %}
Lock PC by proximity works by default. There is no need for additional settings for this.

But the Admin can disable or configure it in the [**Workstation Profiles.**](/hideez-enterprise-server/workstations/workstation-profiles) &#x20;
{% endhint %}

### Lock PC by proximity

1. You unlock the PC by proximity/Bluetooth Touch
2. You work on a PC
3. You stop working, get away from the PC at a sufficient distance.
4. PC is blocked by proximity.

### Important conditions:

* **Only the device of the session user can lock the workstation.**

  Session user – is the user that opened the current session, i.e., logged into a Windows account.
* **The proximity value for locking/unlocking the computer is available for change** [**by the Administrator only**](/use-cases/hideez-key/proximity-settings). For that, the administrator has to set the profile for the workstations and then configure that profile (**Workstation→Workstation Profiles**)&#x20;

  The administrator provides parameters in percentage for Bluetooth signal strength, for example:&#x20;

&#x20;     \- locking occurs when Bluetooth signal strength drops below 20-30%&#x20;

&#x20;     \- unlocking occurs when Bluetooth signal strength exceeds 70-80%

Actual distances in meters can vary greatly in different rooms and depend on external factors (location of the Hideez Key, the presence of furniture and walls in the room, etc.). You need to determine optimal parameters for yourself experimentally.


# Proximity Unlock

Hideez use cases – Unlock PC by proximity

Hideez Key allows you to choose a mechanism to unlock your computer.

{% hint style="success" %}
The proximity mechanism is suitable for Use Cases where 1 user can work on 1 PC.
{% endhint %}

As soon as you come to the PC, it unlocks. You do not need to perform additional mechanical actions.\
The signal level from the Hideez Key determines the distance that you need to get closer to your computer. As soon as the signal level becomes more than 70-80% (by default), the computer automatically unlocks.

**Unlock PC by proximity available if such requirements are met :**

* Hideez Client is installed on your PC. If this is not the case, contact your Administrator, or follow this [instruction](broken://pages/-M77IXy9qoyOqyKqMyDL).
* [You are added as an Employee on the HES server](/hideez-enterprise-server/employees/how-to-add-an-employee).
* [You have been assigned a key, and it is in Active status](/hideez-enterprise-server/hardware-vaults/assign-a-key-to-the-user).
* There is [an account on the Hideez Key to unlock this PC](/hideez-enterprise-server/accounts/how-to-work-with-personal-employee-accounts).
* An administrator [has allowed your Hideez Key to work by proximity with this PC](/hideez-enterprise-server/workstations/use-proximity-with-workstation).

{% embed url="<https://www.youtube.com/watch?v=2R7NZkA7Ogs>" %}

{% hint style="info" %}
If the Hideez Key device has not yet been used with the Hideez Client App, then the first time, you need to pair Hideez Key with Dongle. During pairing, Hideez Key periodically blinks (lights up) with a green LED. To confirm, you need to perform a short press on the button. [Watch the video](https://youtu.be/iBaGqvRmLmA).

If you don’t click on the button within 15 seconds, the pairing will not occur, and the Hideez Client App will not be able to work with Hideez Key. To re-pair, you must re-execute a pairing procedure.
{% endhint %}

### Important conditions

* **Unlocking by proximity will only be possible if the computer has been locked by proximity**. If you forcibly blocked the PC yourself, then it is assumed that this was not done by accident, and you have reasons to block the PC while next to it. Therefore, until you move to the distance necessary for proximity and return, the PC can be unlocked manually.
* **Only the device of the session user can lock the workstation.**

  Session user - is the user that opened the current session, i.e., logged into Windows account.
* **The proximity value for locking/unlocking the computer is available for change** [**by the Administrator only**](/use-cases/hideez-key/proximity-settings) on the HES. The administrator provides parameters in percentage for Bluetooth signal strength, for example: \
  &#x20;\- blocking occurs when Bluetooth signal strength drops below 20-30%, \
  &#x20;\- unlocking occurs when Bluetooth signal strength exceeds 70-80%. Actual distances in meters can vary greatly in different rooms and depend on external factors (location of the Hideez Key, furniture and walls in the room, etc.). It would be best if you determined optimal parameters for yourself experimentally.
* **This option is ideal for the case with 1 Hideez key and 1 PC.**\
  If several Hideez Keys near the PC have the right to unlock it by proximity, then the System's unstable behavior is possible.\
  The administrator should allow this opportunity only for employees who work in shifts. Otherwise, only one key should be able to unlock the computer by proximity. For the remaining keys, only the Tap-and-Go unlock feature should be available.


# Unlock PC by Hideez Dongle Touch (Tap-and-Go)

Hideez use cases – Tap-and-Go

{% hint style="success" %}
Use Cases where many users can work on any PC.
{% endhint %}

To unlock the computer, go to it and touch the dongle with the key.

There is no need for additional settings for this on the part of the Administrator or user.

**Tap-and-Go case available if such requirements are met :**

* Hideez Client is installed on your PC. If this is not the case, contact your Administrator, or follow this [instruction](broken://pages/-M77IXy9qoyOqyKqMyDL).
* [You are added as an Employee on the HES server](/hideez-enterprise-server/employees/how-to-add-an-employee).
* [You have been assigned a key, and it is in Active status](/hideez-enterprise-server/hardware-vaults/assign-a-key-to-the-user).
* There is [an account on the Hideez Key to unlock this PC](/hideez-enterprise-server/accounts/how-to-work-with-personal-employee-accounts). The account must be added by the Administrator on HES.

### Tap-and-Go Scenario

1. You unlock the PC by touching the key to the dongle.
2. You work on PC.
3. You stop working, get away from the PC at a sufficient distance.
4. PC is blocked by proximity.

{% embed url="<https://www.youtube.com/watch?v=QcuQ_9yzbXg>" %}

{% hint style="info" %}
If the Hideez Key device has not yet been used with the Hideez Client App, then the first time, you need to pair your oHideez Key with the Dongle. During pairing, Hideez Key periodically blinks (lights up) with a green LED. To confirm, you need to perform a short press on the button. [Watch the video](https://youtu.be/iBaGqvRmLmA).\
If you don’t click on the button within 15 seconds, the pairing will not occur, and the Hideez Client App will not be able to work with the Hideez Key. To re-pair, you must re-execute a long tap.
{% endhint %}

### Important conditions

* **Only the device of the session user can lock the workstation.**

  Session user - is the user that opened the current session, i.e., logged into Windows account.

{% hint style="success" %}
If this case seems unsafe for you, then the Administrator can add the requirement to tenter a PIN-code and/or click the button on the key in your [profile settings](/hideez-enterprise-server/keys-management/how-to-create-and-set-device-access-profiles#set-a-profile-for-the-device).
{% endhint %}


# Proximity settings (guide for admin)

Hideez admin cases – Proximity settings

{% hint style="info" %}
Hideez Keys allows you to set up locking and unlocking your Workstation with the **Hideez Proximity Mechanism**. Your PC will be **locked** or **unlocked** when the Bluetooth signal level falls below the specified value in % and unlocked when the Bluetooth signal level exceeds the specified value in %.&#x20;
{% endhint %}

Those settings refer to configure:

* ## [Proximity Lock](/use-cases/hideez-key/lock-pc)

* ## [Proximity Unlock](/use-cases/hideez-key/lock-unlock-pc-by-proximity)

To configure Proximity lock and unlock settings, the Administrator needs to set up these parameters on the Hideez Enterprise Server. This is done through the sectionn [**Workstation Profiles**](/hideez-enterprise-server/workstations/workstation-profiles) on the Hideez Enterprise Server. Administrators should navigate to this section, where they can adjust the Proximity Lock and Unlock options based on specific Workstations.

The Admin has the option to create a new profile with the desired configuration and assign the relevant Workstations to that profile. Alternatively, they can edit existing Workstation profiles to update the settings.

{% hint style="success" %}
You can find out more information about [**Workstation Profiles here**](/hideez-enterprise-server/workstations/workstation-profiles)**.**
{% endhint %}

{% hint style="info" %}
When we add a new workstation it has a profile “Default”, that uses the following settings for proximity:

* **Enable Proximity Lock** (locking occurs when Bluetooth signal strength drops below 20-30%)
* **Enable Proximity Unlock** (unlocking occurs when Bluetooth signal strength exceeds 70-80%).&#x20;

**To enable Proximity Unlock, you must grant permission for this option to a specific Hideez Key on the Employee page in the section:**&#x20;

* [**Use Proximity Unlock Workstations.**](/hideez-enterprise-server/workstations/use-proximity-with-workstation)
  {% endhint %}


# Automatic RDP Launch and Logon

This feature allows to automatically start RDP connection to specified workstation and automatically enter credentials if they are requested by this connection.

These features can be used independently from each other.

### **Automatic RDP Logon**

To set up automatic logon into RDP, perform the following steps:

* Open Hideez Client settings page, scroll down to ‘**Experimental**’ section and select ‘***Automatically enter credentials into applications***’ option

![](https://content.gitbook.com/content/RdTysrljwe610dPFG7tE/blobs/XvdgKoaJ6s2AEwwg1ZK0/image.png)

* Create a new or edit an existing account (of any kind - [private](/hideez-client-app/account-management/account-creation), [personal](/hideez-enterprise-server/accounts/how-to-work-with-personal-employee-accounts) or [shared](/hideez-enterprise-server/accounts/how-to-work-with-shared-employee-accounts)) according to the following requirements
  * Enter remote computer name into account name field (e.g. DESKTOP-68U4A)
  * Enter remote user name into login field (e.g. User1)
  * Enter remote user password into password field
  * Click ‘Add Application’ button, scroll to the end and select ‘**automate:mstsc**’ if you are creating a private account or type ‘**automate:mstsc**’ in the "Applications" field if you are creating account on HES
  * Click ‘Save’ button

{% hint style="warning" %}
Then you have to restart your PC for the changes to take effect.
{% endhint %}

{% hint style="info" %}
**Note:** Hideez Client can only perform automatic credentials entry if vault is authorized and password manager storage is loaded. If password manager storage is not yet loaded, automatic credentials entry will not be performed.
{% endhint %}

If everything is configured correctly, next time when RDP prompts user to enter credentials for specified workstation, Hideez Client will try to automatically use credentials from account saved in it’s storage.

If the computer name and/or username displayed by the credentials prompt doesn’t match those saved in the password manager, automatic credentials entry will not be performed.

{% hint style="info" %}
**Note:** Currently if more than one account is saved with ‘automate:mstsc’ application, only the first one will be used, where order is determined by internal vault firmware
{% endhint %}

{% hint style="info" %}
**Note:** Due to certain technicalities, currently this feature is only implemented for the English localization of Windows
{% endhint %}

### **Automatic RDP Launch**

To configure RDP to start automatically, follow these steps:

* Open Hideez Client settings page, scroll down to ‘**Experimental**’ section and select ‘***Automatically launch applications after storage is loaded***’ option

![](https://content.gitbook.com/content/RdTysrljwe610dPFG7tE/blobs/HmV2Fs2cihGME4YDy8jY/image.png)

* Create a new or edit an existing account (of any kind - [private](/hideez-client-app/account-management/account-creation), [personal](/hideez-enterprise-server/accounts/how-to-work-with-personal-employee-accounts) or [shared](/hideez-enterprise-server/accounts/how-to-work-with-shared-employee-accounts)) according to the following requirements
  * Enter remote computer name into account name field (e.g. DESKTOP-68U4A)
  * Click ‘Add Application’ button, scroll to the end and select ‘**automate:mstsc**’ if you are creating a private account or type ‘**automate:mstsc**’ in the "Applications" field if you are creating account on HES
  * Click ‘Save’ button

If everything is configured correctly, next time when password manager finishes loading storage, Hideez Client will initiate RDP connection to the workstation using the computer name specified in the saved account.

{% hint style="info" %}
**Note:** If an instance of RDP application is already running in the current local user session, automatic RDP launch will not be performed.
{% endhint %}

{% hint style="info" %}
**Note:** Currently if more than one account is saved with ‘automate:mstsc’ application, only the first one will be used, where order is determined by internal vault firmware.
{% endhint %}


# Password manager and OTP generator

### Adding new accounts to the Hideez Client <a href="#adding-new-accounts-to-the-hideez-client" id="adding-new-accounts-to-the-hideez-client"></a>

Click the "+" sign at the bottom of the page to create an account.

OR use a shortcut **Ctrl + Alt + A** to open a window for adding an account from an application or site. In this case, the account name and application/site fields will be pre-populated and can be edited.

<figure><img src="https://1669663611-files.gitbook.io/~/files/v0/b/gitbook-x-prod.appspot.com/o/spaces%2FRdTysrljwe610dPFG7tE%2Fuploads%2F2FvBHw64nyHhjIAuhh0r%2Fimage.png?alt=media&amp;token=96d080f9-732e-4d56-9397-d03e0c35bba5" alt="" width="563"><figcaption></figcaption></figure>

Enter your account details in the window that appears:

<figure><img src="https://key4.hideez.com/~gitbook/image?url=https%3A%2F%2Fcontent.gitbook.com%2Fcontent%2FyySSunF8lTBEbKNJWiGw%2Fblobs%2FOywQm5Z6VMa1lz2hCRtN%2Fimage.png&#x26;width=768&#x26;dpr=4&#x26;quality=100&#x26;sign=4d66da96&#x26;sv=1" alt="" width="375"><figcaption></figcaption></figure>

* **Account name** - any name that is convenient and understandable for you
* **Login** - the login used to get into the account
* **Password** - the password used to get into the account. You can enter it manually or generate it by clicking the icon at the end of the line. If you generate a password, be sure to update it on your existing account.
* **Web-site / app** - The addresses of the websites where this account can be used and the names of the applications. Click the **Add Web-site** button to add a website address and the button **Add application** to choose a application name.

Use the drop-down list to select one of the addresses you used previously, or \<Enter Url> to enter a new one. After entering the address, press 'Enter' or the ![](https://key4.hideez.com/~gitbook/image?url=https%3A%2F%2Fcontent.gitbook.com%2Fcontent%2FyySSunF8lTBEbKNJWiGw%2Fblobs%2Fgi88FpWpZcE7Qwe7zO0b%2F%25D0%25B8%25D0%25B7%25D0%25BE%25D0%25B1%25D1%2580%25D0%25B0%25D0%25B6%25D0%25B5%25D0%25BD%25D0%25B8%25D0%25B5_2021-08-02_104528.png\&width=40\&dpr=4\&quality=100\&sign=3069bf45\&sv=1) icon to save it, or ![](https://key4.hideez.com/~gitbook/image?url=https%3A%2F%2Fcontent.gitbook.com%2Fcontent%2FyySSunF8lTBEbKNJWiGw%2Fblobs%2FEFE6EqJQPPqVQNBFjQHC%2F%25D0%25B8%25D0%25B7%25D0%25BE%25D0%25B1%25D1%2580%25D0%25B0%25D0%25B6%25D0%25B5%25D0%25BD%25D0%25B8%25D0%25B5_2021-08-02_104546.png\&width=53\&dpr=4\&quality=100\&sign=125c94b1\&sv=1)to delete it.

<figure><img src="https://key4.hideez.com/~gitbook/image?url=https%3A%2F%2Fcontent.gitbook.com%2Fcontent%2FyySSunF8lTBEbKNJWiGw%2Fblobs%2FiuNT5kq6WcFIuEJB2mok%2Fimage.png&#x26;width=768&#x26;dpr=4&#x26;quality=100&#x26;sign=b0dbb14b&#x26;sv=1" alt="" width="563"><figcaption></figcaption></figure>

You can add an unlimited number of website addresses to a single account. You can delete or edit them by hovering over the address line and clicking the corresponding icon.

<figure><img src="https://key4.hideez.com/~gitbook/image?url=https%3A%2F%2Fcontent.gitbook.com%2Fcontent%2FyySSunF8lTBEbKNJWiGw%2Fblobs%2F5YTCy1Wcp78gIn6xu18P%2Fimage.png&#x26;width=768&#x26;dpr=4&#x26;quality=100&#x26;sign=1bc4740&#x26;sv=1" alt="" width="563"><figcaption></figcaption></figure>

**There are two ultimate login options:** **- Pressing the hotkeys** a) Ctrl+Alt+L = login b) Ctrl+Alt+P = password c) Crtl+Alt+O = OTP **- Pressing the Hideez Key's button** a) 2 clicks = login b) 3 clicks = password c) 4 clicks = OTP

### Enabling OTP Input for your accounts <a href="#enabling-otp-input-for-your-accounts" id="enabling-otp-input-for-your-accounts"></a>

OTP Secret - you can paste the secret key, on the basis of which one-time passwords are generated here. Typically, such a key is displayed as a QR code on the computer screen and is intended to be scanned by the application on the phone. For example, this is how you set up OTPs for a Google account:

<figure><img src="https://key4.hideez.com/~gitbook/image?url=https%3A%2F%2Fcontent.gitbook.com%2Fcontent%2FyySSunF8lTBEbKNJWiGw%2Fblobs%2FTveqKyVsgztZD9nnRwJh%2Fimage.png&#x26;width=768&#x26;dpr=4&#x26;quality=100&#x26;sign=97a8e122&#x26;sv=1" alt="" width="375"><figcaption></figcaption></figure>

You can press the button in Hideez Client to scan the QR code automatically. In this case, the QR code should be visible on the screen when the Hideez Client application is minimized.

<figure><img src="https://key4.hideez.com/~gitbook/image?url=https%3A%2F%2Fcontent.gitbook.com%2Fcontent%2FyySSunF8lTBEbKNJWiGw%2Fblobs%2FBsCr9MDm43kTCLXy0gN8%2Fimage.png&#x26;width=768&#x26;dpr=4&#x26;quality=100&#x26;sign=cb9cabde&#x26;sv=1" alt="" width="563"><figcaption></figcaption></figure>

You can also add the secret manually. In this case, you will need to click on the link "CAN'T SCAN IT?". A window will open in which the same code will be presented in text form:

<figure><img src="https://key4.hideez.com/~gitbook/image?url=https%3A%2F%2Fcontent.gitbook.com%2Fcontent%2FyySSunF8lTBEbKNJWiGw%2Fblobs%2FbtGGaA0Xcm0Izt8hRtoT%2Fimage.png&#x26;width=768&#x26;dpr=4&#x26;quality=100&#x26;sign=77155c6e&#x26;sv=1" alt="" width="375"><figcaption></figcaption></figure>

Copy this text and paste it into the **OTP** field in the Hideez Client application.

<figure><img src="https://key4.hideez.com/~gitbook/image?url=https%3A%2F%2Fcontent.gitbook.com%2Fcontent%2FyySSunF8lTBEbKNJWiGw%2Fblobs%2FFrVAx623UjS2dgOgSkmE%2Fimage.png&#x26;width=768&#x26;dpr=4&#x26;quality=100&#x26;sign=acc2271b&#x26;sv=1" alt="" width="563"><figcaption></figcaption></figure>

#### Adding password protection for local applications <a href="#adding-password-protection-for-local-applications" id="adding-password-protection-for-local-applications"></a>

Click the **Add application** button to add an application

<figure><img src="https://key4.hideez.com/~gitbook/image?url=https%3A%2F%2Fcontent.gitbook.com%2Fcontent%2FyySSunF8lTBEbKNJWiGw%2Fblobs%2F1vUPBTAExeETLwbqVTyK%2Fimage.png&#x26;width=768&#x26;dpr=4&#x26;quality=100&#x26;sign=d40ca636&#x26;sv=1" alt="" width="563"><figcaption></figcaption></figure>

and select one from the list of applications running on your computer. If the application is not listed, it must be launched. Follow the same procedure to add the next application.

The process of removing and editing applications is the same as for websites.

<figure><img src="https://key4.hideez.com/~gitbook/image?url=https%3A%2F%2Fcontent.gitbook.com%2Fcontent%2FyySSunF8lTBEbKNJWiGw%2Fblobs%2Fq10Udp1QPeEh2W46YXTM%2Fimage.png&#x26;width=768&#x26;dpr=4&#x26;quality=100&#x26;sign=ea0fd9ee&#x26;sv=1" alt="" width="563"><figcaption></figcaption></figure>


# OTP manager for two-factor authentication

Hideez use cases – OTP generator for 2FA

You can use the Hideez Key for two-factor authentication. For this, you need to complete the account data not only with login and password but also with the secret key for generating OTP.

### Set up two-factor authentication for your Gmail account

#### Step 1

Visit the <https://mail.google.com/> account login page. \
Place the cursor in the login field and press either the combination **CTRL + ALT + L** or **twice on the Hideez Key button**. If you do not have such an account, then you will be asked to create one.

![](https://content.gitbook.com/content/RdTysrljwe610dPFG7tE/blobs/KhmxX8O2FK68RMVqj2p1/1.png)

Click **Create New Account**.

#### Step **2**

In the Hideez Client account creation window, if necessary, change the automatically added account name, specify a username and password. Save the data.

![](https://content.gitbook.com/content/RdTysrljwe610dPFG7tE/blobs/OnENh4Th7RyFvPoTtftI/image.png)

#### Step 3

Enable two-factor authentication according to [Google’s instructions](https://support.google.com/accounts/answer/1066447?hl=en\&co=GENIE.Platform%3DAndroid\&oco=0).&#x20;

#### Step 4

Add a secret key to generate OTP passwords in the account data.

To do this, go to account editing mode and&#x20;

**OR**&#x20;

when setting up Google Authenticator, click **CAN'T SCAN IT?**\
&#x20;&#x20;

![](https://content.gitbook.com/content/RdTysrljwe610dPFG7tE/blobs/QRk1MUQCEYLwenvs1cI4/5.jpg)

&#x20;&#x20;

![](https://content.gitbook.com/content/RdTysrljwe610dPFG7tE/blobs/SHvsYVqpv5Ij6fZ2elDu/6.jpg)

Enter the seen number-letter code in the Hideez Client in the OTP field and save it by clicking on the corresponding icon.\
&#x20;&#x20;

![](https://content.gitbook.com/content/RdTysrljwe610dPFG7tE/blobs/ujJHkbdByIteFhUNIG4S/4.jpg)

**OR**&#x20;

When the QR code is displayed at the Google Authenticator setup stage, click on the corresponding icon for scanning the QR code and then save it in the Hideez Client.

![](https://content.gitbook.com/content/RdTysrljwe610dPFG7tE/blobs/QTDE7SY1N1bw83w06r9C/7.jpg)

Then click on the **Next** button. Place the cursor in the form and press either **CTRL + ALT + O** or **four times on the Hideez Key button**.

![](https://content.gitbook.com/content/RdTysrljwe610dPFG7tE/blobs/e466jvdUem3dSJjmmqOg/Untitled-5.jpg)

Click **Verify**.

![](https://content.gitbook.com/content/RdTysrljwe610dPFG7tE/blobs/BwmvvPJM06VLRiYHHC3v/Untitled-6.jpg)

### Sign in to your Gmail account with two-factor authentication

#### Step 1

Visit the <https://mail.google.com/> account login page. Place the cursor in the login field and press either **CTRL + ALT + L** or **twice on the Hideez Key button**. \
Your login will be entered.

![](https://content.gitbook.com/content/RdTysrljwe610dPFG7tE/blobs/fqTYAt1CIqyGOLDrl6h6/8.jpg)

#### Step 2

In the next step, position the cursor in the password entry field and press either **CTRL + ALT + P** or **three times on the Hideez Key button**. \
Your password will be entered.

![](https://content.gitbook.com/content/RdTysrljwe610dPFG7tE/blobs/DeSr7BJLNEsxTPHs2pii/9.jpg)

#### Step 3

Indicate whether you want to always pass two-factor authentication on this computer or not - clear or leave the checkbox **Don’t ask again on this computer** and also select **Try another way** and **Get a verification code from the Google Authenticator App:**

![](https://content.gitbook.com/content/RdTysrljwe610dPFG7tE/blobs/DOT9QzBTnTIPPTezSUDF/10.jpg)

![](https://content.gitbook.com/content/RdTysrljwe610dPFG7tE/blobs/BKVAR4Iy21UQmBjqoX9c/11.jpg)

#### Step 4

Place the cursor in the code entry field and press either **CTRL + ALT + O** or **four times on the Hideez Key button**. \
Your OTP will be entered.

![](https://content.gitbook.com/content/RdTysrljwe610dPFG7tE/blobs/4ctGoOoPxZhe2gGvOBaw/12.jpg)

Click the **Next** button. Now you are logged in.

You created an account with OTP and passed two-factor authentication at gmail.com.


# FIDO Security Key


# SSO login to Web Servises via Hardware Key (FIDO2)

## SSO Login to Web Services via Hardware Key (FIDO2)

To log in to web services using a hardware key with FIDO2, follow these steps:

1. **Open the Web Service**\
   Access the web service that has been integrated as a Service Provider for SSO login (using SAML or OIDC protocol). In this example, we are using **Okta**.
2. **Enter Your Username**\
   Type your username on the login screen.

<figure><img src="https://1669663611-files.gitbook.io/~/files/v0/b/gitbook-x-prod.appspot.com/o/spaces%2FRdTysrljwe610dPFG7tE%2Fuploads%2F9o5p6uvYJXpOplOMKUln%2Fimage.png?alt=media&amp;token=614c5077-2f02-4a2d-bd5a-653e37eebc48" alt="" width="347"><figcaption></figcaption></figure>

3. **Select Security Key for Authentication**\
   Choose **Security Key** as the authentication method and proceed with the login process.
4. **Authenticate with Hardware Key**\
   Follow the prompts to authenticate using your FIDO2-compatible hardware key.

<div><figure><img src="https://content.gitbook.com/content/RdTysrljwe610dPFG7tE/blobs/UBKpLcmZ16TL5DzAJP0t/Screenshot%202024-06-27%20134125.png" alt=""><figcaption></figcaption></figure> <figure><img src="https://content.gitbook.com/content/RdTysrljwe610dPFG7tE/blobs/6c7daZQyaVcql0L4N0a2/Screenshot%202024-06-27%20134610.png" alt=""><figcaption></figcaption></figure> <figure><img src="https://content.gitbook.com/content/RdTysrljwe610dPFG7tE/blobs/hjfXAA8waDzRUKCS4T2y/Screenshot%202024-06-27%20134638.png" alt=""><figcaption></figcaption></figure> <figure><img src="https://content.gitbook.com/content/RdTysrljwe610dPFG7tE/blobs/peu3VEj1apUMBWb1CtTi/Screenshot%202024-06-27%20134650.png" alt=""><figcaption></figcaption></figure></div>

<figure><img src="https://content.gitbook.com/content/RdTysrljwe610dPFG7tE/blobs/MhLMgjzGtyf77PhKJ5mI/Screenshot%202024-06-27%20134819.png" alt="" width="563"><figcaption></figcaption></figure>


# Passwordless PC Login to Entra ID (Azure AD).

Hideez use cases – Unlock PC by security key

Hideez Key can be used as a Security key for login in Windows 10/11.

{% hint style="info" %}
To use your Hideez Key as a Security key, there is no need to install any software on the user's PC. FIDO2 authentication is available by default.
{% endhint %}

**Unlock PC by the Security key available if such requirements are met :**

1. You are an Azure Active Directory user. ([Contact the Administrator to clarify this](/faq/hideez-key/how-to-enable-fido2-passwordless-authentication-with-microsoft-azure-ad-for-use-with-windows-10#add-the-user-to-the-ad)).
2. The administrator has specified for you the authentication method in Azure Active Directory - Security key. ([Contact the Administrator to clarify this](/faq/hideez-key/how-to-enable-fido2-passwordless-authentication-with-microsoft-azure-ad-for-use-with-windows-10#enabling-authentication-methods-and-fido2-security-keys)).
3. You have Windows 10-11 version, OS build 1840, and higher installed on your PC. How to check you can find it [here](https://support.microsoft.com/en-us/help/13443/windows-which-version-am-i-running).
4. You have completed the procedure.\
   [Pairing a Hideez Key device with Windows 10-11](/quick-start-guides/fido2-and-u2f-authentication-guide#pairing-a-hideez-key-device-with-windows-10).
5. Key added to  [myaccount.microsoft.com](https://mysignins.microsoft.com/security-info) :

<div><figure><img src="https://content.gitbook.com/content/RdTysrljwe610dPFG7tE/blobs/TxJQ8l6Q6CGucUL0lGaH/Screenshot_40.png" alt=""><figcaption></figcaption></figure> <figure><img src="https://content.gitbook.com/content/RdTysrljwe610dPFG7tE/blobs/Xr1qNMeIcKpqZ9RmYsVb/Screenshot_41.png" alt=""><figcaption></figcaption></figure> <figure><img src="https://content.gitbook.com/content/RdTysrljwe610dPFG7tE/blobs/Ol91DxXscyV2DVQKLjxZ/Screenshot_42.png" alt=""><figcaption></figcaption></figure> <figure><img src="https://content.gitbook.com/content/RdTysrljwe610dPFG7tE/blobs/uGmeY7zk83bJ0ZNVxcwy/Screenshot_43.png" alt=""><figcaption></figcaption></figure></div>

1. You have [created a PIN code for the Security key](/quick-start-guides/fido2-and-u2f-authentication-guide#creating-a-pin-code-on-a-hideez-key-device-for-fido-technology).

### **Unlock the PC with a Security key**

1. You choose the way to unlock the PC - Security key.
2. When there is a key survey, and the system asks you to take action, you click on the button.
3. You enter your PIN-code.
4. When re-survey the key, you confirm again by pressing the button.

{% embed url="<https://www.youtube.com/watch?v=LyWOlgJcroI>" %}

You can also follow this [instruction](https://support.microsoft.com/en-us/help/4463210/windows-10-sign-in-microsoft-account-windows-hello-security-key) from Microsoft.


# Using Hideez Key as U2F security key for your two-factor authentication

Hideez use cases – U2F security key for 2FA

You can use a security key for two-step verification, rather than a 6-digit security code. Hideez Key can be used as a security key that follows one of the open standards:

* FIDO Universal 2nd Factor (U2F)
* FIDO2

### U2F setup examples

### Dropbox

#### Step 1

Carry out the procedure [Pairing a Hideez Key device with Windows 10](https://enterprise.hideez.com/quick-start-guides/fido2-and-u2f-authentication-guide#pairing-a-hideez-key-device-with-windows-10) and [Creating a PIN code on a Hideez Key device for FIDO technology](https://enterprise.hideez.com/quick-start-guides/fido2-and-u2f-authentication-guide#creating-a-pin-code-on-a-hideez-key-device-for-fido2-technology).

#### Step **2**

Follow Dropbox setup instructions\
[How to use a security key for two-step verification](https://help.dropbox.com/en-en/teams-admins/team-member/enable-two-step-verification#securitykey)

{% hint style="warning" %}
Note! Many instructions for configuring the security key are written for USB devices and therefore you may come across the phrase "Insert your security key into a USB port". In the case of Hideez Key, you must press the button on the case.
{% endhint %}

### Sign in to your Dropbox account with U2F

#### Step 1

On the authorization page, enter your username and password in the usual way.

{% hint style="info" %}
You can use the Hideez Key functionality to enter credentials if the corresponding account is created on it, or, you can use Hideez Key only for U2F and enter credentials manually.&#x20;

To use only the U2F functionality, you only need the Hideez Key itself, without a dongle and specialized Hideez software.
{% endhint %}

![](https://content.gitbook.com/content/RdTysrljwe610dPFG7tE/blobs/g1leBjAhEvjiXpAeEJ4P/1.jpg)

#### Step 2

On-screen you will see a request for checking if you have a security key - if the Hideez Key is enabled, then nothing needs to be done. If it is not on, turn it on with a short press.

![](https://content.gitbook.com/content/RdTysrljwe610dPFG7tE/blobs/9apRk2twhjPBQ9iHDG7O/2.jpg)

#### Step 3

Enter the PIN code created earlier [here](/quick-start-guides/fido2-and-u2f-authentication-guide#creating-a-pin-code-on-a-hideez-key-device-for-fido-technology).

![](https://content.gitbook.com/content/RdTysrljwe610dPFG7tE/blobs/Lg7D8UXHwlf1sgrSsc8s/3.jpg)

#### Step 4

Queries are coming to your security key.

![](https://content.gitbook.com/content/RdTysrljwe610dPFG7tE/blobs/oFi1TOsdRfo94HTFX4Aw/4.jpg)

And a screen appears asking you to take action on the security key.

![](https://content.gitbook.com/content/RdTysrljwe610dPFG7tE/blobs/PSYsBACd8DrTYfHusl4g/5.jpg)

Press the button. At this time, the button flashes green.

{% embed url="<https://www.youtube.com/watch?v=iBaGqvRmLmA>" %}

You are authorized in your Dropbox account!

### Google

#### Add a key to your account

1. Carry out the procedure [Pairing a Hideez Key device with Windows 10](https://enterprise.hideez.com/quick-start-guides/fido2-and-u2f-authentication-guide#pairing-a-hideez-key-device-with-windows-10) and [Creating a PIN code on a Hideez Key device for FIDO technology](https://enterprise.hideez.com/quick-start-guides/fido2-and-u2f-authentication-guide#creating-a-pin-code-on-a-hideez-key-device-for-fido2-technology).
2. Open a compatible browser, like Chrome, FireFox, or Safari (13.0.4 or higher).
3. [Enroll your security key](https://myaccount.google.com/signinoptions/two-step-verification?flow=sk\&opendialog=addsk). You might need to sign in.\
   \
   In case you don't see a Bluetooth key option, choose this one:\
   \
   ![](https://content.gitbook.com/content/RdTysrljwe610dPFG7tE/blobs/fwFnSSaGeKBoeEVvrL2m/image.png)

#### Sign in with your key

1. On your computer, open a compatible browser like Chrome, Firefox, Edge, or Opera.
2. [Sign in to your Google Account](https://accounts.google.com/). Your device will detect that your account has a security key.
3. Connect your key to your computer via Bluetooth (Hideez Key 3, 4), NFC or USB (Hideez Key 4).
4. Activate your key by pressing its button when it is asked.

More information on Google 2FA setting you can find [here](https://support.google.com/accounts/answer/6103523).


# Other vendors' hardware keys

Hideez Enterprise Server allows using different FIDO Security Keys

## Other vendors' hardware keys

Hideez Enterprise Server allows using different FIDO Security Keys

In addition to Hideez Keys, you can also use other vendors' keys that support FIDO protocols, ([FIDO2 and U2F](https://fidoalliance.org/fido2-2/fido2-web-authentication-webauthn/)), to authenticate on the Hideez Enterprises Server. Such keys include, for example, [YubiKeys](https://www.yubico.com/).

There is a wide selection of third-party hardware security keys that can be used for authentication on the HES. These keys can use USB, Bluetooth, NFS, or even [USB-C & Lightning](https://www.yubico.com/us/product/yubikey-5ci/) connectionof for authentication. Some of them support Biometric options of authentication.

The main requirement for such keys is their ability to support [**FIDO U2F** and **FIDO2**](https://fidoalliance.org/fido2-2/fido2-web-authentication-webauthn/) standards developed by the FIDO Alliance.

Before using keys produced by any other manufacturer, we highly recommend ensuring that they **support FIDO U2F** and **FIDO2** **protocols.**

Please note that you may use hardware security keys by other vendors **only** to authenticate on the HES server.

1. To [lock](/use-cases/hideez-key/lock-pc) or [unlock](/use-cases/hideez-key/lock-unlock-pc-by-proximity) the workstation by Proximity you can **only** use Hideez Keys.
2. To [passwordless PC Login to Entra ID (Azure AD)](/use-cases/fido-security-key/unlock-pc-by-security-key), you can use other vendors' hardware keys as well.

You can use hardware security keys by third-party vendors to authenticate on the HES using the following methods:

* [Passwordless login](https://enterprise.hideez.com/hideez-enterprise-server/administration/authorization-on-the-hes-server-via-a-fido-key#passwordless-login)
* [Usernameless login](https://enterprise.hideez.com/hideez-enterprise-server/administration/authorization-on-the-hes-server-via-a-fido-key#user-nameless-login)

All of these options are available for **Admin** and **User** accounts.

The option of using the key depends on the specific browser and operating system you are going to use with the Key. Before connecting the key for authentication on the HES, we advise you to check the recommendations of your specific provider. For example, in the case of Yubikey you cam refer to [their official documentation](https://support.yubico.com/hc/en-us/articles/360016615020-Operating-system-and-web-browser-support-for-FIDO2-and-U2F).

The procedure for connecting other vendors' keys to Windows is the same as for [Hideez Keys](https://enterprise.hideez.com/quick-start-guides/fido2-and-u2f-authentication-guide#pairing-a-hideez-key-device-with-windows-10).


# Passkey


# SSO login to Web Services (FIDO2) via Passkey and Hideez Server as Identity Provider

SSO login to Web services (FIDO2) via Passkey

{% hint style="info" %}
Here are the minimum requirements for using a smartphone as a Passkey on Android and iOS:

* Android 9.0 or later.
* &#x20;iOS 15 or later.
  {% endhint %}

{% hint style="success" %}
**Cross-platform authenticators** can be used across different operating systems (Windows, macOS, Android, iOS, etc.). Examples include FIDO security keys (Passkey) and biometric methods like fingerprint or facial recognition, which are supported on a wide range of devices.

**Platform authenticators** are unique to a specific platform. For example, Windows Hello facial recognition for Windows-based devices and Touch ID for Apple devices.
{% endhint %}

#### To create a Passkey on a smartphone or tablet, your employees will be prompted to scan the QR code on their PC:

#### 1. During the registration on the Hideez Server  process:

<div><figure><img src="https://content.gitbook.com/content/RdTysrljwe610dPFG7tE/blobs/LYl3hMv01QtfpzU3hShG/image.png" alt="" width="266"><figcaption></figcaption></figure> <figure><img src="https://content.gitbook.com/content/RdTysrljwe610dPFG7tE/blobs/vPH7ohVJ4N1NddVrWW70/Screenshot_25.jpg" alt="" width="321"><figcaption><p>Select “Cross-Platform”</p></figcaption></figure> <figure><img src="https://content.gitbook.com/content/RdTysrljwe610dPFG7tE/blobs/yRaR6WYMbW4710Q5507b/Screenshot_26.jpg" alt=""><figcaption><p>Add a device</p></figcaption></figure> <figure><img src="https://content.gitbook.com/content/RdTysrljwe610dPFG7tE/blobs/gZ58KVXFVVUzMCirTFFq/Screenshot_27.jpg" alt=""><figcaption><p>Scan QR code</p></figcaption></figure></div>

#### 2. After registration on the Profile Page of the Employee

Login into Hideez Enterprise Server. Click **Profile (Admin account), and** go to the **FIDO2 Authenticators** sectio&#x6E;**.** Click **Add FIDO2 Authenticator,** select **Cross-Platform,** and follow the instructions.&#x20;

<div><figure><img src="https://content.gitbook.com/content/RdTysrljwe610dPFG7tE/blobs/BmUoUi3MOpyBgxSUCoW5/Screenshot_3.jpg" alt=""><figcaption></figcaption></figure> <figure><img src="https://content.gitbook.com/content/RdTysrljwe610dPFG7tE/blobs/K9h1MWupvlSOcLeZmYwH/Screenshot_5.jpg" alt=""><figcaption></figcaption></figure> <figure><img src="https://content.gitbook.com/content/RdTysrljwe610dPFG7tE/blobs/gFYp2bGmO8tv04eXhrCr/Screenshot_6.jpg" alt=""><figcaption></figcaption></figure> <figure><img src="https://content.gitbook.com/content/RdTysrljwe610dPFG7tE/blobs/WgC8WQvhLvp6wJtVD9Pc/Screenshot_7.jpg" alt=""><figcaption></figcaption></figure> <figure><img src="https://content.gitbook.com/content/RdTysrljwe610dPFG7tE/blobs/9PWjRG3LlgtpgUKyKYWa/Screenshot_13.jpg" alt=""><figcaption></figcaption></figure></div>

### Login to the Hideez Server via a smartphone as Passkey&#x20;

After your registration, your smartphone as Passkey you can log in to Hideez Server using that one.&#x20;

<div><figure><img src="https://content.gitbook.com/content/RdTysrljwe610dPFG7tE/blobs/e4ft7xYvgkVFCGTDKtPG/Screenshot_10.jpg" alt=""><figcaption><p>Click “Sign in with a Security Key”</p></figcaption></figure> <figure><img src="https://content.gitbook.com/content/RdTysrljwe610dPFG7tE/blobs/wstqznxS5s1zJDOD6Zcr/Screenshot_11.jpg" alt=""><figcaption><p>Select enrolled as passkey for Hideez Server</p></figcaption></figure></div>


# Emergency blocking of all computers

Hideez admin cases – Emergency blocking

### Alarm Mode Explanation

If for some reason, you need to block all computers on which the Hideez Client is installed and which are online and make it impossible to use by Hideez Keys employees in one move, then the Alarm mode is provided for this.&#x20;

Once you enable Alarm mode on the HES server:

&#x20;\- all computers on which the Hideez Client is installed and in the online status:

* will be blocked;
* bond files will be removed from them, i.e., to connect the keys, it will be necessary to confirm again by pressing the green button while the button is blinking and ensure the availability of the HES server

&#x20;\- all keys will be disconnected from the Hideez Client and will not connect until Alarm mode is turned off.\
Employees will see the message "Failed to connect to the server. 618".

If your employees do not know the password for unlocking the computer (Workstation account) or have disabled the ability to log in without using the Hideez Key, they will not be able to unlock and use the computer.

If a computer were not in the online status at the time the Alarm mode was turned on, but connected later, when the Alarm mode was not turned off yet, it would also be blocked.

### Enabling Alarm Mode

#### Step 1

Click on the Alarm icon. It is convenient to do this even from a mobile phone.

<figure><img src="https://content.gitbook.com/content/RdTysrljwe610dPFG7tE/blobs/OOYGwEin9I0iihj2kDQw/image.png" alt=""><figcaption></figcaption></figure>

![](https://content.gitbook.com/content/RdTysrljwe610dPFG7tE/blobs/HpzlZhfwVhcEfvFSMJWn/alarm3.jpg)

#### Step 2

Click the **Turn On** button.\
\
Also, you can see:

* number of computers online;
* the total number of computers registered on the server is the number of computers that will potentially be locked when they turn online while the Alarm mode is on. This includes all computers (both those that are approved by the administrator and those that are not) on which the Hideez Client is installed, and the address of this server is registered in its settings;
* date, time, and username of the user who turned off the Alarm mode last time.

![](https://content.gitbook.com/content/RdTysrljwe610dPFG7tE/blobs/sJA0lLtBnVZNd4GbjBbI/alarm4.jpg)

#### Step 3

Confirm your action by clicking **Confirm**.

![](https://content.gitbook.com/content/RdTysrljwe610dPFG7tE/blobs/nYdDUuBZC2UCzB8SxtgS/alarm5.jpg)

#### Step 4

The alarm mode is on. Now you can turn it off.

![](https://content.gitbook.com/content/RdTysrljwe610dPFG7tE/blobs/HUTNgYLoVEqz4Dko2Arw/alarm6.jpg)

### Disabling Alarm Mode

#### Step 1

Press the **Turn Off** button.

![](https://content.gitbook.com/content/RdTysrljwe610dPFG7tE/blobs/HUTNgYLoVEqz4Dko2Arw/alarm6.jpg)

#### Step 2

Enter your administrator password to confirm your action and click **Confirm**.

![](https://content.gitbook.com/content/RdTysrljwe610dPFG7tE/blobs/hfKowu1W10LfllcnFAub/alarm7.jpg)

#### Step 3

Alarm mode is off. Information about who did it and when is displayed. All the logic of HES - Hideez Client - Hideez Key operation has been restored. Users need to confirm bonding when connecting their keys to their computers.

![](https://content.gitbook.com/content/RdTysrljwe610dPFG7tE/blobs/juvciCSgaT3txO8Uzum6/alarm8.jpg)


# Employee's account disabling

Hideez admin cases – Deactivating an Employee

{% hint style="info" %}
The Hideez Server Administrator can temporarily or permanently deactivate an employee, preventing them from accessing web services through the Hideez Server or unlocking workstations using the Hideez Authenticator mobile app.
{% endhint %}

**To deactivate an employee:**

1. The administrator selects the employee from the organization's employee list.
2. Click the "Deactivate" button.

<figure><img src="https://1669663611-files.gitbook.io/~/files/v0/b/gitbook-x-prod.appspot.com/o/spaces%2FRdTysrljwe610dPFG7tE%2Fuploads%2F6sItSwLSB3toQDa3HZF9%2FScreenshot_1.png?alt=media&amp;token=01d87efb-fef5-49a3-8946-d2e295ae8683" alt=""><figcaption></figcaption></figure>

{% hint style="info" %}
**Note:** If the employee was imported from Active Directory, the administrator can also deactivate them in Active Directory by checking the "Disable account in Active Directory" checkbox.
{% endhint %}

<figure><img src="https://1669663611-files.gitbook.io/~/files/v0/b/gitbook-x-prod.appspot.com/o/spaces%2FRdTysrljwe610dPFG7tE%2Fuploads%2FiNvDiH18pTuzJrsxFUFU%2FScreenshot_4.png?alt=media&amp;token=47e1e9d9-8b89-47b0-8e1d-30f1de844479" alt="" width="374"><figcaption></figcaption></figure>

The employee will be deactivated and will no longer be able to access web services using Hideez Enterprise Server as the Identity Provider and Active Directory.

<figure><img src="https://1669663611-files.gitbook.io/~/files/v0/b/gitbook-x-prod.appspot.com/o/spaces%2FRdTysrljwe610dPFG7tE%2Fuploads%2FGVhWCwWlpKWINkLu6E7s%2FScreenshot_2.png?alt=media&amp;token=60a124dd-f695-4c13-962c-01a791289d76" alt="" width="563"><figcaption></figcaption></figure>

<div><figure><img src="https://1669663611-files.gitbook.io/~/files/v0/b/gitbook-x-prod.appspot.com/o/spaces%2FRdTysrljwe610dPFG7tE%2Fuploads%2FGmlEeig5B2irhAVDhT04%2Fphoto_2024-07-16_14-39-45.jpg?alt=media&amp;token=1415c98a-8614-4fcf-a34f-fd12155d9de4" alt="" width="375"><figcaption></figcaption></figure> <figure><img src="https://1669663611-files.gitbook.io/~/files/v0/b/gitbook-x-prod.appspot.com/o/spaces%2FRdTysrljwe610dPFG7tE%2Fuploads%2FV3epBGWwmlaG5mjOeJkP%2FScreenshot_34.png?alt=media&amp;token=5514f2f1-a609-4cc9-b547-eda80e7e86b7" alt="" width="350"><figcaption></figcaption></figure> <figure><img src="https://1669663611-files.gitbook.io/~/files/v0/b/gitbook-x-prod.appspot.com/o/spaces%2FRdTysrljwe610dPFG7tE%2Fuploads%2FvCWH9UnMIMKsTSP3jNeQ%2FScreenshot_5.png?alt=media&amp;token=0ec86b3f-3859-4bc4-a28f-27879a3dd258" alt=""><figcaption></figcaption></figure></div>

**To reactivate an employee:**

1. The administrator goes to the "Employees" section and selects the deactivated employee.
2. Click the "Activate" button.

<figure><img src="https://1669663611-files.gitbook.io/~/files/v0/b/gitbook-x-prod.appspot.com/o/spaces%2FRdTysrljwe610dPFG7tE%2Fuploads%2FnbUhBVWkf4vBosa8RJzb%2FScreenshot_3.png?alt=media&amp;token=01878343-cc48-484d-a8ca-c5ce0ef57ea4" alt="" width="563"><figcaption></figcaption></figure>

The employee will be reactivated and will be able to use the Hideez Server for authentication again. If the employee was deactivated in Active Directory, they will also regain access to those services.


# Hideez Enterprise Server

Hideez Enterprise Server is an Identity and Access Management Server. In this section, you can find everything about its features.

<table data-view="cards"><thead><tr><th></th><th></th><th></th><th data-hidden data-card-target data-type="content-ref"></th></tr></thead><tbody><tr><td>Deployment of Hideez Enterprise Server  </td><td></td><td></td><td><a href="/hideez-enterprise-server/deployment">Deployment</a></td></tr><tr><td>Administration of Hideez Enterprise Server</td><td></td><td></td><td><a href="/hideez-enterprise-server/administration">Administration</a></td></tr><tr><td>Dashboard of Hideez Enterprise Server</td><td></td><td></td><td><a href="/hideez-enterprise-server/dashboard">Dashboard</a></td></tr><tr><td>Management of employees </td><td></td><td></td><td><a href="/hideez-enterprise-server/employees">Employees</a></td></tr><tr><td>Management of workstations </td><td></td><td></td><td><a href="/hideez-enterprise-server/workstations">Workstations</a></td></tr><tr><td>Hardware security key on Hideez Enterprise Server</td><td></td><td></td><td><a href="/hideez-enterprise-server/hardware-vaults">Hardware Vaults</a></td></tr><tr><td>Accounts on Hideez Enterprise Server  </td><td></td><td></td><td><a href="/hideez-enterprise-server/accounts">Accounts</a></td></tr><tr><td>Data Protections</td><td></td><td></td><td><a href="/hideez-enterprise-server/administration/data-protection">Data Protection</a></td></tr><tr><td>Load Balancing of Hideez Enterprise Server</td><td></td><td></td><td><a href="/hideez-enterprise-server/administration/enable-load-balancing">Enable load balancing</a></td></tr></tbody></table>


# Glossary

Hideez Enterprise Server Glossary

**Account** – Credentials used to access a resource, including username, password, and OTP secret.\
**AD (Active Directory)** – Refers to Microsoft’s on-premise Active Directory server.\
**HES (Hideez Enterprise Server)** – A central management platform that controls users, keys, and credentials as part of the Hideez enterprise solution.\
**HLS (Hideez License Server)** – Issues licenses for users and their keys within the Hideez solution.\
**Hideez Client** – A client application installed on a user’s computer as part of the Hideez solution.\
**Hideez Dongle (Dongle)** – Ensures proper key operation with the computer via Bluetooth in the Hideez solution.\
**Hideez Key (HK)** – A credential storage device that is part of the Hideez solution.\
**HES Administrator (Administrator)** – The company employee responsible for managing all data on the HES server.\
**Proximity** – A function that locks or unlocks a computer based on the Bluetooth signal strength of the Hideez Key.\
**Task** – An action, such as adding, updating, or deleting accounts, transmitted from HES to the Hideez Key.\
**Unlock Account** – An account used to unlock the computer, formed specifically for that purpose.\
**OTP (One-Time Password)** – A time-based password following the RFC 6238 standard.\
**OTP Secret** – A key for generating one-time passwords, which must be kept secure.\
**User/Employee** – A company employee whose data is stored on HES and who is issued a Hideez Key.\
**Workstation/Computer** – Any computerized workplace where the user operates (synonyms: computer, laptop).


# Hideez Server Architecture

## 1. Basic Server Architecture&#x20;

The basic server configuration is the minimum necessary set of components for the full functioning of the authentication server. This configuration does not involve the use of a load balancer and a standby server, and the database server is installed on the same physical server as the web application. The authentication server can be installed on a Windows or Linux server (physical or virtual). The Reverse Proxy Server accepts incoming HTTPS requests, decrypts them, and passes them to the Kestrel Web Server, which hosts the HES web application.&#x20;

<figure><img src="https://content.gitbook.com/content/RdTysrljwe610dPFG7tE/blobs/rnznz2wJ4HqLgIp8CYa4/image.png" alt="" width="563"><figcaption></figcaption></figure>

As a Reverse Proxy, you can use Nginx or Apache on a Linux server and IIS on a Windows server. This server must contain a domain certificate. To launch the HES web application, the AppSettings.json configuration file is used, which contains the database access settings and the SMTP mail server access settings. The remaining parameters are contained in the database.

MySQL or MS SQL server can be used as a database. Critical data in the database can be encrypted using the Data Protection mechanism. HES server contains a number of connectors and integrations with other servers:&#x20;

* Microsoft Active Directory - integration is performed using the LDAPS protocol.&#x20;
* Azure Active Directory - integration is done using the Graph API.&#x20;
* Mail server - access to the server is performed via the SMTP protocol.&#x20;
* Splunk or SIEM server - integration is based on the server's REST Web API.&#x20;
* Service providers - SAML 2.0 or OpenID Connect integration protocols.

## 2. Hideez Full Server Architecture

A full server configuration includes two separate servers for the HES web application, as well as a separate server for the database. Reverse Proxy server with load balancer function is also installed on a separate physical server.&#x20;

The two HES servers operate on a Primary-Standby basis. In the event of a failure on the primary server, the entire load is switched to the backup server. Servers cannot process requests at the same time, because one of the functions of HES is to route traffic between the Hideez Client desktop applications and the Hideez Authenticator mobile applications.&#x20;

Any server compatible with MySQL or MSSQL can be used as a database server, such as MySQL Cluster, Amazon Aurora, MS SQL Datacenter, etc. The server must be configured with full data redundancy.

<figure><img src="https://content.gitbook.com/content/RdTysrljwe610dPFG7tE/blobs/c0IxFt9Tp5VIH9y8uwA0/image.png" alt="" width="563"><figcaption></figcaption></figure>

&#x20;


# Deployment

{% hint style="warning" %}
If you use Linux and need the AD integration, [join your Linux server to the AD](/hideez-enterprise-server/administration/connecting-linux-server-to-active-directory-1)
{% endhint %}

* #### System Requirements:
  * Can be installed on a bare metal or virtual server
  * Linux
    * CentOS Stream 9
    * Ubuntu Server 20 and up
  * Windows Server 2012 and up
  * 4 GB RAM
* Database installation:
  * [MySQL on Windows](/hideez-enterprise-server/deployment/database-installation/mysql-on-windows)
  * [MySQL on Linux](/hideez-enterprise-server/deployment/database-installation/mysql-on-linux)
  * [Microsoft SQL on Windows](/hideez-enterprise-server/deployment/database-installation/microsoft-sql-server-on-windows)
  * [Microsoft SQL on Linux](/hideez-enterprise-server/deployment/database-installation/microsoft-sql-server-on-linux)
* Server deployment:
  * [Windows](/hideez-enterprise-server/deployment/hes-deployment/windows)
  * [Linux](/hideez-enterprise-server/deployment/hes-deployment/linux)
  * [Docker](/hideez-enterprise-server/deployment/hes-deployment/docker)
* Server update:
  * [Windows](/hideez-enterprise-server/deployment/hes-update/windows)
  * [Linux](/hideez-enterprise-server/deployment/hes-update/linux)
  * [Docker](/hideez-enterprise-server/deployment/hes-update/docker)

{% hint style="info" %}
By default, access to the new server:\
login - [admin@server<br>](mailto:admin@hideez.com)password - admin
{% endhint %}


# Database installation


# MySQL on Windows

#### 1. Download [MySQL](https://dev.mysql.com/downloads/installer)

#### 2. Installation

You can read the documentation for installing MySQL at [this](https://dev.mysql.com/doc/refman/8.0/en/mysql-installer-setup.html) address.

* When installing MySQL to run our software, you can select the Server only option.
* During installation, you may be asked to install Microsoft Visual C ++ 2019 Redistributable Package. Agree, and perform the installation.
* Also, during the installation process, you will be prompted to enter a strong password for the root user. Don't forget this password, we'll need it later.

#### 3. Creating MySQL User and Database

{% embed url="<https://www.youtube.com/watch?v=kQto0YkuqWk>" %}

3.1. Start the MySQL Command Line Client (type "MySQL 8.0 Command Line Client" in Windows search).

3.2. The following lines create a database `hesdb`, the user with name `hesuser` and password `<user_password>`. Сhange `<user_password>` to a strong password, otherwise you may get a password validator error.

```
mysql> CREATE DATABASE hesdb;
mysql> CREATE USER 'hesuser'@'%' IDENTIFIED BY '<user_password>';
mysql> GRANT ALL ON hesdb.* TO 'hesuser'@'%';
mysql> FLUSH PRIVILEGES;
```


# MySQL on Linux

### 1. Install

### CentOS Stream *9:*

```
sudo dnf install mysql-server -y
```

Enable and start MySQL service:

```
sudo systemctl restart mysqld.service
sudo systemctl enable mysqld.service
```

### *Ubuntu*&#x20;

```
$ sudo apt install mysql-server -y
```

### 2.   Change the authentication parameters:

```
sudo mysql 
```

run command in mysql console:

```

ALTER USER 'root'@'localhost' IDENTIFIED WITH mysql_native_password by '<mysql_root_password>';
```

Сhange `<mysql_root_password>` to a strong password,

To exit from the MySQL console, press Ctrl+D.

* run `mysql_secure_installation`, to complete the installation:

```
$ sudo mysql_secure_installation
```

### 3. Creating MySQL User and Database

3.1. Run MySQL client and enter your MySQL root password

<pre><code><strong>sudo mysql -h localhost -u root -p
</strong></code></pre>

3.2. The following lines create a database `hesdb`, the user with name `hesuser` and password `<user_password>`. Сhange `<user_password>` to a strong password, otherwise you may get a password validator error.

```
CREATE DATABASE hesdb;
CREATE USER 'hesuser'@'%' IDENTIFIED BY '<user_password>';
GRANT ALL ON hesdb.* TO 'hesuser'@'%';
FLUSH PRIVILEGES;
```

To exit from the MySQL console, press Ctrl+D.


# Microsoft SQL Server on Windows

#### 1. Download Microsoft [SQL Server 2022 Express](https://download.microsoft.com/download/5/1/4/5145fe04-4d30-4b85-b0d1-39533663a2f1/SQL2022-SSEI-Expr.exe)

#### 2. Install Microsoft SQL Server 2022 Express

* You can select the `Basic installation` type during installation.
* Also for database management, we need SQL Server Management Studio (SSMS). You can download it [here](https://aka.ms/ssmsfullsetup).
* Also, as an alternative to Server Management Studio, you can use `sqlcmd`. The `sqlcmd` utility lets you enter Transact-SQL statements, system procedures, and script files at the command prompt.

#### 3. Enable TCP/IP connections

HES uses TCP/IP to connect to the SQL Server database, but SQL Server Express does not enable TCP support by default. To enable TCP/IP:

3.1. In SQL Server Configuration Manager, expand the `SQL Server Network Configuration` -> `Protocols for SQLEXPRESS` node.

3.2. Right-click the `TCP/IP` item on the right, then select `Properties`.

3.3. On the `General` tab, change `Enabled` to **Yes**.

3.4. On the `IP Addresses` tab, under the `IPAll` node, clear the `TCP Dynamic Ports` box.

3.5. In `TCP Port`, enter the port to listen on **1433**. This port is to be used in the HES connection string.

3.6. Click OK.

3.7. Restart the Microsoft SQL Server Express service using either the standard service control panel or the SQL Express tools.

#### 4. Change authentication mode

4.1. Start SQL Server Management Studio and connect to the Server.

4.2. In `Object Explorer`, right-click the instance of SQL Express, then select `Properties`.

4.3. Select the `Security` section on the left.

4.5. Change the `Server Authentication` to **SQL Server and Windows Authentication mode**.

4.6. Restart the Microsoft SQL Server Express service using either the standard service control panel or the SQL Express tools.

#### 5. Creating SQL Server User and Database

**Create a user in Server Management Studio:**

5.1. Start SQL Server Management Studio and connect to the Server.

5.2. In `Object Explorer` go to `Security` -> `Logins`, right-click the `Logins` node and select `New Login`.

5.3. In the "login new" window:

* Enter the username: `hesuser`.
* Change the `Windows authentication` to `SQL Server аuthentication`.
* Enter the user's password.
* Disable `Enforce password expiration` box.
* Click OK.

**Create a database in the Server Management Studio:**

5.4. In `Object Explorer` go to `Databases`, right-click the `Databases`, then select `New Database`.

* Enter the database name: `hesdb`
* select the owner (an user from the previous step).
* Click OK.

**An alternative way to create a database and user is to use the sqlcmd utility.**

5.1. Start the SQLCMD type "sqlcmd" in Windows search.

The following lines create a database `hesdb`, the user `hesuser` with the password `<user_password>`. Сhange `<user_password>` with your real password:

```
> CREATE LOGIN [hesuser]  WITH PASSWORD = 'user_password';
> GO
> CREATE DATABASE hesdb;
> GO
> USE hesdb; 
> GO
> CREATE USER [hesuser] from login [hesuser];
> GO
> GRANT CONTROL ON DATABASE::hesdb  TO [hesuser];
> GO
```


# Microsoft SQL Server on Linux

### 1. Installation

Detailed installation of the Microsoft SQL Server is described [here](https://docs.microsoft.com/en-us/sql/linux/sql-server-linux-setup?view=sql-server-ver15). We are just repeating the steps of the official documentation.

*Centos 7:*

```
# Import the public repository GPG keys 
$ sudo curl -o /etc/yum.repos.d/mssql-server.repo https://packages.microsoft.com/config/rhel/7/mssql-server-2019.repo
$ sudo yum install -y mssql-server

# Download the Microsoft Red Hat repository configuration file.
$ sudo curl -o /etc/yum.repos.d/msprod.repo https://packages.microsoft.com/config/rhel/7/prod.repo

# Setup mssql use Express (free) option number 3
$ sudo /opt/mssql/bin/mssql-conf setup

$ sudo yum install -y mssql-tools unixODBC-devel
```

*Ubuntu 18.04 :*

```
# Import the public repository GPG keys 
$ wget -qO- https://packages.microsoft.com/keys/microsoft.asc | sudo apt-key add -
$ sudo add-apt-repository "$(wget -qO- https://packages.microsoft.com/config/ubuntu/18.04/mssql-server-2019.list)"
$ sudo apt-get update
$ sudo apt-get install -y mssql-server

# Setup mssql use Express (free) option number 3
$ sudo /opt/mssql/bin/mssql-conf setup
curl https://packages.microsoft.com/keys/microsoft.asc | sudo apt-key add -
$ curl https://packages.microsoft.com/config/ubuntu/18.04/prod.list | sudo tee /etc/apt/sources.list.d/msprod.list
$ sudo apt-get update 
$ sudo apt-get install mssql-tools unixodbc-dev -y  
```

*Ubuntu 20.04:*

```
# Import the public repository GPG keys 
$ wget -qO- https://packages.microsoft.com/keys/microsoft.asc | sudo apt-key add -
$ sudo add-apt-repository "$(wget -qO- https://packages.microsoft.com/config/ubuntu/20.04/mssql-server-2019.list)"
$ sudo apt-get update
$ sudo apt-get install -y mssql-server

# Setup mssql use Express (free) option number 3
$ sudo /opt/mssql/bin/mssql-conf setup
$ curl https://packages.microsoft.com/keys/microsoft.asc | sudo apt-key add -
curl https://packages.microsoft.com/config/ubuntu/20.04/prod.list |  sudo tee /etc/apt/sources.list.d/msprod.list
$ sudo apt-get update 
$ sudo apt-get install mssql-tools unixodbc-dev -y  
```

To make sqlcmd/bcp accessible from the bash shell for interactive/non-login sessions, modify the PATH in the \~/.bashrc file with the following command:

```
$ echo 'export PATH="$PATH:/opt/mssql-tools/bin"' >> ~/.bashrc
$ source ~/.bashrc
```

*Ubuntu 22.04:*

```
Unfortunately, Microsoft does not officially support this OS at the moment. 
We track supported platforms at https://docs.microsoft.com/en-us/sql/linux/sql-server-linux-setup?view=sql-server-ver15#supportedplatforms
```

## 2. Creating SQL Server User and Database

2.1. Run sqlcmd and enter your root password (change `<YourSAPassword>` with your real password)

```
sqlcmd -S localhost -U SA -P '<YourSAPassword>'
```

2.2. The following lines create a database `hesdb`, the user with name `hesuser` and password `<user_password>`. Сhange `<user_password>` to a strong password, otherwise you may get a password validator error.

```
> CREATE LOGIN [hesuser] WITH PASSWORD = '<user_password>';
> GO
> CREATE DATABASE hesdb;
> GO
> USE hesdb; 
> GO
> CREATE USER [hesuser] from login [hesuser];
> GO
> GRANT CONTROL ON DATABASE::hesdb  TO [hesuser];
> GO
```

To exit from the Transact-SQL console, press Ctrl+C.


# HES deployment


# Windows

HES deployment - Windows

### 1. Install IIS

#### 1.1. Add IIS role

* Open `Server Manager` and click `Manage` -> `Add Roles and Features`. Click Next.
* Select Role-based or feature-based installation and click Next.
* Select the appropriate server. The local server is selected by default. Click Next.
* Enable Web Server (IIS) and click Next.
* No additional features are necessary to install the Web Adaptor, so click Next.
* On the Web Server Role (IIS) dialog box, click Next.
* On the Select role services dialog box, verify that the web server components listed below are enabled. Click Next.
* Verify that your settings are correct and click Install.
* When the installation completes, click Close to exit the wizard.

#### 1.2. Enable WebSockets on IIS

* Open Server Manager and click Manage.
* Use the Add Roles and Features wizard from the Manage menu or the link in Server Manager.
* Select Role-based or Feature-based Installation. Select Next.
* Select the appropriate server (the local server is selected by default). Select Next.
* Expand Web Server (IIS) in the Roles tree, expand Web Server, and then expand Application Development.
* Select WebSocket Protocol. Select Next.
* If additional features aren't needed, select Next.
* Select Install.
* When the installation completes, select Close to exit the wizard.

#### 1.3. Download and install Windows Hosting Bundle

* [Windows Hosting Bundle, which includes the .NET Core Runtime and IIS support](https://dotnet.microsoft.com/en-us/download/dotnet/thank-you/runtime-aspnetcore-6.0.36-windows-hosting-bundle-installer)

Note: You MUST have IIS installed before installing Windows Hosting Bundle.

### 2. Download HES server

**Option 1**

You can download the zip file from:

<https://update.hideez.com/hes/windows_x64_latest.zip>

then unzip its contents to a folder `C:\Hideez\HES`.

**Option 2**

Or you can do it with PowerShell:

```
> Invoke-WebRequest -Uri  https://update.hideez.com/hes/windows_x64_latest.zip  -OutFile  ~\windows_x64_latest.zip
> Expand-Archive -LiteralPath ~\windows_x64_latest.zip -DestinationPath C:\Hideez\HES
```

this download and extract the HES to `C:\Hideez\HES` directory

### 3. Configuring the HES

Navigate to the 'C:\Hideez\HES' directory and run the **HES.Wizard** application next, follow the setup tips and configure the server

### 4. Configuring IIS

#### 4.1. Create a Self-Signed Certificate for IIS

**Option 1 (creating a certificate using IIS)**

* Start IIS Manager.
* Click on the name of the server in the Connections column on the left. Double-click on **Server Certificates**.
* In the Actions column on the right, click on **Create Self-Signed Certificate...**
* Enter any *friendly* name (for example HES) and then click **OK**.
* You will now have an IIS Self Signed Certificate valid for 1 year listed under Server Certificates.

You can click on the created certificate and see its properties.

**Option 2 (creating a certificate using PowerShell)**

An alternative way to create a certificate is to use the cmdlet `New-SelfSignedCertificate` in PowerShell, which can be used to specify the required CN:

```
New-SelfSignedCertificate -DnsName <you_domain_name>  -FriendlyName <friendly_name>
```

for example:

```
New-SelfSignedCertificate -DnsName hideez.example.com -FriendlyName HES
```

#### 4.&#x32;**.** Add the Web Site

* Start **IIS Manager**.
* In the **Connections** pane, right-click the **Sites** node in the tree view, and then click **Add Web Site**.
* In the **Add Web Site** dialog box, type a *friendly* name for your Web site in the  **Site name** box. "HES" would be a good choice.
* In the **Physical path** box, type the *physical path* of the Web site's folder (C:\Hideez\HES), or click the browse button **(...)** to browse the file system to find the folder.
* If you want to select a different application pool than the one listed in the Application Pool box. In the **Select Application Pool** dialog box, select an application pool from the **Application Pool** list, and then click **OK**.
* The default value in the **IP address** box is **All Unassigned**. If you must specify a static IP address for the Web site, type the IP *address* in the **IP address** box.
* Optionally, type a host header name for the Web site in the **Host Header** box.
* If you do not have to make any changes to the site, and you want the Web site to be immediately available, select the **Start Web site immediately** check box.
* Click **OK**.
* After warning, "The binding" \*: 80 ′ is assigned to another site ... ", click YES&#x20;
* In the **Bindings** pane click "Add" and Add site Binding with type https for you hostname port 443 and with you certificate (In the **SSL certificate** drop-down menu, select your certificate).
* In **Sites** node turn off "Default Web Site".

**4.3. Application pool configuration**

* Go into the IIS Manager
* Click on Application Pools (on the left)
* Right click on your application pool
* Select **Advanced Settings**
* General
  * Change the value of **.NET CLR Version** to **No Managed Code**
* Process Model
  * Change the value of **Idle Time-out (minutes)** to **0**
  * Change the value of **Load User Profile** to **True**
* Recycling
  * Change **Regular Time Interval (minutes)** to **0**

{% hint style="success" %}
[Here](/hideez-enterprise-server/deployment/hes-update/windows) you can find an update guide for Windows.
{% endhint %}

{% hint style="info" %}
By default, access to the new server:\
login - [admin@server<br>](mailto:admin@hideez.com)password - admin
{% endhint %}


# Linux

HES deployment - Linux

* Option 1: CentOS Linux Stream 9
* Option 2: Ubuntu Server LTS 22.04
* Option 3: Ubuntu Server LTS 24.04

## Before you start

* You need to know how to create and edit text files in Linux. For example, you can use `vim` editor. Here you can find a quick start guide on [how to use the Vim editor](https://www.control-escape.com/linux/editing-vim.html).

## 1. Preparation

### 1.1. System Update

*CentOS*

```
sudo dnf update -y
```

*Ubuntu*

```
sudo apt update
sudo apt upgrade -y  
```

Reboot system

```
sudo reboot
```

### 1.2 Disable SELinux (CentOS only)

<pre><code><strong>sudo sed -i 's/SELINUX=enforcing/SELINUX=disabled/' /etc/selinux/config
</strong>sudo reboot
</code></pre>

To verify that SELinux is disabled, you can type:

```
sudo sestatus
SELinux status:                 disabled
```

**Note:** on production servers, usually after installation and verification, you need to re-enable SELinux and configure it accordingly.

### 1.3 Firewall Configuration (optional)

To access the server from the network, ports 80 and 443 and port 22 (default port for connection via ssh) should be opened:

*CentOS:*

```
sudo firewall-cmd --zone=public --permanent --add-port=22/tcp
sudo firewall-cmd --zone=public --permanent --add-port=80/tcp
sudo firewall-cmd --zone=public --permanent --add-port=443/tcp
sudo firewall-cmd --reload
```

*Ubuntu:*

```
sudo ufw allow 22
sudo ufw allow 80
sudo ufw allow 443
sudo ufw enable
```

## 2. Installing Prerequisites

### 2.1. Installing additional packages

*CentOS stream 9 :*

```
sudo dnf install https://dl.fedoraproject.org/pub/epel/epel-release-latest-9.noarch.rpm -y
sudo dnf install libgdiplus libicu jq -y
sudo dnf install compat-openssl11 -y

```

*Ubuntu 22.04:*

```
sudo apt install libgdiplus libicu70 jq gss-ntlmssp-dev -y
```

*Ubuntu 24.04:*

```
sudo apt install libgdiplus libicu74 jq gss-ntlmssp-dev -y
```

Package descriptions:

* **libgdiplus** – An open-source implementation of the GDI+ graphics library used by .NET applications for image rendering and drawing operations on Linux.
* **libicu70** – International Components for Unicode (ICU) library that provides robust Unicode and globalization support, including string collation, date/number formatting, and locale-specific operations.
* **jq** – A lightweight command-line processor for JSON data, enabling filtering, parsing, and transformation of structured JSON directly in the terminal.
* **gss-ntlmssp-dev** – Development package for GSS-NTLMSSP, which enables NTLM authentication through the GSSAPI framework, often used for integrating Linux services with Windows Active Directory.

## 3. Installing the HES server

### 3.1. Download HES server

```
cd ~
curl -O https://update.hideez.com/hes/linux_x64_latest.tar.gz
```

### 3.2. Extracting files and moving to the /opt directory

```
tar -xvf linux_x64_latest.tar.gz
sudo mv HES /opt/
```

### 3.3. Configuring the HES

Navigate to the '/opt/HES/' directory and run the **HES.Wizard** application <br>

```
cd /opt/HES/
sudo ./HES.Wizard
```

next, follow the setup tips and configure the server

### 3.4. Daemonizing of the HES

We already prepared the configuration file to start and manage the HES server in the `/opt/HES/Deploy` directory. You need to copy the file `HES.service` to the `/lib/systemd/system/`:

```
sudo cp /opt/HES/Deploy/HES.service /lib/systemd/system/HES.service
```

Enabling autostart:

```
sudo systemctl enable HES.service
sudo systemctl restart HES.service
```

You can verify that HES server is running with the command:

```
sudo systemctl status HES
```

The output of the command should be something like this:

```
● HES.service - Hideez Enterprise Server
     Loaded: loaded (/usr/lib/systemd/system/HES.service; enabled; vendor preset: disabled)
     Active: active (running) since Wed 2022-12-21 14:15:03 UTC; 8s ago
   Main PID: 929817 (HES.Web)
      Tasks: 18 (limit: 4405)
     Memory: 103.1M
        CPU: 4.817s
     CGroup: /system.slice/HES.service
             └─929817 /opt/HES/HES.Web
```

## 4. Configuring Reverse Proxy Server

To access your server from the local network as well as from the Internet, you have to configure a reverse proxy. We will use the Nginx server for this.

### 4.1. Install Nginx

*CentOS 7:*

```
sudo yum install nginx -y
sudo systemctl enable nginx
```

*Ubuntu:*

```
sudo apt install nginx -y
```

### 4.2.  Copying of self-signed certificates for Nginx

&#x20;We have prepared a self-signed certificate for nginx that you can use to test running HES.  Just copy it to nginx:<br>

```
sudo mkdir /etc/nginx/certs
sudo cp /opt/HES/Deploy/certs/*   /etc/nginx/certs
```

{% hint style="info" %}
**Note :**

In the production environment, you should take care of acquiring a certificate from a certificate authority. For a self-signed certificate, the browser will alert you that site has security issues.
{% endhint %}

### 4.3. Updating Nginx config

We prepared some Nginx configurations for different versions of Linux and placed them in the `/opt/HES/Deploy` directory. You may just copy the corresponding file or you can review and edit it for your needs.

*CentOS 7:*

```
sudo cp /opt/HES/Deploy/CentOS7/nginx.conf /etc/nginx/nginx.conf
```

*Ubuntu 20:*

```
$ sudo cp /opt/HES/Deploy/Ubuntu20/nginx.conf /etc/nginx/nginx.conf
```

* remove default nginx site:

```
sudo rm  /etc/nginx/sites-enabled/default
```

*Ubuntu 22, Ubuntu 24:*

```
sudo cp /opt/HES/Deploy/Ubuntu22/nginx.conf /etc/nginx/nginx.conf
```

* remove default nginx site:

```
sudo rm  /etc/nginx/sites-enabled/default
```

After copying the file, it is recommended to verify nginx settings:

```
$ sudo nginx -t
```

The output should be something like this:

```
nginx: the configuration file /etc/nginx/nginx.conf syntax is ok
nginx: configuration file /etc/nginx/nginx.conf test is successful
```

Otherwise, you should carefully review the settings and correct the errors.

### 4.4. Restart nginx

```
sudo systemctl restart nginx
```

### 4.5. Check that nginx service is installed and started

```
sudo systemctl status nginx
```

The output would be something like this:

```
* nginx.service - The nginx HTTP and reverse proxy server
   Loaded: loaded (/usr/lib/systemd/system/nginx.service; enabled; vendor preset: disabled)
   Active: active (running) since Sat 2020-01-25 08:22:56 UTC; 8min ago
  Process: 1702 ExecStart=/usr/sbin/nginx (code=exited, status=0/SUCCESS)
  Process: 1700 ExecStartPre=/usr/sbin/nginx -t (code=exited, status=0/SUCCESS)
  Process: 1699 ExecStartPre=/usr/bin/rm -f /run/nginx.pid (code=exited, status=0/SUCCESS)
 Main PID: 1704 (nginx)
   CGroup: /system.slice/nginx.service
           +-1704 nginx: master process /usr/sbin/nginx
           +-1705 nginx: worker process
```

{% hint style="info" %}
[Here](/hideez-enterprise-server/deployment/hes-update/linux) you can find an update guide for Linux.
{% endhint %}

{% hint style="info" %}
By default, access to the new server:\
login - [admin@server<br>](mailto:admin@hideez.com)password - admin
{% endhint %}


# Docker

HES deployment - Docker

This instruction shows how to install the HES server using docker containers on Linux. Examples of commands are given for CentOS Stream  9 and Ubuntu (20+),  for other Linux versions, refer to the documentation on installing and running docker. The steps for running HES will not be different.

First of all, you need to decide what URL will be for your future HES server. It can be something like hideez.yurcompany.com. Hereinafter, this name is indicated as \<your\_domain\_name>. You can copy this instruction into any text editor and replace all instances of the \<your\_domain\_name> with your name. After that, you can execute most of the commands just copying them from the editor.

You need to add your domain name to the DNS settings of your hosting provider.

## 1. Preparation (if not already done)

### Install Docker

You can also always refer to the official installation documentation: <https://docs.docker.com/engine/install>

**CentOS**

```
sudo yum install -y yum-utils
sudo yum-config-manager --add-repo https://download.docker.com/linux/centos/docker-ce.repo
sudo yum install -y docker-ce docker-ce-cli containerd.io docker-buildx-plugin docker-compose-plugin
sudo systemctl start docker
sudo systemctl enable docker
```

in case of unsuccessful installation, on Centos, you may need to remove some packages

```
sudo yum remove runc podman buildah -y
```

and retry the installation

**Ubuntu**

```
# Add Docker's official GPG key:
sudo apt-get update 
sudo apt-get install ca-certificates curl gnupg -y
sudo install -m 0755 -d /etc/apt/keyrings 
curl -fsSL https://download.docker.com/linux/ubuntu/gpg | sudo gpg --dearmor -o /etc/apt/keyrings/docker.gpg
sudo chmod a+r /etc/apt/keyrings/docker.gpg

# Add the repository to Apt sources:
echo \
  "deb [arch="$(dpkg --print-architecture)" signed-by=/etc/apt/keyrings/docker.gpg] https://download.docker.com/linux/ubuntu \
  "$(. /etc/os-release && echo "$VERSION_CODENAME")" stable" | \
  sudo tee /etc/apt/sources.list.d/docker.list > /dev/null
sudo apt-get update 
# Install docker
sudo apt-get install -y docker-ce docker-ce-cli containerd.io docker-buildx-plugin docker-compose-plugin
```

**To verify installed docker version run the following command:**

```
docker --version

# Docker version 27.3.1, build ce12230
```

and docker compose:

<pre><code><strong>docker compose version
</strong>
# Docker Compose version v2.29.7
</code></pre>

## 2. Іnstalling HES in the docker

### Download templates

We have prepared an archive with a template for building containers

```
cd ~
curl -O https://update.hideez.com/hes/docker_latest.tar.gz
```

### Extracting files and moving to the /opt directory and create folders for HES

```
tar -xvf docker_latest.tar.gz
sudo mv HES /opt/ 
```

### Build docker image

```
cd /opt/HES/
sudo docker build . -t hes
```

During operation, HES uses an encryption certificate that will be generated in the /opt/hes/hes-site/x509stores directory Since the server will run under the "root" user inside the container, you need to change the owner of the certificate directory:

```
sudo chown root:root /opt/HES/hes-site/x509stores
```

(optional) during the build, some space was used, then it can be cleared:

```
sudo docker builder prune --force            
```

and load the container&#x73;**:**

```
sudo docker compose up -d     
```

### Check the status

You can check the status of the docker containers running the command:

```
sudo docker compose ps


NAME        IMAGE     COMMAND                  SERVICE     CREATED         STATUS                        PORTS
hes-mysql   mysql     "docker-entrypoint.s…"   hes-mysql   9 minutes ago   Up About a minute (healthy)   3306/tcp, 33060/tcp
hes-nginx   nginx     "/docker-entrypoint.…"   hes-nginx   9 minutes ago   Up About a minute             0.0.0.0:80->80/tcp, :::80->80/tcp, 0.0.0.0:443->443/tcp, :::443->443/tcp
hes-site    hes       "./HES.Web"              hes         9 minutes ago   Up About a minute             5000/tcp
```

To make sure that everything is configured correctly, open the URL of your site in a browser (`https://<your_domain_name>`). You should see the server authorization page. Log in using the default login 'admin\@server' and default password 'admin'.

In case you cannot log in to the HES, see log files located in '/opt/HES/hes-site/logs'

### Configure the Nginx (Optional)

Stop Server:

```
cd /opt/HES
sudo docker compose down
```

Open the `/opt/HES/nginx/nginx.conf` file for editing. Uncoment and replace all instances of \<your\_domain\_name> with your name.

Finally, when config files updated,  you can run the server:

```
cd /opt/HES
sudo docker compose up -d 
```

### Configure the Docker for MS SQL (Optional)

Currently, HES can work with two databases: MySQL or MS SQL. By default, we use My SQL, but if you want to switch to MS SQL, you will need to perform a few additional steps, which will be described below

Skip this step, if you use a MySQL database<br>

Stop Server:

```
cd /opt/HES
sudo docker compose down
```

So, first you need to tweak the file `/opt/HES/docker-compose.yml`

We have prepared a templates  to work with the MS SQL container. Just run next commands:

```
sudo cp /opt/HES/mssql/docker-compose.yml /opt/HES/docker-compose.yml
sudo cp /opt/HES/mssql/appsettings.Production.json /opt/HES/hes-site/appsettings.Production.json
```

You need to find the text in docker-compose.yml  file

`SA_PASSWORD: C00ll_Passwrd_here`

and set your SA user password instead of 'C00ll\_Passwrd\_here'.  We will later need this password to create a user and HES database

Start MS SQL container only:

```
sudo docker-compose up -d hes-mssql
```

Use the docker exec -it command for create a new database and user:

```
sudo docker exec -it hes-mssql /opt/mssql-tools18/bin/sqlcmd -S localhost -U SA -P "C00ll_Passwrd_here" -No  -i /root/create_database.sql
```

instead of "C00ll\_Passwrd\_here", enter your password here, which you specified in the `/opt/HES/docker-compose.yml` file

The above command will execute the "/opt/HES/mssql/create\_database.sql" script, which you can view (and optionally modify). As a result, a user and a database will be created in the Ms Sql database. Please note that this user and database will be used by HES (in the file /opt/HES/hes-site/appsettings.Production.json)

after changing the settings, you can start the server:

```
cd /opt/HES
sudo docker compose up -d 
```

{% hint style="info" %}
[Here](/hideez-enterprise-server/deployment/hes-update/docker) you can find an update guide for Docker.
{% endhint %}

{% hint style="info" %}
By default, access to the new server:\
login - [admin@server<br>](mailto:admin@hideez.com)password - admin
{% endhint %}


# Deployment without Internet access

HES deployment - Deployment without Internet access

This guide describes how to install the HES server on a computer that does not have Internet access. An example is taken for RedHat 7.9 in which MySQL 8 and nginx are not present in official repositories.

#### In the test environment we have a "fresh" server with SELinux and firewall disabled

```
systemctl stop firewalld
systemctl disable firewalld
sed -i 's/SELINUX=enforcing/SELINUX=disabled/' /etc/selinux/config
reboot
```

#### Enable local repo

For install additives packages, If you do not have a local repository, you need to connect, for example, a repository with an official DVD in "/media/iso/”

```
cp /media/iso/media.repo /etc/yum.repos.d/rhel7dvd.repo
chmod 644 /etc/yum.repos.d/rhel7dvd.repo
```

then edit file ‘/etc/yum.repos.d/rhel7dvd.repo’

```
vi /etc/yum.repos.d/rhel7dvd.repo
```

and bring this file to this content:

```
[InstallMedia]
name=Red Hat Enterprise Linux 7.9
mediaid=1600369739.509793
metadata_expire=-1
gpgcheck=1
cost=500
enabled=1
baseurl=file:///media/iso/
gpgkey=file:///etc/pki/rpm-gpg/RPM-GPG-KEY-redhat-release
```

here "/media/iso/" is our DVD

and finally, connect the repository:

```
yum clean all
yum repolist enabled
```

#### Remove mariadb-libs

```
yum remove mariadb-libs -y
```

#### Install additive packages from default repo (CD-ROM in our case)

```
yum install perl net-tools libicu cyrus-sasl -y
```

#### Download files

We will need to install the following programs: HES, MySQL, nginx

You can always find the latest versions of these programs at the following links:

* HES - <https://update.hideez.com/hes/windows_x64_latest.zip>
* MySQL - <https://dev.mysql.com/downloads/mysql/>\
  here we need the following packages:
  * mysql-community-client
  * mysql-community-client-plugins
  * mysql-community-common
  * mysql-community-libs
  * mysql-community-server
* nginx - <http://nginx.org/packages/>

Of course, you can always download from the original sites and download them manually, or:

Option 1:&#x20;

We have saved the rpm files you need on our site by following the link <https://update.hideez.com/hes/AdditionalLibraries/rpm/> and hes in <https://update.hideez.com/hes>

Option 2:\
For automatic download, we have prepared a small script that downloads the latest versions of packages at the time of writing our instructions:

* **Or on windows computer:**

```
#!/bin/bash
# HES
curl -O https://update.hideez.com/hes/linux_x64_latest.tar.gz
# MySQL
curl -O https://cdn.mysql.com//Downloads/MySQL-8.0/mysql-community-server-8.0.27-1.el7.x86_64.rpm
curl -O https://cdn.mysql.com//Downloads/MySQL-8.0/mysql-community-client-8.0.27-1.el7.x86_64.rpm
curl -O https://cdn.mysql.com//Downloads/MySQL-8.0/mysql-community-client-plugins-8.0.27-1.el7.x86_64.rpm
curl -O https://cdn.mysql.com//Downloads/MySQL-8.0/mysql-community-libs-8.0.27-1.el7.x86_64.rpm
curl -O https://cdn.mysql.com//Downloads/MySQL-8.0/mysql-community-common-8.0.27-1.el7.x86_64.rpm
# nginx
curl -O http://nginx.org/packages/rhel/7/x86_64/RPMS/nginx-1.20.2-1.el7.ngx.x86_64.rpm
```

&#x20;You can save it, on a computer with internet access, called "download.sh" and then run:

```
bash download.sh
```

* **Or on windows computer:**

```
# HES
$Name="linux_x64_latest.tar.gz"
Invoke-WebRequest https://update.hideez.com/hes/$Name -OutFile $Name

# MySQL
$Name="mysql-community-server-8.0.27-1.el7.x86_64.rpm"
Invoke-WebRequest https://cdn.mysql.com//Downloads/MySQL-8.0/$Name -OutFile $Name
$Name="mysql-community-client-8.0.27-1.el7.x86_64.rpm"
Invoke-WebRequest https://cdn.mysql.com//Downloads/MySQL-8.0/$Name -OutFile $Name
$Name="mysql-community-client-plugins-8.0.27-1.el7.x86_64.rpm"
Invoke-WebRequest https://cdn.mysql.com//Downloads/MySQL-8.0/$Name -OutFile $Name
$Name="mysql-community-libs-8.0.27-1.el7.x86_64.rpm"
Invoke-WebRequest https://cdn.mysql.com//Downloads/MySQL-8.0/$Name -OutFile $Name
$Name="mysql-community-common-8.0.27-1.el7.x86_64.rpm"
Invoke-WebRequest https://cdn.mysql.com//Downloads/MySQL-8.0/$Name -OutFile $Name

# nginx
$Name="nginx-1.20.2-1.el7.ngx.x86_64.rpm"
Invoke-WebRequest http://nginx.org/packages/rhel/7/x86_64/RPMS/$Name -OutFile $Name
```

save it, on a computer with internet access, called "download.ps1" and then run in powershell:

```
.\download.ps1
```

It doesn't matter how you download the files, but in the end you need to have the following files on your computer:

* linux\_x64\_latest.tar.gz
* mysql-community-client-8.0.27-1.el7.x86\_64.rpm
* mysql-community-client-plugins-8.0.27-1.el7.x86\_64.rpm
* mysql-community-common-8.0.27-1.el7.x86\_64.rpm
* mysql-community-libs-8.0.27-1.el7.x86\_64.rpm
* mysql-community-server-8.0.27-1.el7.x86\_64.rpm
* nginx-1.20.2-1.el7.ngx.x86\_64.rpm

Transfer these files to the computer on which you want to install HES and run the following commands

* installing MySQL and nginx:

```
rpm -ivh *.rpm
systemctl enable mysqld nginx
systemctl start mysqld nginx
```

* installing HES:

```
tar -xvf linux_x64_latest.tar.gz
mv HES /opt/
```

Then follow our instructions posted [here](/hideez-enterprise-server/deployment/hes-deployment/linux) given that MySQL, nginx and HES have already been installed. All you have to do is configure them.

{% hint style="info" %}
By default, access to the new server:\
login - [admin@server<br>](mailto:admin@hideez.com)password - admin
{% endhint %}


# Troubleshooting

HES deployment - Troubleshooting

### Email notifications are not coming

If you chosen Gmail as your mail server and you don't get the email notifications from HES, please, try next guide:

* Go to the [myaccount.google.com](https://myaccount.google.com/)
* Then open the "Security" tab → "Signing in to Google" section
* Add any convenient 2-Step Verification method (for example, [OTP](/use-cases/hideez-key/using-hideez-key-as-otp-security-key-for-your-two-factor-authentication) or [security key](/use-cases/fido-security-key/using-hideez-key-as-u2f-security-key-for-your-two-factor-authentication#google))
* Then go back to the "Security" tab → "Signing into Google" section
* Choose "App passwords" option
* Choose from the "Select app" dropdown option "Other (Custom name)"
* Enter application name ("HES") and click "Generate" button
* Go to the server HES → Parameters→ Mail Section and сonfiguring credentials to send email notifications to the users.

### If you want to change the default ports

By default, .Net Core uses ports 5000 and 5001. Therefore, if only one domain is running on the server, port numbers can be skipped. But if it is supposed to run a few sites on one computer, then it is necessary to specify different ports for each site in json file.

For example, for a site to listen to ports 6000 and 6001, after "AllowedHosts": "\*" add the following (via comma):

```
,
 "Kestrel": {
    "Endpoints": {
      "Http": {
        "Url": "http://localhost:6000"
      },
      "Https": {
        "Url": "https://localhost:6001"
      }
    }
  }
```

### To include values that contain a semicolon, single-quote character, or double-quote character

The basic format of a connection string includes a series of keyword/value pairs separated by semicolons. The equal sign (=) connects each keyword and its value. To include values that contain a semicolon, single-quote character, or double-quote character, the value must be enclosed in double quotation marks. If the value contains both a semicolon and a double-quote character, the value can be enclosed in single quotation marks. The single quotation mark is also useful if the value starts with a double-quote character. Conversely, the double quotation mark can be used if the value starts with a single quotation mark. If the value contains both single-quote and double-quote characters, the quotation mark character used to enclose the value must be doubled every time it occurs within the value.

### How to enable logging before HES starts (Windows)

In case there is no logs folder in the HES location, please, follow next steps:

1. Open **web.config** file at the '**C:/Hideez/HES**' folder and check if `stdoutLogEnabled="true"`. If not - set it "true" and save changes.
2. Restart HES from the IIS. It may turn on logging and the log file will appear at the "**C:/Hideez/HES/logs**".

## Enabling Virtual List View

If you encounter the "Unavailable Critical Extension" error during user sync or a password update, it may be caused by a disabled Virtual List View (VLV). VLV allows LDAP applications to query large directory containers efficiently in manageable chunks. By default, Virtual List View is enabled in eDirectory.

#### Enabling Virtual List View on Active Directory:

1. Click Start -> Run type Adsiedit.msc, and ENTER.
2. In the ADSI Edit tool, expand the Configuration\[DomainController] node.
3. Expand the CN=Configuration,DC=DomainName container.
4. Expand the CN=Services object.
5. Expand the CN=Windows NT object.
6. Right-click the CN=Directory Service object.
7. Click Properties.
8. In the Attributes list, click msds-Other-Settings > Edit.
9. In the Values list, click any instance of DisableVLVSupport=x where x is not equal to 0, and click Remove.
10. Click OK twice. Close the ADSI Edit tool.

<figure><img src="https://1669663611-files.gitbook.io/~/files/v0/b/gitbook-x-prod.appspot.com/o/spaces%2FRdTysrljwe610dPFG7tE%2Fuploads%2FCeX6tkjueyO1tmeJqB4w%2Fimage.png?alt=media&amp;token=f0e65b7b-5c87-40fd-9a68-5e29285051a4" alt="" width="563"><figcaption></figcaption></figure>


# HES update


# Windows

HES update - Windows

## The simplest way to update the HES server.

1. Stop the server from IIS
2. Download the zip file from <https://update.hideez.com/hes/windows_x64_latest.zip>
3. Extract binary files from the zip archive to your HES folder
4. Start the server from IIS

## Recommended updating the HES server with backup&#x20;

### 1. Backup the HES binaries and the configuration file

* Copy existed folder `C:\Hideez\HES` to `C:\Hideez\HES_old`

### 2. Backup SQL Database

For MySQL database:

* YOUR\_DB\_NAME – The database name may be different for you, depending on how you have named it on install.
* You will need to enter the MySQL root password.

```
> cd "C:\Program Files\MySQL\MySQL Server 8.0\bin"
>  .\mysqldump -u root -p YOUR_DB_NAME > "C:\Hideez\HES.old\YOUR_DB_NAME.sql"
```

For Microsoft SQL Server database:

* Go to the SQL Server Management Studio
* Right-click on the database name Select Tasks > Backup Select "Full" as the backup type Select "Disk" as the destination Click on "Add..." to add a backup file and type `C:\Hideez\HES_old\`YOUR\_DB\_NAME`.bak` and click "OK" Click "OK" again to create the backup

### 3. Download and install the latest HES

Download the zip file from <https://update.hideez.com/hes/windows_x64_latest.zip>, then unzip its content to the folder `C:\Hideez\HES`.

### 4. Restoring the configuration file

Copy `C:\Hideez\HES_old\appsettings.Production.json` to `C:\Hideez\HES\appsettings.Production.json` in the File Explorer

### 5. Starting the HES

Start the site  using  the IIS console

## If something goes wrong, you can restore the HES server and Database server using the following steps:

1. Stop the site using the IIS console, then rename the old folder to HES,
2. Then restore the database:

**For MySQL database:**

```
> cd "C:\Program Files\MySQL\MySQL Server 8.0\bin"
> Get-Content  "C:\Hideez\HES_old\YOUR_DB_NAME.sql" | .\mysql.exe  -u root -p YOUR_DB_NAME
```

**For Microsoft SQL Server database:**

* In the SQL Server Management Studio:
* In the left navigation bar, right-click on `Databases` and then click `Restore Database`.
* In the `Source` section, select `Devic`e and click the button with three dots and type `C:\Hideez\HES_old\YOUR_DB_NAME.bak`
* In the pop-up window that opens, click `Add` and browse for your backup file. Click `OK`.
* In the left navigation menu, click `Options`.
* In the pane on the right, select `Overwrite the existing database (WITH REPLACE)` and `Close existing connections to destination database`.
* Click `OK`.

3. Then start the site using the IIS console.

## Update using a script

In the latest versions, there is another way to update the server – using the **PowerShell** script **update.ps1**, which is located in the directory with the server (C:/Hideez/HES/update.ps1). This script has the following command line parameters:

-service - Name of IIS site. Default HES&#x20;

-url - URL to download the update file. The default, URL will be taken from <https://update.hideez.com/hes/build.json>

But you can override these parameters. For example, to update HES offline, from the file "windows\_x64\_latest.zip", located in the C:/Updates directory, you can run the script in PowerShell, as follows: &#x20;

`update.ps1 -url file://C:/Updates/windows_x64_latest.zip`


# Linux

HES deployment - Linux

## To update the HES server for Linux, you have to:

1. Disable the Data Protection on the HES.
2. Update the server using the following instruction.
3. Enable Data Protection again.

## Option 1 (using a script)

To update the server, you can use the `update.sh` script, which is located in the HES directory (`/opt/HES` default). You can run it either manually or through the web interface (by clicking on the server version). If an update is available, you will be prompted to update the server using a script. If you have changed the location of the server, the name of the service to run, you can manually update the necessary parameters in the script.

The script has the following command line parameters:&#x20;

\--dir -  path to HES bin directory. Default /opt/HES&#x20;

\--service  - name of HES-service. Default HES&#x20;

\--url  - url to download the update file. Default, url will be taken from <https://update.hideez.com/hes/build.json&#x20>;

But you can override these parameters. For example, to update HES offline, from the file "linux\_x64\_latest.tar.gz", located in the user's home directory, you can run the script as follows: &#x20;

`/opt/HES/update.sh --url file://~/linux_x64_latest.tar.gz`

or, if the update is on another of your resources:\
`update.ps1 --url https://<your_resource/linux_x64_latest.tar.gz`

## Option 2 (without using a script)

### 2.1. Stopping HES Service

```
  $ sudo systemctl stop HES
```

### 2.2. Backup the HES binaries and the configuration file

```
  $ sudo mv /opt/HES /opt/HES.old
```

### 2.3. Backup the Database

* For MySQL database:

The following command will create a copy (dump) of the database `hesdb` in file `hesdb.sql` in `/opt/HES.old` directory:

```
  $ sudo mysqldump -uroot -p<MySQL_root_password>  hesdb > /opt/HES.old/hesdb.sql
```

change `<MySQL_root_password>` with your real password.

* For Microsoft SQL Server database:

The following command will create a backup of the database `hesdb` in file `hesdb.bak` in `/var/opt/mssql/data` directory:

```
sqlcmd -S localhost -U SA -Q "BACKUP DATABASE [hesdb] TO DISK = N'/var/opt/mssql/data/hesdb.bak' WITH NOFORMAT, NOINIT, NAME = 'db-full', SKIP, NOREWIND, NOUNLOAD, STATS = 10"
```

### 2.4. Download a new version of the HES

```
$ cd ~
$ curl -O https://update.hideez.com/hes/linux_x64_latest.tar.gz
$ tar -xvf linux_x64_latest.tar.gz
$ sudo mv HES /opt/
```

### 2.5. Restore the configuration file

```
  $ sudo cp /opt/HES.old/appsettings.Production.json /opt/HES/appsettings.Production.json
```

### 2.6. Restart the HES and check its status

```
  $ sudo systemctl restart HES
  $ sudo systemctl status HES

  
  ● HES-hideez.example.com.service - Hideez Enterprise Service
   Loaded: loaded (/usr/lib/systemd/system/HES-hideez.example.com.service; enabled; vendor preset: disabled)
   Active: active (running) since Wed 2020-03-25 10:48:12 UTC; 16s ago
 Main PID: 4657 (HES.Web)
   CGroup: /system.slice/HES.service
           └─4657 /opt/HES/HES.Web

Mar 25 10:48:12 hesservertest systemd[1]: Started Hideez Enterprise Service.
```

**After checking that the update was successful and everything works fine, you can delete copies of the database and server:**

```
$ sudo rm -rf /opt/HES.old
```

## If something goes wrong, you can restore the HES server using the following commands

Restore the folder with previous HES version:

```
$ sudo systemctl stop HES
$ sudo mv /opt/HES.old /opt/HES
```

Restore the Database:

* For MySQL database:

```
$ sudo mysql -uroot -p<MySQL_root_password> hesdb < /opt/HES.old/hesdb.sql
```

change `<MySQL_root_password>` with your real password.

* For Microsoft SQL Server database:

```
$ sqlcmd -S localhost -U  SA -Q "RESTORE DATABASE [hesdb] FROM DISK = N'/var/opt/mssql/data/hesdb.bak' WITH FILE = 1, NOUNLOAD, REPLACE, STATS = 5"
```

then restart HES:

```
$ sudo systemctl  start HES
```

### As an alternative, you can make updates via a web interface on your HES server&#x20;

1. Open the HES server.
2. Open section **Settings** → **Parameters** on the sidebar → **Server Update**
3. Type address in the field **Service Name** (by default “HES.service”)
4. In the section with available updates, Click **Update**

{% hint style="info" %}
Note: that way of updating HES available **only** for servers deployed on Linux&#x20;
{% endhint %}


# Docker

HES update - Docker

**Migration from 3.10 (or less) to 3.11 (or up) requires additional steps because we have significantly improved the data protection mechanism - now it is built on certificates and doesn't require entering the password manually on server start. Please follow these steps to update your HES:**

1. Update all Hideez Clients to 3.16.X, the new version can work with both old and new versions of the HES.
2. Disable the Data Protection on the HES.
3. Update the server using the following instruction.
4. Enable Data Protection again.

#### Create folder for backup

```
sudo mkdir /opt/HES.old
```

Backup the Database (Optimal (for possible further recovery)):

* MySQL Database:

The following command will create a copy of the database (dump) in file hesdb.sql in `/opt/HES.old` directory (on host) from container with name `hes-mysql`:

```
cd /opt/HES/
sudo sh -c "docker exec hes-mysql /usr/bin/mysqldump -u root --password=password hesdb > /opt/HES.old/hesdb.sql"
```

* MS SQL Database:

The following command will create a backup of the database  hesdb in file hesdb.bak in `/opt/HES/mssql/data/` local directory:

```
cd /opt/HES/
sudo docker exec -it hes-mssql  /opt/mssql-tools18/bin/sqlcmd -S localhost -U SA -P "C00ll_Passwrd_here"  -Q "BACKUP DATABASE [hesdb] TO DISK = N'/var/opt/mssql/data/hesdb.bak' WITH NOFORMAT, NOINIT, NAME = 'db-full', SKIP, NOREWIND, NOUNLOAD, STATS = 10"
```

instead of "C00ll\_Passwrd\_here", enter your password here, which you specified in the `/opt/HES/docker-compose.yml` file

### Stop containers:

```
cd /opt/HES/
sudo docker compose down
```

(Optimal) Save the image of HES to a tar file (for possible further recovery):

```
sudo docker save -o /opt/HES.old/hes.tar hes
```

### Remove image of HES:

```
sudo docker rmi hes --force
```

To upgrade the server to the latest version, run commands:

```
sudo docker build . -t hes
```

and Restart containers:

```
sudo docker compose up -d
```

### If something goes wrong, you can restore the HES server using the following commands:

Stop containers:

```
cd /opt/HES/
sudo docker compose down
```

Remove image of HES:

```
sudo docker rmi hes --force
```

Restore the Database

* My SQL:

Start MySQL container only:

```
sudo docker compose up -d hes-mysql
```

Restore the MySQL Database from dump file:

```
sudo cat /opt/HES.old/hesdb.sql | sudo docker exec -i hes-mysql /usr/bin/mysql -u root --password=password hesdb
sudo docker compose down 
```

* MS SQL:

Start MS SQL container only:

```
sudo docker compose up -d hes-mssql
```

Restore the MS SQL Database from bak file:

```
cd /opt/HES/
sudo docker exec -it hes-mssql /opt/mssql-tools18/bin/sqlcmd -S localhost -U SA -P "C00ll_Passwrd_here"  -Q "RESTORE DATABASE [db] FROM DISK = N'/var/opt/mssql/data/hesdb.bak' WITH FILE = 1, NOUNLOAD, REPLACE, STATS = 5"
```

instead of "C00ll\_Passwrd\_here", enter your password here, which you specified in the `/opt/HES/docker-compose.yml` file

Restore old image of HES from tar file:

```
sudo docker load -i /opt/HES.old/hes.tar
```

and start containers:

```
sudo docker compose up -d
```

### After checking that the update was successful and everything works fine, you can delete copies of the database and server:

```
$ sudo rm -rf /opt/HES.old
```


# Publishing on-premises HES for remote users

### HES connection to on-premise AD via Application Proxy

If you need to connect HES to on-premises AD while providing access from the internet, you need to deploy the server inside the company's corporate network and make it accessible from the internet using Azure AD and Application Proxy: More information about Azure Active Directory Application Proxy:&#x20;

<figure><img src="https://content.gitbook.com/content/RdTysrljwe610dPFG7tE/blobs/ugiiYm7T5n5vbyhvSZqp/image.png" alt=""><figcaption></figcaption></figure>

{% hint style="info" %}
Please refer to the guide for more information:

* [Microsoft Entra application proxy documentation](https://learn.microsoft.com/en-us/entra/identity/app-proxy/)
  {% endhint %}


# Administration

Hideez Enterprise Server Administration

Immediately after installing the server, a default administrator account will be created with the username **admin\@server** and the password **“admin,”** which is configured in the database.

{% hint style="info" %}
**Important Recommendations:**

* It is highly recommended to remove the **admin\@server** user from the database after adding another administrator.
* Retaining the **admin\@server** account may prevent you from receiving email notifications from the server and hinder password recovery if forgotten.
  {% endhint %}


# How to change the password for an administrator account?

Hideez Enterprise Server – Changing the password

#### Step 1

In the upper right corner of the window, click the profile icon and select the **Profile** tab from the drop-down list.

<figure><img src="https://1669663611-files.gitbook.io/~/files/v0/b/gitbook-x-prod.appspot.com/o/spaces%2FRdTysrljwe610dPFG7tE%2Fuploads%2Fcp9R8ceTAhracpL1k3qM%2Fimage.png?alt=media&amp;token=28e88448-3be0-4e09-8237-a9498935e984" alt=""><figcaption></figcaption></figure>

Step 2

In the Profile window, navigate to the **Password** section and click **Change**.

<img src="https://content.gitbook.com/content/RdTysrljwe610dPFG7tE/blobs/dssnq5MqN837Scfcftzq/%D0%B7%D0%B0%D0%BC%D0%B5%D0%BD%D0%B0%20%D0%BF%D0%B0%D1%80%D0%BE%D0%BB%D1%8F.jpg" alt="" width="563">

Then enter the current password and a new password in the appropriate fields and click **Save**.
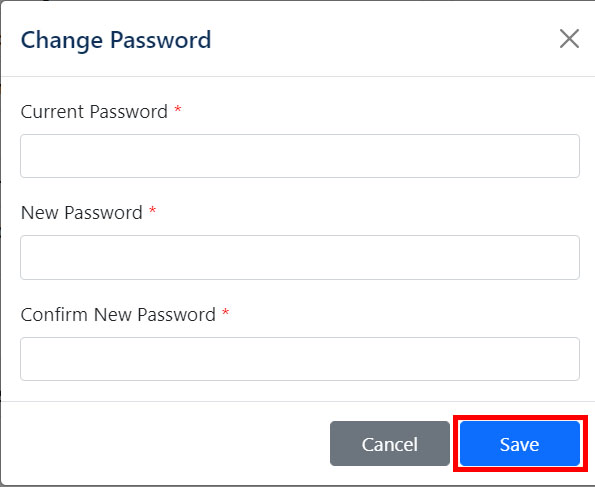
<img src="https://content.gitbook.com/content/RdTysrljwe610dPFG7tE/blobs/ObD0VRAskCcZehXAvsuM/%D0%B7%D0%B0%D0%BC%D0%B5%D0%BD%D0%B0%20%D0%BF%D0%B0%D1%80%D0%BE%D0%BB%D1%8F%201.jpg" alt="" width="375">

{% hint style="info" %}
It is not recommended to use the **<admin@hideez.com>** account for password recovery, as you will not be able to recover a forgotten password via email. [Create your own account](/hideez-enterprise-server/administration/adding-an-admin-account) with a valid email address for this purpose.
{% endhint %}


# How to recover a forgotten admin password?

Hideez Enterprise Server – Recovering a forgotten password

To restore the administrator password, you need to:

#### Step 1

Enter your email address on the login page and click Next.

<figure><img src="https://1669663611-files.gitbook.io/~/files/v0/b/gitbook-x-prod.appspot.com/o/spaces%2FRdTysrljwe610dPFG7tE%2Fuploads%2F2gnw4bJfCeWdv6JKxLfP%2Fimage.png?alt=media&amp;token=3294522b-1a9f-496a-a495-0ec2a090767e" alt="" width="272"><figcaption></figcaption></figure>

#### Step 2 <a href="#shag-2" id="shag-2"></a>

Click **Forgot your password?** on the login page.

<figure><img src="https://1669663611-files.gitbook.io/~/files/v0/b/gitbook-x-prod.appspot.com/o/spaces%2FRdTysrljwe610dPFG7tE%2Fuploads%2FBGPXk8gP2Fu1jJUXKFca%2Fimage.png?alt=media&amp;token=5a57dd9b-faef-4617-b8a5-d7a0834ab5ae" alt="" width="372"><figcaption></figcaption></figure>

#### Step 3&#x20;

Check the e-mail address of the administrator and click **Confirm**.

<figure><img src="https://1669663611-files.gitbook.io/~/files/v0/b/gitbook-x-prod.appspot.com/o/spaces%2FRdTysrljwe610dPFG7tE%2Fuploads%2FdH5MKGpeXb5tTwkpn2Z0%2Fimage.png?alt=media&amp;token=d7bcbbe2-0786-4e8d-9edf-b7afa3ae36a8" alt="" width="361"><figcaption></figcaption></figure>

#### Step 4

Open the email and follow the link in the received email to reset the password.

<figure><img src="https://1669663611-files.gitbook.io/~/files/v0/b/gitbook-x-prod.appspot.com/o/spaces%2FRdTysrljwe610dPFG7tE%2Fuploads%2F5O14pbYQdCx9JVNEG6yP%2Fimage.png?alt=media&amp;token=142ae1d9-7b9b-4056-839b-1f0a8f0ae584" alt="" width="375"><figcaption></figcaption></figure>

### Step 5

&#x20;Enter a new password, confirm the password, and save the changes.

<figure><img src="https://1669663611-files.gitbook.io/~/files/v0/b/gitbook-x-prod.appspot.com/o/spaces%2FRdTysrljwe610dPFG7tE%2Fuploads%2FK6wDXt7gessBLKK700jv%2Fimage.png?alt=media&amp;token=1acb1899-7c1c-485f-bfa0-815e254ddf88" alt="" width="380"><figcaption></figcaption></figure>

{% hint style="info" %}
It is not recommended to use the **admin\@server** account because you will not be able to recover a forgotten password by email. [Create your own account](/hideez-enterprise-server/administration/adding-an-admin-account) with the correct email address.
{% endhint %}


# Adding an admin account

Hideez Enterprise Server – Adding an admin account

{% embed url="<https://youtu.be/yDThFLsE-Fs>" %}

To add an administrator to your HES server, you need to either add a new employee or select an existing one in the **Employees** menu section and assign them the **Administrator** role.

### Adding a New Admin User

If you want to create a new employee, you can set the role during the creation process:

1. Choose the **"Administrator"** option from the role dropdown list.
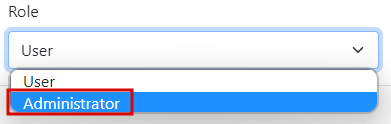
<img src="https://content.gitbook.com/content/RdTysrljwe610dPFG7tE/blobs/rP2pB1dZ0ZBctNSLeuVU/image.png" alt="" width="375">

Choose the **"Administrator"** option from the role dropdown list.
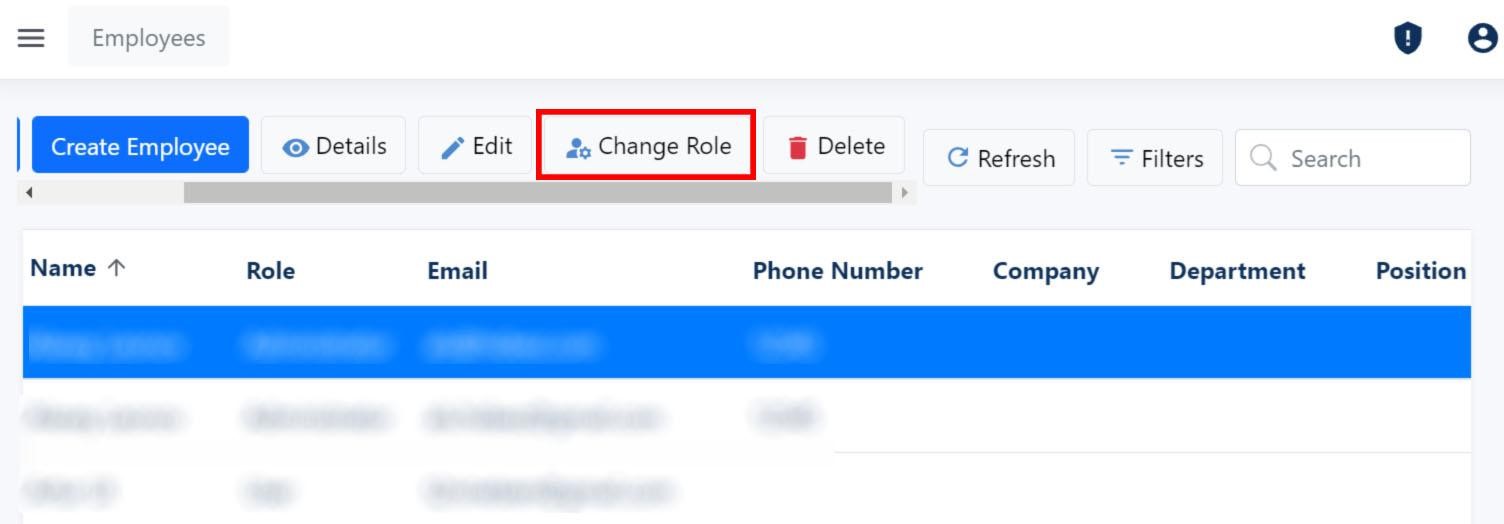
<figure><img src="https://content.gitbook.com/content/RdTysrljwe610dPFG7tE/blobs/XPumiImEpHsog3thu7db/image.png" alt="" width="375"><figcaption></figcaption></figure>

### **Changing a User's Role to Admin**

If you want to change an existing user's role to admin, follow the steps below:

#### Step 1 (optional)

Follow the [instructions](https://enterprise.hideez.com/hideez-enterprise-server/employees/how-to-add-an-employee) to add a new employee if needed.

#### Step 2

Select the required user from the list in the **Employees** section and click the **Change Role** button.

<img src="https://content.gitbook.com/content/RdTysrljwe610dPFG7tE/blobs/nFjhaM251rF0Y5u1djL0/1.jpg" alt="" width="563">

#### Step 3

In the Role section, select **Administrator** and click the **Confirm** button.
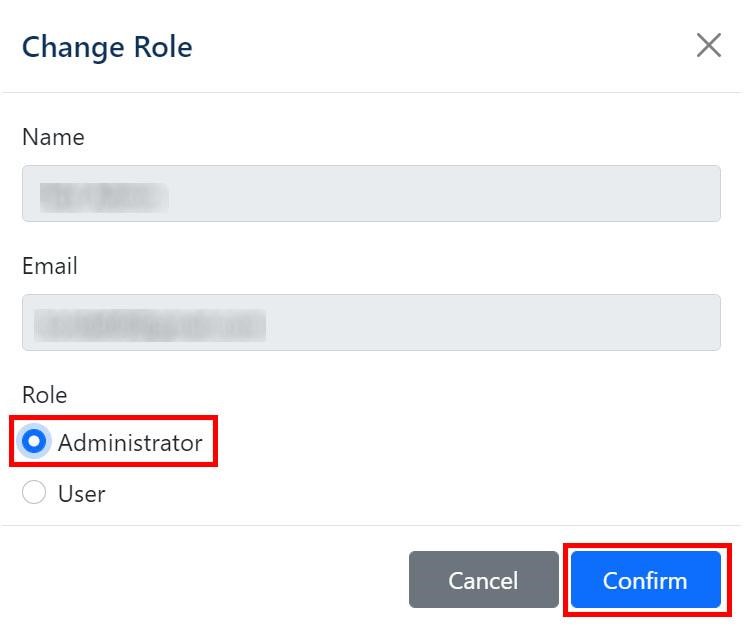
<img src="https://content.gitbook.com/content/RdTysrljwe610dPFG7tE/blobs/n6u9Cf8r64LGWyVAh29o/2.jpg" alt="" width="375">

#### Step 4 **(optional)**

If the user has just been added, the new administrator will need to open the email invitation and follow the provided link.

If the email did not reach the specified address or if the invitation has not been accepted for a long time, you can resend it. Click on the line with the required administrator and click the **Resend Invite** button.

![](https://content.gitbook.com/content/RdTysrljwe610dPFG7tE/blobs/IwA5fnI4tDyUuq7w434s/Untitled-25.jpg)

{% hint style="info" %}
Follow all these steps for all the people you want to give administrator rights.
{% endhint %}


# Deleting an admin account

Hideez Enterprise Server – Deleting an admin account

{% hint style="info" %}
You can remove any added administrator by either revoking their admin rights or deleting the account entirely.
{% endhint %}

### **Option 1: Revoke Admin Rights**

**Step 1:**\
Go to the **Employees** section.

<figure><img src="https://1669663611-files.gitbook.io/~/files/v0/b/gitbook-x-prod.appspot.com/o/spaces%2FRdTysrljwe610dPFG7tE%2Fuploads%2FceaC1pWnoM8Xi3aXXeSm%2Fimage.png?alt=media&amp;token=ccca3720-7d24-4c4d-8d2b-ede8b70bf3f6" alt="" width="563"><figcaption></figcaption></figure>

**Step 2:**\
Select the required user from the list and click the **Change Role** button.

<figure><img src="https://1669663611-files.gitbook.io/~/files/v0/b/gitbook-x-prod.appspot.com/o/spaces%2FRdTysrljwe610dPFG7tE%2Fuploads%2FpUwNlnd4sHZSIpIeV7w6%2Fimage.png?alt=media&amp;token=0b564216-f4ad-498c-94a5-75a5d14d4508" alt="" width="563"><figcaption></figcaption></figure>

**Step 3:**\
In the Role section, select **User** and click the **Confirm** button.

<figure><img src="https://1669663611-files.gitbook.io/~/files/v0/b/gitbook-x-prod.appspot.com/o/spaces%2FRdTysrljwe610dPFG7tE%2Fuploads%2FEtCVrQAUQACTDna8k0zQ%2Fimage.png?alt=media&amp;token=9c9ea8b0-ab08-47e8-8d52-b4a3156b4cab" alt="" width="375"><figcaption></figcaption></figure>

***

### **Option 2: Delete an Admin Account**

**Step 1:**\
Select the required user from the list in the **Employees** section and click the **Delete** button.

<figure><img src="https://1669663611-files.gitbook.io/~/files/v0/b/gitbook-x-prod.appspot.com/o/spaces%2FRdTysrljwe610dPFG7tE%2Fuploads%2FwSOeKJrLnDVcX8AodmEy%2Fimage.png?alt=media&amp;token=dc8c9755-b501-4c46-afab-c69cd747f694" alt="" width="563"><figcaption></figcaption></figure>

**Step 2:**\
Click the **Delete** button again to confirm the action.

<figure><img src="https://1669663611-files.gitbook.io/~/files/v0/b/gitbook-x-prod.appspot.com/o/spaces%2FRdTysrljwe610dPFG7tE%2Fuploads%2FKR2UdlVK1XpU62oNnBnG%2Fimage.png?alt=media&amp;token=52f5fe2c-50d4-4645-8086-d6f39f382ab3" alt="" width="371"><figcaption></figcaption></figure>

***

{% hint style="info" %}
This allows you to either demote an admin to a regular user or completely remove their account from the server.
{% endhint %}


# How to enable two-factor authentication at the Hideez Enterprise Server?

Hideez Enterprise Server – Enabling 2FA

{% hint style="info" %}
This guide explains how to enable two-factor OTP (One-Time Password) authentication for accessing the Hideez Enterprise Server (HES) web interface. To enable OTP for other websites, you must configure the appropriate settings on those sites.
{% endhint %}

***

### **Enabling 2FA for Admin Accounts**

#### **Step 1:**

In the top-right corner of the window, click on the **profile icon** and select **Profile** from the drop-down list.

<figure><img src="https://1669663611-files.gitbook.io/~/files/v0/b/gitbook-x-prod.appspot.com/o/spaces%2FRdTysrljwe610dPFG7tE%2Fuploads%2FgVwdYz8TPlwexg2RAVnD%2Fimage.png?alt=media&amp;token=fd0ebefc-f798-479c-8fa4-a29eb1db0502" alt=""><figcaption></figcaption></figure>

#### **Step 2:**

In the Profile section, go to **One-Time Password** and click on the **Add OTP App** button.

<figure><img src="https://content.gitbook.com/content/RdTysrljwe610dPFG7tE/blobs/1YBYY0J04gT87R8VFVBN/image.png" alt=""><figcaption></figcaption></figure>

#### **Step 3:**

Follow the on-screen instructions to set up 2FA.

<div><figure><img src="https://1669663611-files.gitbook.io/~/files/v0/b/gitbook-x-prod.appspot.com/o/spaces%2FRdTysrljwe610dPFG7tE%2Fuploads%2FcrIVPNtl3r0p2NqpKbuV%2FScreenshot_2.png?alt=media&amp;token=87016aa2-4129-4dd9-93f7-35c4f542a31b" alt="" width="563"><figcaption></figcaption></figure> <figure><img src="https://1669663611-files.gitbook.io/~/files/v0/b/gitbook-x-prod.appspot.com/o/spaces%2FRdTysrljwe610dPFG7tE%2Fuploads%2FgtiBp3hzNS8Pl0jcU9cP%2Fphoto_2024-10-01_16-33-58.jpg?alt=media&amp;token=706ee512-355d-424b-8937-3a262ded1f7a" alt="" width="371"><figcaption></figcaption></figure></div>

You can use [**Hideez Authenticator**](/hideez-authenticator-app/quick-overview) as the OTP generation application.

#### **Step 4:**

After successfully enabling two-factor authentication, you will be prompted to save your **recovery codes**. You will receive 10 recovery codes, each consisting of 8 characters. These can be used in case you are unable to generate an OTP code.

{% hint style="warning" %}
**Important:** Save these recovery codes in a secure place.
{% endhint %}

Two-factor authentication is now configured, and you can use it with your OTP application.

***

### **Using Hideez Key for OTP Generation**

If you want to use the [**Hideez Key** to generate OTPs](/use-cases/hideez-key/password-manager-and-otp-generator#enabling-otp-input-for-your-accounts), when creating your admin account, enter the **Secret Key** provided during the OTP setup in the corresponding field.

<img src="https://content.gitbook.com/content/RdTysrljwe610dPFG7tE/blobs/jNzPEIPLz5hCsDikimte/image.png" alt="" width="375">

The **Secret Key** is a 32-character value provided in **Step 3**.

\
[Learn more about creating accounts via Hideez Client](/hideez-client-app/account-management/account-creation). \
[Learn more about creating accounts on HES](/hideez-enterprise-server/accounts/how-to-work-with-personal-employee-accounts). \
[How to enter credentials with the Hideez key](/hideez-key-enterprise-edition/how-to-enter-credentials-with-hideez-key).

***

### **Disabling 2FA on HES**

#### **Step 1:**<br>

Go to the **Profile** tab and locate the **One-Time Password** section. Click **Disable 2FA**.

![](https://content.gitbook.com/content/RdTysrljwe610dPFG7tE/blobs/SwQogfcfvZyouIH9Xjc8/2fa%20on%20hes3.jpg)

#### **Step 2:**<br>

Confirm the action to disable two-factor authentication.

{% hint style="info" %}
Two-factor authentication is now disabled, but you can enable it again at any time.
{% endhint %}

***

### **Resetting Recovery Codes**

When you disable and then re-enable 2FA, your recovery codes will be reset.

{% hint style="info" %}
**Note:** If you reset the OTP app without disabling 2FA, the recovery codes will **not** be reset.
{% endhint %}

***

### **Logging In with a Recovery Code**

If you cannot enter the OTP code during login, you can use a recovery code.

#### **Step 1:**<br>

Enter your login and password.

#### **Step 2:**<br>

Click on the **One-Time Password** button.

#### **Step 3:**<br>

Click **Log in with a recovery code**.

<figure><img src="https://1669663611-files.gitbook.io/~/files/v0/b/gitbook-x-prod.appspot.com/o/spaces%2FRdTysrljwe610dPFG7tE%2Fuploads%2FxqpVmSfXZPH9WXTDKnpN%2FScreenshot_4.png?alt=media&amp;token=a85b3caa-267a-41f2-8370-00cf88cfdd3a" alt="" width="265"><figcaption></figcaption></figure>

#### **Step 4:**<br>

Enter one of your previously saved recovery codes and click **Login**.

<figure><img src="https://1669663611-files.gitbook.io/~/files/v0/b/gitbook-x-prod.appspot.com/o/spaces%2FRdTysrljwe610dPFG7tE%2Fuploads%2FzF7gWSXInfHRBUpbw5Ui%2FScreenshot_6.png?alt=media&amp;token=b3b1e78e-2f45-4380-b1b7-191a65da6830" alt="" width="262"><figcaption></figcaption></figure>

***

{% hint style="info" %}
This completes the setup and usage guide for two-factor authentication on Hideez Enterprise Server.
{% endhint %}


# Authorization on the HES server via a FIDO key

Hideez Enterprise Server – Authorization via FIDO key

On the Hideez Enterprise Server, both administrators and users can authenticate using the following options:

* [Password-based](/use-cases/fido-security-key/using-hideez-key-as-u2f-security-key-for-your-two-factor-authentication) login with hardware Hideez Keys as a second Factor (FIDO U2F).
* [Passwordless login](#passwordless-login) with hardware Hideez Keys (FIDO/WebAuthn).
* [Password-based login](/use-cases/fido-security-key/using-hideez-key-as-u2f-security-key-for-your-two-factor-authentication) with [hardware security keys by other vendors](/use-cases/fido-security-key/other-vendors-hardware-keys) as a second Factor (FIDO U2F).
* [Passwordless login](#passwordless-login) using [third-party hardware security keys (FIDO/WebAuthn).](/use-cases/fido-security-key/other-vendors-hardware-keys)
* [Login with the Hideez Authenticator mobile app](https://authenticator.hideez.com/) (Biometric passwordless login/two-factor authentication) – available on Android and iOS.
* [Platform authentication](/hideez-enterprise-server/administration/platform-authentication-on-the-hes-server) using Windows, macOS, iOS, or Android.
* [Authentication using Passkeys.](https://fidoalliance.org/passkeys/)

You can configure FIDO key authentication on HES, using either an external FIDO key or a platform security key. Additionally, FIDO2 attestation can be enabled to ensure the device's authenticity and disable platform keys if necessary.

{% hint style="info" %}
**Platform keys** allow users to authenticate using built-in device features like **Touch ID**, **Face ID**, or **Windows Hello** for easier logins.
{% endhint %}

### Step 1. Adding a key <a href="#shag-1-dobavlenie-klyucha" id="shag-1-dobavlenie-klyucha"></a>

1. In the upper-right corner of the window, click the **profile icon** and select **Profile** from the drop-down list.

   <figure><img src="https://content.gitbook.com/content/RdTysrljwe610dPFG7tE/blobs/hQFlfvcDG9D5Xh49RqvW/image.png" alt="" width="563"><figcaption></figcaption></figure>

2. Go to the **Security Keys** section and click **Add FIDO2 Authenticator**.

<figure><img src="https://content.gitbook.com/content/RdTysrljwe610dPFG7tE/blobs/NzIhlRCGGmLHkR3TFTFh/image.png" alt="" width="563"><figcaption></figcaption></figure>

3. Choose the type of key and click **Next**.

<figure><img src="https://content.gitbook.com/content/RdTysrljwe610dPFG7tE/blobs/V4X9gByBVO6H1b1B8L1g/image.png" alt="" width="375"><figcaption></figcaption></figure>

4. Follow the on-screen instructions for your FIDO key:

* For **Hideez Keys**, refer to the specific [guide](/quick-start-guides/fido2-and-u2f-authentication-guide).
* For **platform security keys**, follow the [relevant instructions](https://enterprise.hideez.com/hideez-enterprise-server/administration/platform-authentication-on-the-hes-server).

You can add multiple keys if needed.

### Step 2. Authorization via the FIDO key. <a href="#shag-2-avtorizaciya-s-pomoshyu-fido-klyucha" id="shag-2-avtorizaciya-s-pomoshyu-fido-klyucha"></a>

#### **Passwordless Login**

If your key was registered without the "Use Passwordless" option:

1. Enter your email address.

<figure><img src="https://1669663611-files.gitbook.io/~/files/v0/b/gitbook-x-prod.appspot.com/o/spaces%2FRdTysrljwe610dPFG7tE%2Fuploads%2F9trhSixR7ajUxooFW55I%2Fimage.png?alt=media&amp;token=ca7b6789-be8f-4d5e-924e-0c0aab2c44aa" alt="" width="263"><figcaption></figcaption></figure>

2. Select the **Sign in with a security key** option.
3. Follow the on-screen instructions:

   * Insert your FIDO key.

   <figure><img src="https://1669663611-files.gitbook.io/~/files/v0/b/gitbook-x-prod.appspot.com/o/spaces%2FRdTysrljwe610dPFG7tE%2Fuploads%2F8zLdH1f1m8JIreOgjLPZ%2Fimage.png?alt=media&amp;token=25e8f6a7-d1e5-45ed-a9bc-9c0c47556b7b" alt="" width="275"><figcaption></figcaption></figure>

   * Enter your PIN code.

   <img src="https://content.gitbook.com/content/RdTysrljwe610dPFG7tE/blobs/yJB0GPMLJJuKw1bR4wBE/image.png" alt="" width="375">

   * When the green LED flashes, press the button on the key.

   ![](https://content.gitbook.com/content/RdTysrljwe610dPFG7tE/blobs/DHoHpOytuqXeiT1rRSis/image.png) ![](https://content.gitbook.com/content/RdTysrljwe610dPFG7tE/blobs/x5FJiq78Jwb1Hct0YnJU/image.png)

You will then be authorized on the HES server.

#### **User nameless Login**

If your key was registered with the "Use User nameless" option:

1. Select the **Sign in with a security key** option.

<figure><img src="https://1669663611-files.gitbook.io/~/files/v0/b/gitbook-x-prod.appspot.com/o/spaces%2FRdTysrljwe610dPFG7tE%2Fuploads%2Fx0BZxqH2dD5onc7tuMAb%2Fimage.png?alt=media&amp;token=6c1b5710-281b-4cc1-959e-b318e5dd3cfa" alt="" width="266"><figcaption></figcaption></figure>

2. Follow the on-screen instructions:

* Insert your FIDO key.

<figure><img src="https://1669663611-files.gitbook.io/~/files/v0/b/gitbook-x-prod.appspot.com/o/spaces%2FRdTysrljwe610dPFG7tE%2Fuploads%2F8zLdH1f1m8JIreOgjLPZ%2Fimage.png?alt=media&amp;token=25e8f6a7-d1e5-45ed-a9bc-9c0c47556b7b" alt="" width="275"><figcaption></figcaption></figure>

* Enter your PIN code.

<img src="https://content.gitbook.com/content/RdTysrljwe610dPFG7tE/blobs/yJB0GPMLJJuKw1bR4wBE/image.png" alt="" width="375">

* When the green LED flashes, press the button on the key.

![](https://content.gitbook.com/content/RdTysrljwe610dPFG7tE/blobs/DHoHpOytuqXeiT1rRSis/image.png) ![](https://content.gitbook.com/content/RdTysrljwe610dPFG7tE/blobs/x5FJiq78Jwb1Hct0YnJU/image.png)

#### Step 3: Managing Your Keys

You can manage your registered keys by renaming or deleting them using the corresponding buttons in the **Security Keys** section.

***

{% hint style="info" %}
This process simplifies user authentication while ensuring security through FIDO key integration on the Hideez Enterprise Server.
{% endhint %}


# Platform authentication on the HES server

Hideez Enterprise Server – Platform authentication on the HES server

{% hint style="info" %}
Platform authentication allows you to use your device's built-in biometric sensors or PIN codes as FIDO keys for secure logins. This method works with **Windows 10-11**, **Apple iPhone**, and **Android** devices.
{% endhint %}

***

## **Adding a key** <a href="#xtzmwnqk7bzn" id="xtzmwnqk7bzn"></a>

### Windows 10-11

1. **Enable Windows Hello Fingerprint** or **PIN** sign-in on your device.

<img src="https://content.gitbook.com/content/RdTysrljwe610dPFG7tE/blobs/QZSnKdj0LzXS03BaDzR3/2" alt="" width="563">

2. When adding a FIDO key for server authentication, use the **fingerprint sensor** or log in via **PIN**.

<img src="https://content.gitbook.com/content/RdTysrljwe610dPFG7tE/blobs/s2EvvEP6I0mGcPwTg5kp/0.png" alt="" width="375">

3. In the upper right corner of the window, click the **profile icon**, select **Profile** from the drop-down list, and go to **FIDO2 Authenticators**.

<figure><img src="https://content.gitbook.com/content/RdTysrljwe610dPFG7tE/blobs/d57GFLMcMmr8kA6g7hNW/Screenshot_7.jpg" alt="" width="563"><figcaption></figcaption></figure>

4. Choose **Platform**, optionally check **Use Usernameless**, click **Next**, enter your **PIN**, set an authentication name, and click **Done**.

<div><figure><img src="https://content.gitbook.com/content/RdTysrljwe610dPFG7tE/blobs/GE11ZwDRn9XrCFKDD7uK/Screenshot_13.jpg" alt=""><figcaption></figcaption></figure> <figure><img src="https://content.gitbook.com/content/RdTysrljwe610dPFG7tE/blobs/cyDM8afkZj6TFOHfwvuq/Screenshot_10.jpg" alt=""><figcaption></figcaption></figure> <figure><img src="https://content.gitbook.com/content/RdTysrljwe610dPFG7tE/blobs/Pl32jAqnd9zYb5wh5sel/Screenshot_11.jpg" alt=""><figcaption></figcaption></figure> <figure><img src="https://content.gitbook.com/content/RdTysrljwe610dPFG7tE/blobs/bAEf6DjSPjdrguR262iN/Screenshot_12.jpg" alt=""><figcaption></figcaption></figure></div>

### Apple iPhone

1. Set up **Touch ID** on your iPhone.
2. When adding a FIDO key, scan your **fingerprint** using the sensor.&#x20;
3. Name the key and touch **Done**.

***

### **Android**

1. Enable **fingerprint** or **PIN unlock** on your Android device.
2. When adding a FIDO key, scan your **fingerprint** or log in via **PIN**. Touch **Get Started**, then select **Use this device with screen lock**.
   * If using **fingerprint unlock**, scan your fingerprint.
   * If using **PIN unlock**, touch **Use screen lock** and enter your PIN.
3. Name the key and touch **Done**.

***

## &#x20;**Authorization via the platform key** <a href="#shag-2-avtorizaciya-s-pomoshyu-fido-klyucha" id="shag-2-avtorizaciya-s-pomoshyu-fido-klyucha"></a>

### Windows 10

1. Select the **Sign in with a Security Key** option.
2. Choose your user in the next window and click **OK**.
3. **Scan your fingerprint** using the sensor, or log in via **PIN**.

<div><figure><img src="https://1669663611-files.gitbook.io/~/files/v0/b/gitbook-x-prod.appspot.com/o/spaces%2FRdTysrljwe610dPFG7tE%2Fuploads%2F4mfVdj1EJXWyaC5tcgCi%2Fimage%20(1).png?alt=media&amp;token=5eea5562-2a46-46cb-8263-dcdb351b07c7" alt=""><figcaption></figcaption></figure> <figure><img src="https://1669663611-files.gitbook.io/~/files/v0/b/gitbook-x-prod.appspot.com/o/spaces%2FRdTysrljwe610dPFG7tE%2Fuploads%2F4MmWzHOi7WyE5YlMcz5m%2Fimage.png?alt=media&amp;token=ecf49fcc-3fda-4d5c-a880-f9b8a77c2991" alt=""><figcaption></figcaption></figure> <figure><img src="https://1669663611-files.gitbook.io/~/files/v0/b/gitbook-x-prod.appspot.com/o/spaces%2FRdTysrljwe610dPFG7tE%2Fuploads%2FfRBwmDzwcBKFHFLrOPfW%2F000.png?alt=media&amp;token=ac90ceb0-f5fe-437e-b0fd-02bac8fb5c58" alt=""><figcaption></figcaption></figure></div>

### **Apple iPhone**

1. Select the **Sign in with a Security Key** option.
2. **Scan your fingerprint** using the sensor.

<div><figure><img src="https://1669663611-files.gitbook.io/~/files/v0/b/gitbook-x-prod.appspot.com/o/spaces%2FRdTysrljwe610dPFG7tE%2Fuploads%2Fv6b3CpKO5nYHcxIjHHKe%2Fimage%20(1).png?alt=media&amp;token=03bf0541-9dc2-433b-90e6-631ffda24e82" alt="" width="272"><figcaption></figcaption></figure> <figure><img src="https://1669663611-files.gitbook.io/~/files/v0/b/gitbook-x-prod.appspot.com/o/spaces%2FRdTysrljwe610dPFG7tE%2Fuploads%2FIQORsuwPoyoDGia49yK7%2FScreenshot_8.png?alt=media&amp;token=ff87eed4-3bff-462d-bcf1-481034763216" alt="" width="238"><figcaption></figcaption></figure></div>

***

### **Android**

{% hint style="info" %}
**Note**: Android does not support usernameless FIDO authentication.
{% endhint %}

1. Enter your login and touch **Next**.
2. Select **Sign in with a Security Key**.

<div><figure><img src="https://1669663611-files.gitbook.io/~/files/v0/b/gitbook-x-prod.appspot.com/o/spaces%2FRdTysrljwe610dPFG7tE%2Fuploads%2FyqsDiarO5gFfjLwTMytJ%2FScreenshot_8z.png?alt=media&amp;token=9670091b-fed1-48af-bdfb-b8dbba74b20e" alt="" width="265"><figcaption></figcaption></figure> <figure><img src="https://1669663611-files.gitbook.io/~/files/v0/b/gitbook-x-prod.appspot.com/o/spaces%2FRdTysrljwe610dPFG7tE%2Fuploads%2FwldzCT6d8xSNMPERqhu6%2FScreenshot_9.png?alt=media&amp;token=a49a50ed-0fa9-4e5c-95bc-4d9292774500" alt="" width="264"><figcaption></figcaption></figure></div>

1. **Scan your fingerprint** using the sensor, or log in via **PIN**:
   * If using **fingerprint unlock**, scan your fingerprint.
   * If using **PIN unlock**, touch **Use screen lock** and enter your PIN.

<div><figure><img src="https://1669663611-files.gitbook.io/~/files/v0/b/gitbook-x-prod.appspot.com/o/spaces%2FRdTysrljwe610dPFG7tE%2Fuploads%2FT7GwOJrdcKdcARO2QuhA%2Fimage%20(2).png?alt=media&amp;token=cc0c0763-22bf-4cb4-aada-1b1412bad1e8" alt="" width="188"><figcaption></figcaption></figure> <figure><img src="https://1669663611-files.gitbook.io/~/files/v0/b/gitbook-x-prod.appspot.com/o/spaces%2FRdTysrljwe610dPFG7tE%2Fuploads%2F8EcUXX1i1YO0UtS8SV0N%2Fimage%20(3).png?alt=media&amp;token=2a0f1627-3fd1-44d8-8307-6bbe3baa5d3f" alt="" width="188"><figcaption></figcaption></figure></div>

***

### **Using the Platform Key as a Second Factor**

You can also use a platform key for two-factor authentication. To do this, set up your platform key as described above. Then, at the login screen, input your **login** and **password**, and choose **Security Key** from the list of two-factor authentication methods.


# Connecting Linux server to Active Directory

Hideez Enterprise Server – Connecting Linux Server to Active Directory

{% hint style="info" %}
This guide outlines the steps to connect a Linux server to an Active Directory (AD) domain. The process varies slightly between Ubuntu and CentOS distributions.
{% endhint %}

***

#### **1. Edit /etc/hosts File**

Edit the `/etc/hosts` file to add or update the Fully Qualified Domain Name (FQDN) for the host:

```bash
bashCopy code127.0.1.1       <hostname>.<Domain_Name>  <hostname>
```

You may also need to add the FQDN for the AD server:

```bash
bashCopy code<server_ip>       <Server_Name>.<Domain_Name>  <Server_Name>
```

Ensure the AD server is installed as a DNS server for proper connectivity. Check the current DNS settings with:

```bash
bashCopy codecat /etc/resolv.conf
```

***

#### **2. Configure DNS Settings**

**Ubuntu 18.04**

1. **Install resolvconf package**:

   ```bash
   bashCopy codesudo apt update
   sudo apt install resolvconf
   sudo systemctl enable resolvconf.service
   ```
2. **Edit the `/etc/resolvconf/resolv.conf.d/head` file** to add the line:

   ```bash
   bashCopy codenameserver  <server_ip>
   ```
3. **Start the resolvconf service**:

   ```bash
   bashCopy codesudo systemctl start resolvconf.service
   ```

**CentOS 7**

1. **Add the following lines to the network interface configuration** (replace `ifcfg-*` with your actual network interface):

   ```bash
   bashCopy codePEERDNS=no
   DNS1=<server_ip>
   ```
2. **Restart the NetworkManager**:

   ```bash
   bashCopy codesudo systemctl restart NetworkManager
   ```
3. **Check `/etc/resolv.conf` again**:

   ```bash
   bashCopy codecat /etc/resolv.conf
   ```
4. **(Optional) Install bind-utils**:

   ```bash
   bashCopy codesudo yum install bind-utils -y
   ```
5. **Verify domain resolution**:

   ```bash
   bashCopy codenslookup <Domain_Name>
   ```

***

#### **3. Install Necessary Packages**

**Ubuntu 18.04**

```bash
bashCopy codesudo apt install realmd samba-common-bin samba-libs sssd-tools krb5-user adcli
```

**CentOS 7**

```bash
bashCopy codesudo yum install sssd realmd oddjob oddjob-mkhomedir adcli samba-common samba-common-tools krb5-workstation openldap-clients policycoreutils-python -y
```

During the installation of Kerberos, confirm the domain and specify the server name.

***

#### **4. Discover the Domain**

Check if the domain is visible on the network:

```bash
bashCopy coderealm discover <Domain_Name>
```

***

#### **5. Join the Domain**

To join the machine to the domain, use:

```bash
bashCopy codesudo realm --verbose join <Domain_Name> -U <YourDomainAdmin> --install=/
```

If there are no errors, the server should now appear in the domain controller.

***

#### **6. Update ldap.conf for Self-Signed Certificates**

If the Active Directory server uses self-signed certificates, edit the `ldap.conf` file:

* **Ubuntu**: `/etc/ldap/ldap.conf`
* **CentOS**: `/etc/openldap/ldap.conf`

Add the following parameter at the end of the file:

```bash
bashCopy codeTLS_REQCERT never
```

***

#### **7. Installation Check**

To retrieve all users, execute the following command (you will need to enter a password):

```bash
bashCopy codeldapsearch -x -H "ldaps://<Domain_Name>" -D "<YourDomainAdmin>@<Domain_Name>" -W -b "dc=<dc>,dc=<dc>, ..." "objectCategory=person" name
```

For example, if your domain is `hideez.example.com` and your administrator is named "administrator", the command would look like this:

```bash
bashCopy codeldapsearch -x -H "ldaps://hideez.example.com" -W -D "administrator@hideez.example.com" -b "dc=hideez,dc=example,dc=com" "objectCategory=person" name
```

#### **8. Troubleshooting**

If you encounter an error, add the `-d1` option to the command to get detailed error information.

```bash
bashCopy codeldapsearch -x -H "ldaps://hideez.example.com" -W -D "administrator@hideez.example.com" -b "dc=hideez,dc=example,dc=com" "objectCategory=person" name -d1
```

***

{% hint style="info" %}
By following these steps, you should successfully connect your Linux server to an Active Directory environment.
{% endhint %}


# Connecting Linux server to Active Directory (old)

Hideez Enterprise Server – Connecting Linux server to Active Directory

Edit the file /etc/hosts, add (or edit) the line specifying the FQDN for this host (change it to your host name and \<Domain\_Name> to the domain name):

```
127.0.1.1       <hostname>.<Domain_Name>  <hostname>
```

It may also be necessary to add the FQDN for the AD server depending on the network settings.

```
<server_ip>       <Server_Name>.<Domain_Name>  <Server_Name>
```

The AD server must be installed as a DNS server for a correct connection to AD. If DHCP is running on your network, as a rule, the administrator has already assigned the correct settings for your server. You can see a list of current DNS in the resolv.conf file:

```
cat /etc/resolv.conf
```

The IP of the AD server will appear as a nameserver. Otherwise, you can manually assign the nameserver. When using DHCP, you cannot modify resolv.conf directly, so it will be necessary to follow a few simple steps.

### Ubuntu 18.04

Let\`s install resolvconf package

```
sudo apt update
sudo apt install resolvconf
sudo systemctl enable resolvconf.service
```

You will then need to edit the `/etc/resolvconf/resolv.conf.d/head` file. Add the line:

```
nameserver  <server_ip>
```

and start

```
sudo systemctl start resolvconf.service
```

### Centos 7

The following lines should be added

```
PEERDNS=no
DNS1=<server_ip>
```

to the file \`/etc/sysconfig/network-scripts/ifcfg-\* Here you need to replace ifcfg-\* with the name of your network interface and restart NetworkManager

```
sudo systemctl restart  NetworkManager
```

Check your resolv.conf again to make sure everything is correct

```
cat /etc/resolv.conf
```

Check that the domain name resolves. Note: under Centos 7, it may be required to install the bind-utils package:

```
sudo yum install bind-utils -y
```

```
nslookup <Domain_Name>
```

#### Install the necessary packages

#### Ubuntu 18.04

```
sudo apt install realmd samba-common-bin samba-libs sssd-tools krb5-user adcli
```

#### Centos 7

```
sudo yum install sssd realmd oddjob oddjob-mkhomedir adcli samba-common samba-common-tools krb5-workstation openldap-clients policycoreutils-python -y
```

You must confirm the domain during the installation of kerberos, and specify the server name. Let's check that our domain is visible on the network:

```
realm discover <Domain_Name>
```

Join the machine to a domain:

```
sudo realm --verbose join <Domain_Name> -U <YourDomainAdmin> --install=/
```

If there is no error, everything went fine. You can go to the domain controller and check if our linux server appears in the domain. If the Active Directory server uses self-signed certificates, you need to edit the `ldap.conf` file. In ubuntu it is stored in `/etc/ldap/ldap.conf`, in Centos - `/etc/openldap/ldap.conf`. You should specify (add at the end of the file) this parameter:

```
TLS_REQCERT never
```

### Installation check

For example, to get all users (you have to enter a password):

```
ldapsearch -x -H "ldaps://<Domain_Name>" -D "<YourDomainAdmin>@<Domain_Name>" -W  -b "dc=<dc>,dc=<dc>, ..." "objectCategory=person" name
```

In case we have the hideez.example.com domain and an administrator named "administrator", the command would look like this:

```
ldapsearch -x -H "ldaps://hideez.example.com" -W -D "administrator@hideez.example.com" -b "dc=hideez,dc=example,dc=com"  "objectCategory=person" name
```

In case of an error, you can add the -d1 key and read the description of the error.


# Hideez Enterprise Server Setting

Hideez Enterprise Server – Setting HES Server Parameters

{% hint style="info" %}
To ensure proper functionality of the Hideez Enterprise Server (HES), you need to specify some basic settings. Follow the instructions below to configure the necessary parameters.
{% endhint %}

***

### **Accessing Parameters**

* Navigate to **Settings → Parameters** to manage your application settings.

<figure><img src="https://1669663611-files.gitbook.io/~/files/v0/b/gitbook-x-prod.appspot.com/o/spaces%2FRdTysrljwe610dPFG7tE%2Fuploads%2F2YHYU62iCUN94ncuZ2sb%2Fimage.png?alt=media&amp;token=4b3cc08a-f8ef-4376-8f71-1ef12f623e77" alt="" width="563"><figcaption></figcaption></figure>

***

### **1.  Application.**&#x20;

#### **Domain Configuration**

The domain is essential for various processes such as email, FIDO2 authorization, SAML, OIDC protocols, and product license verification.

<div><figure><img src="https://1669663611-files.gitbook.io/~/files/v0/b/gitbook-x-prod.appspot.com/o/spaces%2FRdTysrljwe610dPFG7tE%2Fuploads%2FOiC7UTTeX9bqmWEh0wNc%2Fimage%20(1).png?alt=media&amp;token=9b1aac0c-5ffc-4324-bbc0-b321013a1082" alt=""><figcaption></figcaption></figure> <figure><img src="https://1669663611-files.gitbook.io/~/files/v0/b/gitbook-x-prod.appspot.com/o/spaces%2FRdTysrljwe610dPFG7tE%2Fuploads%2FxTq80YGkUv9r9uqr6l7P%2FScreenshot_9.png?alt=media&amp;token=dcc559b6-1f57-4015-823b-408040e9b2b8" alt=""><figcaption></figcaption></figure></div>

***

### **2. Mail Configuration**

Administrators can configure email credentials to send service notifications to users, including invitations for new employees, password resets, and activation codes.

* **Expand the Mail Section**:
  * Click **Configure** to set or change email credentials.
* **Fill in the Email Credentials**:

  * **Host**: Email server address (e.g., for Gmail: `smtp.gmail.com` for SMTP).
  * **Port**: Numeric code for the specific network port.
  * **Enable SSL**: Select this option to use SSL for secure connections.
  * **Email**: The email address used for sending messages.
  * **Password**: The password associated with the email account for authentication.

<div><figure><img src="https://1669663611-files.gitbook.io/~/files/v0/b/gitbook-x-prod.appspot.com/o/spaces%2FRdTysrljwe610dPFG7tE%2Fuploads%2F4QeKglFndW3BDsaN7eAG%2FScreenshot_9.png?alt=media&amp;token=03a51bb5-3370-4620-b1a3-6a666363f531" alt=""><figcaption></figcaption></figure> <figure><img src="https://1669663611-files.gitbook.io/~/files/v0/b/gitbook-x-prod.appspot.com/o/spaces%2FRdTysrljwe610dPFG7tE%2Fuploads%2FEd9lWNFzHYj4EpYov6dZ%2FScreenshot_11.png?alt=media&amp;token=e0bd9fa2-54e5-4f5b-a0fa-7c54d15e8703" alt=""><figcaption></figcaption></figure> <figure><img src="https://1669663611-files.gitbook.io/~/files/v0/b/gitbook-x-prod.appspot.com/o/spaces%2FRdTysrljwe610dPFG7tE%2Fuploads%2FLBRXuDHFNKh56aYUwCwf%2FScreenshot_12.png?alt=media&amp;token=74917f18-288d-4808-8686-88d534f3e530" alt=""><figcaption></figcaption></figure></div>

{% hint style="info" %}
Please see our guide on how to set up [**Gmail with Hideez Enterprise Server.**](/faq/setting-up-gmail-with-hes)
{% endhint %}

### **3. Licensing**

* **Import License**:
  * Click the **Import License** button.
  * Upload the license file downloaded from the Hideez Portal, or contact support to generate a license for you.

{% hint style="info" %}
Import the file license that you download from the [Hideez Portal](https://portal.hideez.com/). Or you can [ask us](mailto:support@hideez.com), and we will generate a license for you.
{% endhint %}

<div><figure><img src="https://1669663611-files.gitbook.io/~/files/v0/b/gitbook-x-prod.appspot.com/o/spaces%2FRdTysrljwe610dPFG7tE%2Fuploads%2FTFUU8BdA98aKenPyRJFR%2FScreenshot_14.png?alt=media&amp;token=ab06fbca-2b46-4900-87b0-f8ba78edde57" alt=""><figcaption></figcaption></figure> <figure><img src="https://1669663611-files.gitbook.io/~/files/v0/b/gitbook-x-prod.appspot.com/o/spaces%2FRdTysrljwe610dPFG7tE%2Fuploads%2FFlWU3sxbFAvtHHeFoRG9%2FScreenshot_15.png?alt=media&amp;token=5202ed9b-6848-4bfc-bf50-1bea0986be8c" alt=""><figcaption></figcaption></figure></div>

***

### **4. Active Directory (On-premises)**

To work with Active Directory (AD) using HES, the following parameters must be specified:

* **Add Domain Settings**:
  * Click **Settings → Parameters → Add Domain Settings**.
* **Fill in the Domain Parameters**:
  * **Domain Name**: Enter your Active Directory domain (required for user import).
  * **User Logon Name**: AD administrator's login with permissions to access users and groups.
  * **Password**: AD administrator's password.
  * **Auto Password Change (days)**: Number of days after which users from the Security Key Auto Password Change group need to change their passwords.

<div><figure><img src="https://1669663611-files.gitbook.io/~/files/v0/b/gitbook-x-prod.appspot.com/o/spaces%2FRdTysrljwe610dPFG7tE%2Fuploads%2F2cJoxgq575krDZO8QrlX%2FScreenshot_25.jpg?alt=media&amp;token=44886e17-88fc-4025-86a2-627fd3415caa" alt=""><figcaption></figcaption></figure> <figure><img src="https://1669663611-files.gitbook.io/~/files/v0/b/gitbook-x-prod.appspot.com/o/spaces%2FRdTysrljwe610dPFG7tE%2Fuploads%2FnDcElfn8Cz9JE2aepA2B%2FScreenshot_10.png?alt=media&amp;token=b529f216-1882-4017-aea2-ffdd6d4f0a37" alt=""><figcaption></figcaption></figure> <figure><img src="https://1669663611-files.gitbook.io/~/files/v0/b/gitbook-x-prod.appspot.com/o/spaces%2FRdTysrljwe610dPFG7tE%2Fuploads%2FdwO8Y0kxpAc3jRTrqAz3%2FScreenshot_11.png?alt=media&amp;token=ac30deb0-227b-419b-8b28-249149a0419d" alt=""><figcaption></figcaption></figure></div>

{% hint style="info" %}
For detailed permission requirements for Active Directory users, see [**Configuring Access to Active Directory On-Premises and Delegating Rights.**](broken://pages/VeKy05jOcpWCyonpn5Cz#configuring-access-to-active-directory-on-premises-and-delegating-rights)
{% endhint %}

***

### **5. Azure AD (Entra)**

To connect Azure AD with HES, follow these steps:

1. **Add Domain Settings**:

   * Open **Settings → Parameters → Add Domain Settings** and select the **Azure Active Directory** radio button.

<div><figure><img src="https://1669663611-files.gitbook.io/~/files/v0/b/gitbook-x-prod.appspot.com/o/spaces%2FRdTysrljwe610dPFG7tE%2Fuploads%2FH2onvUGRBDu3EoRiSdmz%2Fimage%20(2).jpg?alt=media&amp;token=e27910ec-2c42-4342-b802-8a5b046412aa" alt=""><figcaption></figcaption></figure> <figure><img src="https://1669663611-files.gitbook.io/~/files/v0/b/gitbook-x-prod.appspot.com/o/spaces%2FRdTysrljwe610dPFG7tE%2Fuploads%2F6lqRH7oS0VHUzGGXQ54Z%2Fimage%20(1).jpg?alt=media&amp;token=b5c9b9db-107c-4d4a-a79b-a6de9015716d" alt=""><figcaption></figcaption></figure></div>

{% hint style="info" %}
[**Please see our guide on how to connect Azure AD to Hideez Enterprise Server.**](#id-6.-azure-a-d-entra)
{% endhint %}

***

### **6. Domain Settings**

* **Domain Credentials**: Used to connect to Active Directory via LDAPS.
* **Users Default Single Sign-On Settings**: Applies to all users synchronized from Active Directory; [can be modified for individual users later.](https://enterprise.hideez.com/hideez-enterprise-server/administration/pages/-Me-JAF0dz2mUZEBDjun#if-you-have-already-created-employee-select-an-employee-and-click-the-edit-button.-then-click-the-en)
* **Workstation Passwordless Logon Settings**: Update these settings as necessary.&#x20;

<div><figure><img src="https://1669663611-files.gitbook.io/~/files/v0/b/gitbook-x-prod.appspot.com/o/spaces%2FRdTysrljwe610dPFG7tE%2Fuploads%2Fwi6mTWikCVnD9g0xiuWU%2FScreenshot_18.png?alt=media&amp;token=9f77b529-dc6a-4dc9-bfd7-6a9f583fc279" alt=""><figcaption></figcaption></figure> <figure><img src="https://1669663611-files.gitbook.io/~/files/v0/b/gitbook-x-prod.appspot.com/o/spaces%2FRdTysrljwe610dPFG7tE%2Fuploads%2FnillulQh8BOMA2lySup1%2FScreenshot_19.png?alt=media&amp;token=6eff6e08-3416-43a9-a9aa-1d8cabd873e6" alt=""><figcaption></figcaption></figure> <figure><img src="https://1669663611-files.gitbook.io/~/files/v0/b/gitbook-x-prod.appspot.com/o/spaces%2FRdTysrljwe610dPFG7tE%2Fuploads%2FhEptaUssh6BugkhqWH3s%2FScreenshot_20.png?alt=media&amp;token=453a4ffb-8f1f-46fa-88dc-f92df9919d8c" alt=""><figcaption></figcaption></figure></div>

<figure><img src="https://1669663611-files.gitbook.io/~/files/v0/b/gitbook-x-prod.appspot.com/o/spaces%2FRdTysrljwe610dPFG7tE%2Fuploads%2FI1V3kww1qdiE2I3vfijD%2Fimage.png?alt=media&amp;token=f18a8b73-44d4-4b1c-9048-948363cd232c" alt="" width="563"><figcaption></figcaption></figure>

{% hint style="info" %}
[Please see our guide on how to set up Workstation passwordless logon.](/hideez-authenticator-app/admin-guide/setup-for-pc-login-scenario/passwordless-pc-login-setup)&#x20;
{% endhint %}

### **7. Splunk**&#x20;

{% hint style="info" %}
Splunk is a powerful platform designed for searching, monitoring, and analyzing machine-generated data (such as logs, metrics, and events) from applications, systems, and infrastructures. It is widely used for operational intelligence, security, and data analytics.
{% endhint %}

<figure><img src="https://1669663611-files.gitbook.io/~/files/v0/b/gitbook-x-prod.appspot.com/o/spaces%2FRdTysrljwe610dPFG7tE%2Fuploads%2FoHYYZqSY1gUPNdxxCFjn%2FScreenshot_21.png?alt=media&amp;token=0005cb14-98f4-44a9-ac8b-6ac6079bd6ee" alt="" width="563"><figcaption></figcaption></figure>

***

### **8. FIDO2**

{% hint style="info" %}
**FIDO (Fast IDentity Online)** is a set of standards that enables secure and passwordless authentication. FIDO2 allows users to authenticate using various methods, such as biometric data (fingerprint or face recognition) and security keys, enhancing security and user experience by eliminating the need for traditional passwords.
{% endhint %}

### **9. SAML**&#x20;

Refer to documentation for additional SAML configuration details.

***

### **10. OIDC**

Set parameters for OpenID Connect clients in the OIDC section. Refer to the documentation for more information.

***

### **11.  Appearance Settings**

In this section, you can customize logos and email settings for the server.

***


# Setting Hideez Server parameters

Hideez Enterprise Server – Setting HES Server parameters

To work correctly, you need to specify some basic settings.&#x20;

Go to **Settings → Parameters**.&#x20;

<figure><img src="https://1669663611-files.gitbook.io/~/files/v0/b/gitbook-x-prod.appspot.com/o/spaces%2FRdTysrljwe610dPFG7tE%2Fuploads%2FadsEtBPA3bxorip7njKi%2Fimage.png?alt=media&amp;token=eb601d15-0f3c-49e5-8ba6-bd10578230f7" alt="" width="563"><figcaption></figcaption></figure>

## **Application**

Domain name setup

{% hint style="info" %}
The domain is used in email, FIDO2 authorization processes, and SAML and OIDC protocols. In addition, the domain is used when checking the product license.
{% endhint %}

<figure><img src="https://1669663611-files.gitbook.io/~/files/v0/b/gitbook-x-prod.appspot.com/o/spaces%2FRdTysrljwe610dPFG7tE%2Fuploads%2FMjLvvkRaPiZiaLfWdu0e%2Fimage.png?alt=media&amp;token=a3dde2fd-d374-402e-807e-182d5cf0252a" alt="" width="563"><figcaption></figcaption></figure>

## **Mail**

Administrators can configure credentials to send service email messages to users. These messages are used to invite new employees, reset employee passwords, change employee email addresses, send activation codes for Hideez Key, and more. To check the current credentials you are using to send emails, you need to expand the Mail section:

<figure><img src="https://1669663611-files.gitbook.io/~/files/v0/b/gitbook-x-prod.appspot.com/o/spaces%2FRdTysrljwe610dPFG7tE%2Fuploads%2FFebAMndObA5XI6yeaFb4%2Fimage.png?alt=media&amp;token=e3f95049-9347-49c7-9703-98e44090df54" alt="" width="563"><figcaption></figcaption></figure>

To set **Email Credentials,** fill in the following fields:&#x20;

* **Host –** this is the email server address you want to connect to. For example, for Gmail, the SMTP host might be “smtp.gmail.com” and the IMAP host might be “imap.gmail.com”. The actual host may vary depending on the email service provider and the specific protocol you are using.
* **Port –** this is the numeric code that determines the specific network port for establishing a connection to the email server using a specific email protocol.
* **Enable SSL –** this is an option that indicates whether to use SSL (Secure Socket Layer) to establish a secure connection with the email server. SSL encrypts the data transmitted between your computer and the server to protect sensitive information during transmission.
* **Email –** is the email address that you use for sending and receiving messages.
* **Password –** this is the password associated with your email address. It is used for authentication and confirming your identity when connecting to the server.

The configured mail may look like this:

<figure><img src="https://1669663611-files.gitbook.io/~/files/v0/b/gitbook-x-prod.appspot.com/o/spaces%2FRdTysrljwe610dPFG7tE%2Fuploads%2Fq3nWpbCd3D7E10L30Qif%2Fimage.png?alt=media&amp;token=90666ccb-c13a-4073-93db-e870bbd7167b" alt="" width="563"><figcaption></figcaption></figure>

## Licensing

Click the button **Import License**<br>

<figure><img src="https://1669663611-files.gitbook.io/~/files/v0/b/gitbook-x-prod.appspot.com/o/spaces%2FRdTysrljwe610dPFG7tE%2Fuploads%2F8OzA0UL8j1kgTwO2VrYu%2FScreenshot_15.png?alt=media&amp;token=c0c0c0dc-d1ab-4ffe-8f69-8d11bd1f2a4b" alt="" width="563"><figcaption></figcaption></figure>

Import the file license that you download from the [Hideez Portal](https://portal.hideez.com/).  Or you can [ask us](mailto:support@hideez.com), and we will generate a license for you.

<figure><img src="https://content.gitbook.com/content/RdTysrljwe610dPFG7tE/blobs/6CSg3VddzssBHyMQozEw/image.png" alt="" width="467"><figcaption></figcaption></figure>

{% hint style="info" %}
Import the file license that you download from the [Hideez Portal](https://portal.hideez.com/). Or you can [ask us](mailto:support@hideez.com), and we will generate a license for you.
{% endhint %}

## Active Directory (On-premises)

{% hint style="info" %}
To enable integration between Hideez Server and on-premises Active Directory via Microsoft Entra ID, including user synchronization and password management, refer to the following guide:

* [**Connect Hideez Server to Microsoft Entra ID — Active Directory (On-Premises)**](/hideez-server-integration/active-directory-on-premises)

The following parameters must be configured if Hideez Server will be used in Active Directory integration scenarios:

* [Import and synchronize users from on-premises Active Directory](/hideez-server-integration/microsoft-entra-id/import)
* [Import and synchronize users from on-premises Active Directory with domain password rotation](broken://pages/-MGw06-MyCMW2GA5VeGA)
  {% endhint %}

{% embed url="<https://youtu.be/NE32IXCqp20>" %}

### **Microsoft Entra ID**

{% hint style="info" %}
For details on integrating Hideez Server with Microsoft Entra ID, including user synchronization and password management setup, please refer to the instruction:

* [**Connect Hideez Server to Microsoft Entra ID**](/hideez-server-integration/microsoft-entra-id)
  {% endhint %}

{% embed url="<https://youtu.be/NdQWp-nDCRI>" %}

#### Other Domain settings&#x20;

<figure><img src="https://content.gitbook.com/content/RdTysrljwe610dPFG7tE/blobs/XPJSW1X32BudCNWfPQOX/Screenshot_8.jpg" alt=""><figcaption></figcaption></figure>

* **Domain Settings –** These credentials will be used to connect to Active Directory via LDAPS
* **Users default single sign-on settings -** This setting will be used for all users synchronized from Active Directory. Later you can change this [Single Sign-On setting for each user individually in user settings. ](https://enterprise.hideez.com/hideez-enterprise-server/administration/pages/-Me-JAF0dz2mUZEBDjun#if-you-have-already-created-employee-select-an-employee-and-click-the-edit-button.-then-click-the-en)

<figure><img src="https://content.gitbook.com/content/RdTysrljwe610dPFG7tE/blobs/HrWkTgPI8evHI4drHYj2/Screenshot_9.jpg" alt="" width="563"><figcaption></figcaption></figure>

* **Workstation passwordless logon settings -** Update Workstation Passwordless Logon Settings.

## Splunk

{% hint style="info" %}
**Splunk** is a platform for collecting, analyzing, and visualizing machine data in real-time. It helps organizations monitor systems, detect threats, and troubleshoot issues by processing logs and other data sources.
{% endhint %}

![](https://content.gitbook.com/content/RdTysrljwe610dPFG7tE/blobs/vP7qTVaIbiZvPFYkt0Sj/image.png)

### **FIDO2**

![](https://content.gitbook.com/content/RdTysrljwe610dPFG7tE/blobs/iY5dK4PyCAYzee7ZaQpY/image.png)

If the "Allow Platform Authenticators" feature is enabled, you can choose the type of security key you are [enrolling for the user](/hideez-enterprise-server/administration/authorization-on-the-hes-server-via-a-fido-key) (by default it is cross-platform):

<figure><img src="https://content.gitbook.com/content/RdTysrljwe610dPFG7tE/blobs/V4X9gByBVO6H1b1B8L1g/image.png" alt=""><figcaption></figcaption></figure>

So the list of the user's FIDO keys will look like this:

![](https://content.gitbook.com/content/RdTysrljwe610dPFG7tE/blobs/HclxHjj24Ilqd5ItNgDW/image.png)

### SAML

More about **SAML configuration** you can read [here](/hideez-enterprise-server/configuring-saml-protocol).

### OIDC

The **Openid connect clients (OIDC)** parameters can be set at the OIDC section.&#x20;

* [Please see the Configuration for OIDC (OpenID Connect)](/hideez-enterprise-server/configuration-oidc-openid-connect)

![](https://content.gitbook.com/content/RdTysrljwe610dPFG7tE/blobs/dceOYTz3YOm51K3bCWvK/image.png)

### Appearance

In this section, you can customize logos and email for the server.

<figure><img src="https://content.gitbook.com/content/RdTysrljwe610dPFG7tE/blobs/YmzqImvFhJFYtZvi3lZO/image.png" alt=""><figcaption></figcaption></figure>


# Configuring DNS server

Hideez Enterprise Server – Configuring DNS Server

{% hint style="info" %}
Note! For the functionality of importing groups and users from Microsoft Active Directory to work, the HES server must be installed on the Windows platform. \
\
If you use Linux and need the AD integration, [join your Linux server to the AD](/hideez-enterprise-server/administration/connecting-linux-server-to-active-directory-1)
{% endhint %}

In the network settings of the server, you need to specify the AD server address as DNS:

![](https://content.gitbook.com/content/RdTysrljwe610dPFG7tE/blobs/4j5eSzcPdUfDyNwZXm5g/pasted%20image%200.png)


# Setting up a Proxy for Mobile App Access to HES

{% hint style="info" %}
**A proxy server is required to redirect the mobile application from the external network to the local network where the Hideez Enterprise Server (HES) is running.**
{% endhint %}

### **Setting up a Proxy for Mobile App Access to HES**

**Step 1: Set Up the Reverse Proxy Server**

1. **Choose a Platform**:
   * Use **Nginx** or **Apache** for the reverse proxy, either on **Linux** or **Windows**.
2. **Ensure Internet Access to the Proxy**:
   * The proxy server must be accessible from the internet. Open the necessary ports (e.g., 80 for HTTP or 443 for HTTPS) on your firewall or router.
   * Register a domain name (e.g., **<https://hesproxy.hideez.com>**) and link it to the public IP address of your proxy server.

**Step 2: Configure Communication Between Proxy and HES**

1. **Allow Access Between Proxy and HES**:
   * Ensure that the proxy can reach the HES server in the local network and that the firewall rules allow traffic between the proxy and HES.
   * Confirm that HES can respond to requests routed through the proxy.

**Step 3: Modify appsettings.json on the Proxy Server**

1. **Open appsettings.json** on the proxy server.
2. **Update the HES Address**:
   * Locate the configuration block related to the reverse proxy:

     ```json
     jsonCopy code"ReverseProxy": {
       "Clusters": {
         "cluster1": {
           "Destinations": {
             "destination1": {
               "Address": "https://localhost/"
             }
           }
         }
       }
     }
     ```
   * Replace `"https://localhost/"` with the HES server’s local hostname or IP address, such as:

     ```json
     "Address": "https://hes.mycompany.local"
     ```

**Step 4: Expose the Proxy to the Internet**

1. **Set Up Public Proxy Address**:
   * Configure your proxy to expose the HES server to the internet via the registered public URL (e.g., **<https://hesproxy.hideez.com>**).
2. **Configure HTTPS (Optional but Recommended)**:
   * Set up SSL/TLS certificates for secure HTTPS access using a certificate authority like Let’s Encrypt.

**Step 5: Configure Reverse Proxy URL in HES**

1. **Log into the HES Admin Dashboard**.
2. **Set the Reverse Proxy URL**:
   * Go to **Settings > Parameters > Reverse Proxy**.
   * Enter the public proxy URL (e.g., **<https://hesproxy.hideez.com>**) as the reverse proxy address.


# Network Filter: Restrict Admin Access by Network

### Overview

The `NetworkFilter` setting allows you to restrict access to the admin panel based on the user’s network:

* Full admin access is allowed only from the internal (On-Prem / AD) network
* External users (e.g., via Internet) cannot access the admin interface
* Authentication protocols (SAML, OIDC, WS-Fed) and device connections (PC/mobile) still work from external networks

### Use Case

A system administrator wants to prevent unauthorized access to the Hideez Enterprise Server admin panel from external networks. By enabling `NetworkFilter`, only users connecting from the corporate network (e.g., office or VPN) can manage the system. External users can still authenticate to services but won’t be able to access server settings.

### System Requirements

To enable this feature, you need:

1. A deployed instance of **Hideez Enterprise Server (HES)** with access to modify `appsettings.json`
2. **NGINX installed and running on a Linux server**, acting as a reverse proxy in front of HES
3. Administrative access to configure both the HES backend and NGINX frontend

{% hint style="info" %}
This feature will not function properly without the correct configuration **on both sides** — the Hideez Server **and** the NGINX reverse proxy on Linux.
{% endhint %}

### How to Enable Network Filter

Enabling `NetworkFilter` requires **two configuration steps**:

### Step 1: Configure Hideez Server (`appsettings.json`)

On the server side, open the `appsettings.json` file (located in the HES installation directory) and add or verify the following setting:

```
"ServerSettings": 
  "NetworkFilter": true
}
```

### Step 2: Configure NGINX on Linux to Identify Internal IPs

On the NGINX side (running on Linux), configure IP detection and header injection.

**Define internal network detection:**

Add the following **before** your `location` block:

```
# Determine whether the client IP belongs to the internal network
geo $is_local {
    default 0;
    # Example internal network
    192.168.1.0/24 1;
    # Example individual IP
    10.10.100.1/32 1;
}

# Map the result to a value for the X-Local-Network header
map $is_local $x_source_type {
    1 "true";
    0 "false";
}
```

This logic evaluates the client’s IP address and sets the `$x_source_type` variable accordingly.

**Update your location block:**

```
location / {
    proxy_pass http://HES;
    proxy_http_version 1.1;
    proxy_set_header Upgrade $http_upgrade;
    proxy_set_header Connection $connection_upgrade;
    proxy_set_header Host $host;
    proxy_cache_bypass $http_upgrade;
    proxy_set_header X-Forwarded-For $proxy_add_x_forwarded_for;
    proxy_set_header X-Forwarded-Proto $scheme;
    proxy_set_header X-Local-Network $x_source_type;
}
```

#### Example Configuration File (`appsettings.json`)

```json
{
  "ConnectionStrings": {
    "DefaultConnection": "server=127.0.0.1;port=3306;database=db;uid=user;pwd=password",
    "Provider": "MySql"
  },
  "Logging": {
    "LogLevel": {
      "Default": "Debug",
      "Microsoft": "Warning",
      "Microsoft.Hosting.Lifetime": "Information"
    }
  },
  "ServerSettings": {
    "NetworkFilter": true
  },
  "AllowedHosts": "*"
```


# Enable load balancing

Hideez Enterprise Server – Enable load balancing

In some cases, it is necessary to ensure that the HES server failure resistance.

In general, we can separate the fault tolerance of the database server (MySQL) and the fault tolerance of the HES itself.

As for the fault tolerance of databases, this process is described in detail in the relevant documentation - for example [here](https://www.mysql.com/products/cluster/mcm/).

Here we are talking only about HES, and then there is a small instruction on how to do it.

Consider an example where you have a separate MySQL server, three separate HES servers, and an Nginx proxy through which the end client has access to a group of HES servers.

Load balancing, in this case, will be that nginx will try to distribute requests evenly to the three HES servers, and fault tolerance is that if one of the servers crashes, users will continue to use the HES server.

In this case, in addition to our installation instructions, you need to do the following:

* you need to allow remote user connection in the MySQL server settings. By default, only local users have access to the database, so the MySQL /etc/mysql/mysql.conf.d/mysqld.cnf configuration file needs to be modified - instead of

```
bind-address = 127.0.0.1
```

you have to setup

```
bind-address = 0.0.0.0
```

(you can simply add this line to the \[mysqld] section if it is not there).

After restarting the MySQL server, you will be able to access it from remote HES servers.

* when creating a MySQL user instead of a command&#x20;

```
CREATE USER 'user'@'127.0.0.1' IDENTIFIED BY '<user_password>';
```

should be used

```
CREATE USER 'user'@'%' IDENTIFIED BY '<user_password>';
```

this will allow the user ‘user’ to connect to the database from any computer.

* the following should be done when editing the /opt/HES/appsettings.Production.json file:

1\) in the row

```
"ConnectionStrings":
{
"DefaultConnection":
"server=127.0.0.1;
port=3306;
database=db;
uid=user;
pwd=<user_password>"
},
```

127.0.0.1 must be changed to the ip of your MySQL server.

appsettings.Production.json should be the same on all servers!

However, if you want to visually "see" which server is currently processing your data, there may be slight differences between ServerFullName and ServerShortName.

```
"ServerFullName": "Hideez Enterprise Server",
"ServerShortName": "HES",
```

2\) by default, the HES server receives requests only from localhost, but since our proxy with nginx can be hosted at a different address, you need to allow access from other addresses. You can do this by adding the following lines to /opt/HES/appsettings.Production.json, after "AllowedHosts": "\*" add the following (via comma):

```
,
"Kestrel": {
"Endpoints": {
"Http": {
"Url": "http://0.0.0.0:5000"
}
}
}
```

3\) in the nginx.conf file on the nginx server, you need to comment out the line

```
server localhost:5000;
```

and uncomment lines

```
#ip_hash;
#server <ip or name of hes1 server>:5000 weight=3;
#server <ip or name of hes2 server>:5000;
#server <ip or name of hes1 server>:5000;
```

and by entering the corresponding IP addresses of their three HES servers.

And of course, it is necessary to adjust the rules of firewalls.\
\
Note that MySQL typically uses TCP port 3306 and HES port TCP 5000.


# Data Protection

Hideez Enterprise Server – Data protection

{% hint style="info" %}
Data Protection ensures the secure storage of sensitive data in the database, such as device encryption keys, passwords, and OTP secrets.
{% endhint %}

### **Protected Data:**

* **Device Keys**: Encryption keys for Security Keys.
* **Passwords**: Including "Shared Account" passwords.
* **OTP Secrets**: Temporarily stored during transfer to devices.

### **How It Works**

Sensitive data fields in the database are encrypted using AES-256 encryption. The master encryption key is itself encrypted using a system-installed certificate. This key is decrypted at server startup, and all protected data is decrypted as needed.

### How to Configure Data Protection

1. Go to the **Dashboard** and click **Configure** in the Data Protection section, or navigate to **Settings → Data Protection**.

<figure><img src="https://1669663611-files.gitbook.io/~/files/v0/b/gitbook-x-prod.appspot.com/o/spaces%2FRdTysrljwe610dPFG7tE%2Fuploads%2F3rjMIqWQzFJhgjWL7Oh9%2FScreenshot_3.png?alt=media&amp;token=c5abdb22-3447-4404-b695-3f6b815c1101" alt="" width="563"><figcaption></figcaption></figure>

2. Enter a password for the certificate and download the certificate.\
   (If you don't have a certificate, you can create a self-signed one.)

<figure><img src="https://1669663611-files.gitbook.io/~/files/v0/b/gitbook-x-prod.appspot.com/o/spaces%2FRdTysrljwe610dPFG7tE%2Fuploads%2FrSvNHNEGvAIkATdk1vZ2%2FScreenshot_14.png?alt=media&amp;token=f115b2f8-0d6e-4f6d-b313-495d1d0b7efa" alt="" width="563"><figcaption></figcaption></figure>

3. Click **Enable Protection**.
4. Choose the downloaded certificate and enter the password from Step 2.
5. Check the boxes:
   * "I made a backup and I am aware of the potential risks"
   * "I have shut down all standby servers and will install the certificate as soon as they are restarted"
6. Click **Next** to complete the configuration.
7. Choose **Restart Now** or **Restart Later** to apply the changes.

<div><figure><img src="https://1669663611-files.gitbook.io/~/files/v0/b/gitbook-x-prod.appspot.com/o/spaces%2FRdTysrljwe610dPFG7tE%2Fuploads%2FTYrPmuxDKhYwh30HecC3%2FScreenshot_13.png?alt=media&amp;token=05e53277-8ed6-495e-b5f1-f0791562a361" alt=""><figcaption></figcaption></figure> <figure><img src="https://1669663611-files.gitbook.io/~/files/v0/b/gitbook-x-prod.appspot.com/o/spaces%2FRdTysrljwe610dPFG7tE%2Fuploads%2FjjI4DJhSixSDMEkOyEui%2FScreenshot_7.png?alt=media&amp;token=392604ba-22ac-47a9-b36e-05f2be6b5491" alt=""><figcaption></figcaption></figure> <figure><img src="https://1669663611-files.gitbook.io/~/files/v0/b/gitbook-x-prod.appspot.com/o/spaces%2FRdTysrljwe610dPFG7tE%2Fuploads%2FghMzWid1mUDinfzLf7Tp%2FScreenshot_8.png?alt=media&amp;token=813d5606-db32-4bac-a089-112bc2df5b0e" alt=""><figcaption></figcaption></figure></div>

**Now Data Protection is enabled.**

<figure><img src="https://1669663611-files.gitbook.io/~/files/v0/b/gitbook-x-prod.appspot.com/o/spaces%2FRdTysrljwe610dPFG7tE%2Fuploads%2Fg7UlzgeauBRbGQuj5J2I%2FScreenshot_10.png?alt=media&amp;token=ab3ead13-ccad-448d-8def-0232d760593f" alt="" width="563"><figcaption></figcaption></figure>

You can also:

* **Change the Data Protection Certificate** or

<figure><img src="https://1669663611-files.gitbook.io/~/files/v0/b/gitbook-x-prod.appspot.com/o/spaces%2FRdTysrljwe610dPFG7tE%2Fuploads%2Fati5Zh3jzqJ29BYUIgGV%2FScreenshot_11.png?alt=media&amp;token=cad7746e-0efd-496e-972d-20827b24f38a" alt="" width="279"><figcaption></figcaption></figure>

* **Disable Data Protection** when needed.

<figure><img src="https://1669663611-files.gitbook.io/~/files/v0/b/gitbook-x-prod.appspot.com/o/spaces%2FRdTysrljwe610dPFG7tE%2Fuploads%2FGRLpVdlZ3h5nNee4QsG5%2FScreenshot_12.png?alt=media&amp;token=cc601f0f-ccfe-4cc0-a939-c9d011cb915a" alt="" width="279"><figcaption></figcaption></figure>


# Dashboard

Hideez Enterprise Server Dashboard

A dashboard is an admin tool that allows you to quickly see important information about the state of the entire infrastructure.

<figure><img src="https://content.gitbook.com/content/RdTysrljwe610dPFG7tE/blobs/WayIFBOvylWi5ouRsGu3/Screenshot_2.jpg" alt=""><figcaption></figcaption></figure>


# Information about the server

Hideez Enterprise Server – Server

**HES version** - the current version of the server installed

![](https://content.gitbook.com/content/RdTysrljwe610dPFG7tE/blobs/GFbQI3nD6wntkaJnLTX6/Screenshot_12.jpg)

**Hardware Vault Tasks**  - tasks that are sent by the server to Hideez keys but have not yet been completed due to the fact that HKs did not connect to the server.&#x20;

**Long pending tasks** - tasks that were sent by the server to Hideez keys, but were not completed due to the fact that HKs did not connect to the server for more than a day.

Device Tasks and Long pending tasks are links and allow you to view these tasks.

![](https://content.gitbook.com/content/RdTysrljwe610dPFG7tE/blobs/0aBUBin5xoM22O9LWWpD/image.png)

**Types of tasks:**

**Profile** - the task of updating the user profile\
**Update** - the task of updating the account data\
**Create** - the task of creating an account\
**Delete** - the task of deleting the account\
**Link** - the task of connecting HK and the User\
**UnlockPin** - the task of resetting the incorrectly entered Pin                                                                               **Restore** - the task of restoring the backup on key

As soon as the Hideez key connects to the server, the tasks will be completed.


# Information about employees

Hideez Enterprise Server – Employees

![](https://content.gitbook.com/content/RdTysrljwe610dPFG7tE/blobs/QOTmuI3InbYKTm9khWZr/image.png)

**Registered** - registered users.&#x20;

{% hint style="info" %}
Please note that these are all users, they can be without attached keys.
{% endhint %}

**Opened sessions** - the number of running sessions on registered workstations.

**License Warning** - employee license expires soon.\
**Manual unlock (24h)** - the number of running sessions at workstations without using Hideez keys in the last 24 hours.

All links are active and allow you to go to more detailed information.


# Information about devices

Hideez Enterprise Server – Devices

![](https://content.gitbook.com/content/RdTysrljwe610dPFG7tE/blobs/0xAfMIPb9jG9J0WCUQBd/image.png)

**Low battery** - the number of keys that have a battery charge below 30%. The battery charge is updated when the key is connected to the server. If there has been no connection for a long time, then the charge data will not be relevant.\
**Device error** - the number of HK that went into the error state.\
**License expired** - the number of HKs whose license has expired.\
**License warning** - the number of HKs whose license expires in 3 months.\
**Registered** - the number of HKs that are registered on the server.\
**In reserve** - the number of HKs that are registered on the server, but are not tied to specific users.


# Workstations Information

Hideez Enterprise Server – Workstations

![](https://content.gitbook.com/content/RdTysrljwe610dPFG7tE/blobs/uPxIocR6qHQNizGVZVNJ/image.png)

**Registered** - Computers on which Hideez Windows Client is installed. This number includes both approval and computers unapproval by the administrator.

**Online** - computers on which Hideez Windows Client is installed and which are currently working.

**Waiting for approval** - computers that are waiting for confirmation from the administrator.


# Employees

Hideez Enterprise Server – Employees


# How to add an Employee?

Hideez Enterprise Server – Adding an employee

{% embed url="<https://youtu.be/UtRgkhEN1Uk>" %}

Go to the **Employees** menu section.&#x20;

![](https://content.gitbook.com/content/RdTysrljwe610dPFG7tE/blobs/Rj38gwKjBzaryfWRa4KH/Screenshot%202021-11-16%20161849.png)

Click the **Create Employee** button.

Fill out the employee’s data in the Wizard:

### **The 'Profile' page:**

<img src="https://content.gitbook.com/content/RdTysrljwe610dPFG7tE/blobs/DrpYGmZlYt3X5qj6rS0o/image.png" alt="" width="375">

{% hint style="info" %}
The only required fields are the First Name and Email. Uniqueness is checked by a bunch of First Name and Last Names.&#x20;
{% endhint %}

If there is no required company/department/position on the list, you can add them.\
[How to add a company?](/hideez-enterprise-server/employees/how-to-add-a-company#adding-a-company)\
[How to add a Department to the Company?](/hideez-enterprise-server/employees/how-to-add-a-company#adding-a-department)\
[How to manage Positions?](/hideez-enterprise-server/employees/how-to-manage-positions#adding-a-position)

### The 'Hardware Vault' page (optional):

In this step, you can assign the Hideez Key to the Employee. You can choose only from devices in status Ready.\
You can skip this step if you are not sure. Just click **Skip.**

<img src="https://content.gitbook.com/content/RdTysrljwe610dPFG7tE/blobs/5YYiLsAH5oHFK0hdbeOx/image.png" alt="" width="563">

### The 'Account' page (optional):

On this step, you ca&#x6E;**,** for example, add a Personal Account for Unlock Workstation. Select account type (Local/Domain/Windows/Azure AD) and add all the required data.

You can skip this step if you are not sure. Just click **Skip.**

<img src="https://content.gitbook.com/content/RdTysrljwe610dPFG7tE/blobs/yLIhLZEBTMhUVsHtDIfM/image.png" alt="" width="375">

### The 'Single Sign On' **page:**

On this step you can enable the Single Sign On option if the [SAML protocol is configured on your server](/hideez-enterprise-server/configuring-saml-protocol) and requires[ two-factor authentication](/hideez-enterprise-server/single-sign-on-settings/user-settings#two-factor-authentication-required).

<img src="https://content.gitbook.com/content/RdTysrljwe610dPFG7tE/blobs/9ZNgoV82ULGPajADkcLS/Screenshot_25.jpg" alt="" width="375">

<figure><img src="https://content.gitbook.com/content/RdTysrljwe610dPFG7tE/blobs/SDoRo7iyFohD99EYWlv6/Screenshot_26.jpg" alt="" width="563"><figcaption></figcaption></figure>

### The 'Overview' page:

Verify all entered data and click **Create**.

<img src="https://content.gitbook.com/content/RdTysrljwe610dPFG7tE/blobs/vFr6QC5qNO6BVOOsT4cT/image.png" alt="" width="563">

After this step, the Employee will be created. At the next step, you need to provide the device activation code to the user (in case you tied the vault to the user on the "Hardware vault" step).

### The 'Activation' page:

<img src="https://content.gitbook.com/content/RdTysrljwe610dPFG7tE/blobs/EMvI9Vwxogfvc910Avm3/image.png" alt="" width="563">

You can send the code to the employee's email (it will be displayed immediately if it is added to the employee or you can enter it manually) or report the code in any convenient way (e.g. by phone or a messenger application).&#x20;

The user will have to enter the activation code when trying to connect the Hideez Key.

You can [read more about the Activation mechanism](/hideez-enterprise-server/keys-management/keys-activation-mechanism).


# Employees management

Hideez Enterprise Server – Employee management

### **On Hideez Enterprise Server, you can perform the following actions with employees:**

* Edit personal information.
* See the employee's details
* Change roles.
* Deactivate accounts.
* Delete accounts.
* Unlock accounts after failed login attempts.
* [Activate or reactivate the Single Sign-On (SSO) feature](/hideez-enterprise-server/employees/edit-employee/activate-or-reactivate-the-single-sign-on-sso-feature)

## **Editing Personal Information** <a href="#edit-employee" id="edit-employee"></a>

An administrator can edit the following details of an employee:

* First Name.
* Last Name.
* Email Address.
* Phone Number.
* Company.
* Department.
* Position.

**How to edit:**

1. Go to the **Employees** section.
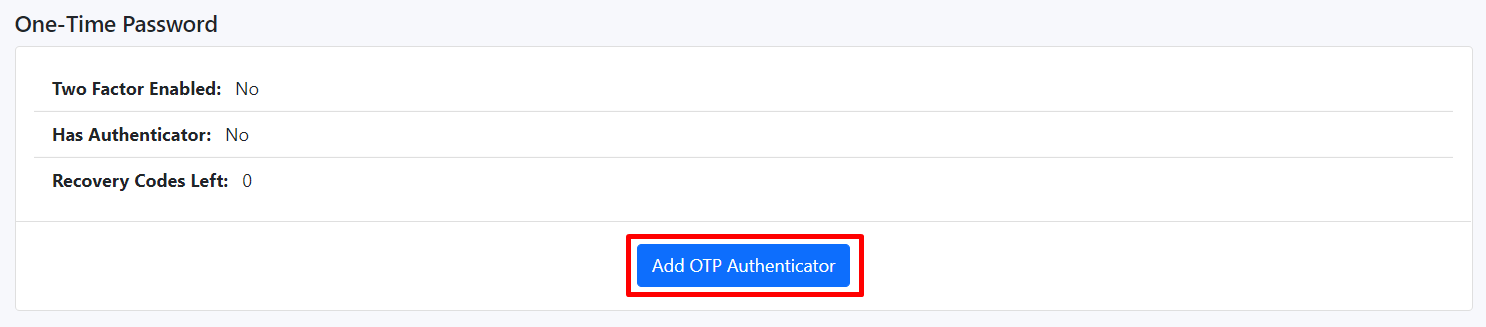
2. Select the required employee and click **Actions → Edit**.

<div><figure><img src="https://1669663611-files.gitbook.io/~/files/v0/b/gitbook-x-prod.appspot.com/o/spaces%2FRdTysrljwe610dPFG7tE%2Fuploads%2FnXkrjWci05WFXtXSm2J2%2Fimage.png?alt=media&amp;token=ec7e22f4-9ae5-49e8-846c-a5ee83eeb3fe" alt=""><figcaption></figcaption></figure> <figure><img src="https://1669663611-files.gitbook.io/~/files/v0/b/gitbook-x-prod.appspot.com/o/spaces%2FRdTysrljwe610dPFG7tE%2Fuploads%2FLURMP67GTcLN3FTLuigI%2Fimage%20(2).png?alt=media&amp;token=da14cff1-3f7f-4be8-8d06-acd25d83aee2" alt=""><figcaption></figcaption></figure></div>

{% hint style="info" %}
**Note:** Editing is not available for employees imported from Active Directory or EntraID (Azure AD)
{% endhint %}

## **Viewing Employee Details**

To view user account information, you can:

* Double-click on the row with the user's name.
* Click on the row with the desired user and click the **Details** button.

<figure><img src="https://1669663611-files.gitbook.io/~/files/v0/b/gitbook-x-prod.appspot.com/o/spaces%2FRdTysrljwe610dPFG7tE%2Fuploads%2FDrUzxWJho0RKGtCJsMQ4%2Fimage.png?alt=media&amp;token=81ce1fdc-f221-4ef4-9e5b-ce2440f09bc4" alt=""><figcaption></figcaption></figure>

All Hideez keys and user accounts are visible in the window that appears.

![](https://content.gitbook.com/content/RdTysrljwe610dPFG7tE/blobs/i9lzDtleI6ATjedu9Roi/image.png)

In this window, you can [create a personal account](https://enterprise.hideez.com/hideez-enterprise-server/accounts/how-to-work-with-personal-employee-accounts), [add a shared account](https://enterprise.hideez.com/hideez-enterprise-server/accounts/how-to-work-with-shared-employee-accounts), [edit a personal account](https://enterprise.hideez.com/hideez-enterprise-server/accounts/changing-and-deleting-a-personal-account), [add a key to the user](/hideez-enterprise-server/hardware-vaults/assign-a-key-to-the-user), and [delete the key from the user](/hideez-enterprise-server/hardware-vaults/untie-the-key-from-the-user).

Also, here you can see the list of user's FIDO2 authenticators and Hideez Authenticator applications and delete them:

<figure><img src="https://content.gitbook.com/content/RdTysrljwe610dPFG7tE/blobs/u8khatkb4ZKw3XNP7aAj/image.png" alt=""><figcaption></figcaption></figure>

<figure><img src="https://content.gitbook.com/content/RdTysrljwe610dPFG7tE/blobs/Q70vhvmq9E29Pvwnd0xE/image.png" alt=""><figcaption></figcaption></figure>

<figure><img src="https://content.gitbook.com/content/RdTysrljwe610dPFG7tE/blobs/UpweyvuThImSCpMeghLt/image.png" alt=""><figcaption></figcaption></figure>

## **Changing an Employee's Role**

The administrator can assign the administrator role to an employee or revert them to a regular user.

**How to change a role:**

1. Go to the **Employees** section.
2. Select the required employee and click **Actions → Change Role**.
3. Select the new role for the employee.

<div><figure><img src="https://1669663611-files.gitbook.io/~/files/v0/b/gitbook-x-prod.appspot.com/o/spaces%2FRdTysrljwe610dPFG7tE%2Fuploads%2FxpjhaYvte1OS2Y7WenWR%2Fimage.png?alt=media&amp;token=17d69245-1754-4355-9711-bae9b660635b" alt=""><figcaption></figcaption></figure> <figure><img src="https://1669663611-files.gitbook.io/~/files/v0/b/gitbook-x-prod.appspot.com/o/spaces%2FRdTysrljwe610dPFG7tE%2Fuploads%2FvjdeGhi6OvsufJzZJE9z%2FScreenshot_74.png?alt=media&amp;token=bf7b416b-b074-43d4-99a2-97848bdf9424" alt=""><figcaption></figcaption></figure></div>

## **Deactivating an Employee**

A deactivated employee:

* Cannot log in to the Hideez Server.
* Loses access to web services that use Single Sign-On via Hideez Server.
* Loses access to Active Directory if imported from there.

**How to deactivate:**

1. Go to the **Employees** section.
2. Select the employee and click **Actions → Deactivate**.

<div><figure><img src="https://1669663611-files.gitbook.io/~/files/v0/b/gitbook-x-prod.appspot.com/o/spaces%2FRdTysrljwe610dPFG7tE%2Fuploads%2F6mdznnGmD0tuhyW9PuW2%2Fimage.png?alt=media&amp;token=cb5fb7c7-0691-4982-b4f5-5ff2c34b2e16" alt=""><figcaption></figcaption></figure> <figure><img src="https://1669663611-files.gitbook.io/~/files/v0/b/gitbook-x-prod.appspot.com/o/spaces%2FRdTysrljwe610dPFG7tE%2Fuploads%2FzZcG2dtJerSVaj20EOMs%2FScreenshot_75.png?alt=media&amp;token=b77a7c34-f4fd-4150-9bbb-745998b18cca" alt=""><figcaption></figcaption></figure></div>

## Delete Employee <a href="#delete-employee" id="delete-employee"></a>

**How to delete:**

1. Go to the **Employees** section.
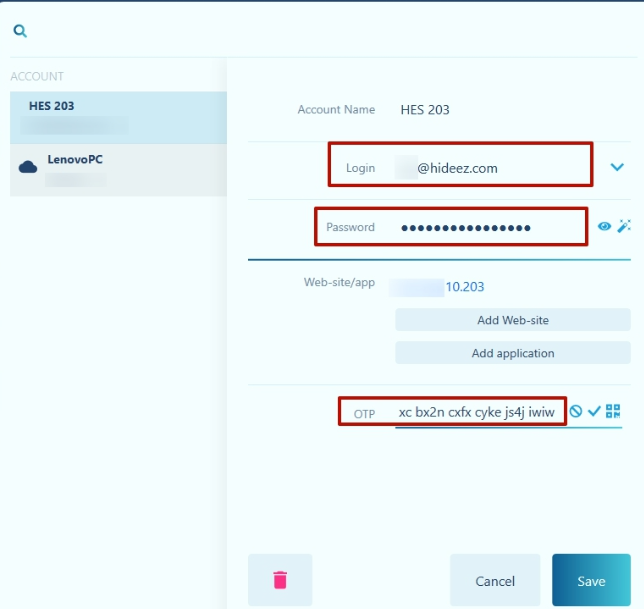
2. Select the employee and click **Actions → Delete**.

<figure><img src="https://1669663611-files.gitbook.io/~/files/v0/b/gitbook-x-prod.appspot.com/o/spaces%2FRdTysrljwe610dPFG7tE%2Fuploads%2FATcdjN15ulR6xdmKzsHE%2Fimage.png?alt=media&amp;token=bf494180-df1b-46a0-bef0-c5993681849b" alt=""><figcaption></figcaption></figure>

{% hint style="info" %}
**Important:**

* Unlink the Hideez Key from the employee before deleting them.
* If this is not done, the system will display an error message.

&#x20;                                       <img src="https://gblobscdn.gitbook.com/assets%2F-M5X-tvIH8ADc6oaz0dC%2F-MAkolVx2Xo4lHbYgXmp%2F-MAkqiBbjoRA1LmGnC7M%2F11.jpg?alt=media&#x26;token=ffcb6aaf-5a6f-4361-97a9-1f45164e9d63" alt="" data-size="original">
{% endhint %}

## Unlock employee account

\
If a user attempts to log in with the wrong password 10 times, their account will be locked. The user can wait for 15 minutes for the account to be automatically unlocked and then log in with the correct password, or they can ask the administrator to manually unlock the account following the guide below.

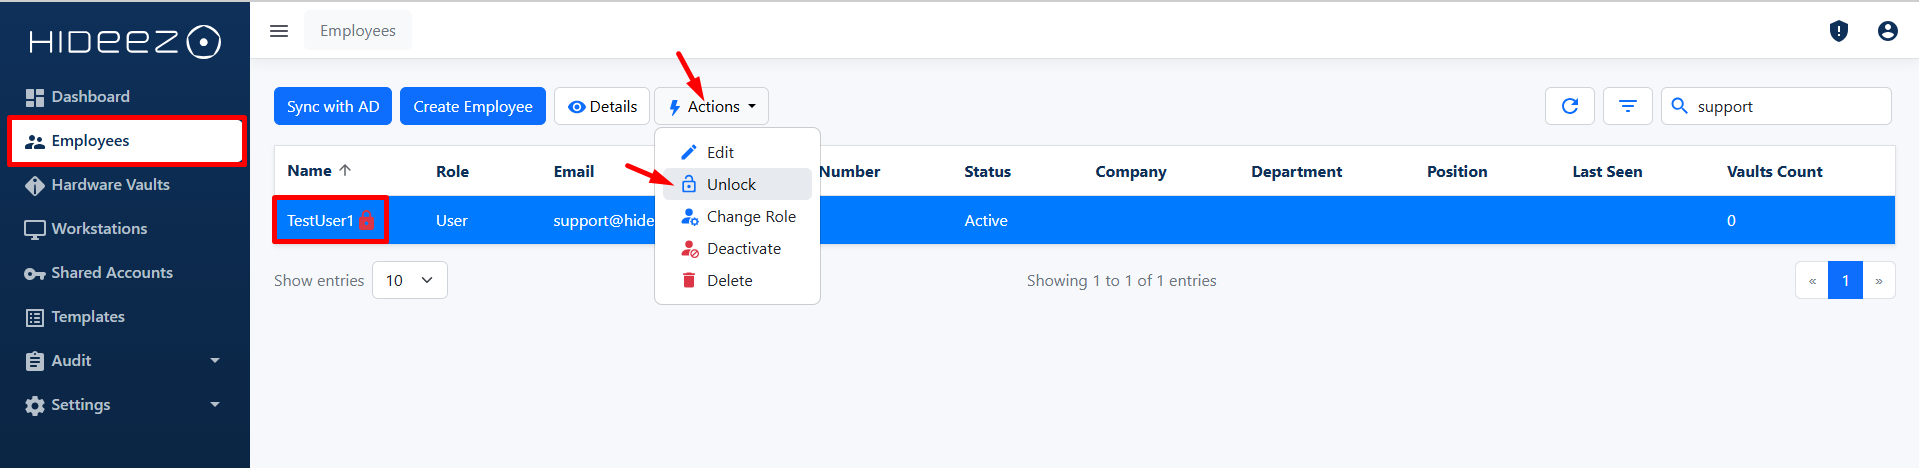
<figure><img src="https://content.gitbook.com/content/RdTysrljwe610dPFG7tE/blobs/UtT5OZ2P6mAIRdaKYD6Z/image.png" alt=""><figcaption></figcaption></figure>

Employees with locked accounts have a corresponding icon next to their name.

To unlock such account click it and then click the "**Unlock**" button.

<figure><img src="https://1669663611-files.gitbook.io/~/files/v0/b/gitbook-x-prod.appspot.com/o/spaces%2FRdTysrljwe610dPFG7tE%2Fuploads%2FQQXTEPxDluHePDbad4LH%2Fimage.png?alt=media&amp;token=6c399efc-bd5b-4dc9-bbf7-20bf448500eb" alt=""><figcaption></figcaption></figure>

Then confirm the unlock operation.

<figure><img src="https://1669663611-files.gitbook.io/~/files/v0/b/gitbook-x-prod.appspot.com/o/spaces%2FRdTysrljwe610dPFG7tE%2Fuploads%2FxphFEByOy3fv6SHZyzeK%2Fimage.png?alt=media&amp;token=d6f5f805-ed36-45cd-a41e-57ed297e0cf1" alt=""><figcaption></figcaption></figure>


# Activate or reactivate the Single Sign-On (SSO) feature

### An HES administrator can activate or reactivate a user's SSO connection, or initiate an update to a user's SSO authentication configuration, from the 'Employees' menu in the left panel of the HES Administrator Console.

User SSO can be activated or reactivated in the following way:

* Send or resend the activation email – the user will receive a new email at their personal address containing a unique link.
* Alternatively, the invitation link can be copied and sent to the user through any preferred and secure method, such as a messaging app
* The activation QR code can also be shared as an image via any trusted and secure communication channel. Using a QR code, a user can easily configure their Hideez Authenticator.

{% hint style="info" %}
Regardless of the chosen method, the link will remain valid for 24 hours and will allow the user to change or update their authentication method in HES. The QR code will remain valid until device registration is complete.
{% endhint %}

<figure><img src="https://1669663611-files.gitbook.io/~/files/v0/b/gitbook-x-prod.appspot.com/o/spaces%2FRdTysrljwe610dPFG7tE%2Fuploads%2FGnyC9qAu3bhsgEeSo7lS%2Fimage.png?alt=media&amp;token=b3c2d862-e736-4d04-8932-e66e6e86425e" alt=""><figcaption><p>Activating or reactivating user SSO</p></figcaption></figure>


# How to manage Positions?

Hideez Enterprise Server – Managing positions

The position directory is used to search and filter data by the position field in the Employees table. Each employee can be assigned one position.

To manage positions go to **Settings -> Organization Structure** and click on the tab **Positions.**

<figure><img src="https://content.gitbook.com/content/RdTysrljwe610dPFG7tE/blobs/WmYzqxjppmYNzjHfY4Kj/Screenshot_12.jpg" alt=""><figcaption></figcaption></figure>

## Adding a position <a href="#adding-a-position" id="adding-a-position"></a>

Click the **Create Position** button:

![](https://content.gitbook.com/content/RdTysrljwe610dPFG7tE/blobs/hIVWtHGggwGNNSXeg44d/Screenshot_14.jpg)

Enter the name of the position and click **Create.**

![](https://content.gitbook.com/content/RdTysrljwe610dPFG7tE/blobs/So9OXAmjm134hDAlTy3o/Screenshot_15.jpg)

The position will be added and displayed in the list in alphabetical order.

## Manage a position <a href="#manage-a-position" id="manage-a-position"></a>

You can edit and delete any position you have created. Click the corresponding buttons **Edit** and **Delete** near the name of the position.

![](https://content.gitbook.com/content/RdTysrljwe610dPFG7tE/blobs/Gjh5aAmAZSMsAX6P0F9X/Screenshot_16.jpg)

Positions are sorted alphabetically. You can change the sorting from A-Z to Z-A.


# How to manage companies and departments?

Hideez Enterprise Server – Managing companies and departments

There can be an unlimited number of companies and departments. They should reflect the organizational structure of your company or group of companies. Each employee or workstation can belong to one of the departments, which in turn is part of one of the companies.&#x20;

Thanks to this, you can filter and group data in tables by departments and companies, as well as build reports by departments and companies (read more about these options in the [Audit section](/hideez-enterprise-server/audit)).

To manage companies, departments and positions go to the **Settings > Organization Structure**.

![](https://content.gitbook.com/content/RdTysrljwe610dPFG7tE/blobs/WwZID16cC3pGh3rW06A1/image.png)

## Adding a company <a href="#adding-a-company" id="adding-a-company"></a>

#### Step 1 <a href="#step-1" id="step-1"></a>

Click the **Create Company** button on the tab **Companies**.

![](https://content.gitbook.com/content/RdTysrljwe610dPFG7tE/blobs/VbVsQbzxBAL87NV5jXgA/Screenshot_5.jpg)

#### Step 2 <a href="#step-2" id="step-2"></a>

Enter the name of the company and click **Create**.

![](https://content.gitbook.com/content/RdTysrljwe610dPFG7tE/blobs/aD7gNRFGEGr29aNHbYbR/Screenshot_6.jpg)

The company will be added and displayed in the list in alphabetical order.

## Manage a company <a href="#manage-a-company" id="manage-a-company"></a>

You can **Edit Company** or **Delete Company** any company you have created. Click the corresponding buttons **Edit** and **Delete** near the name of the company.

![](https://content.gitbook.com/content/RdTysrljwe610dPFG7tE/blobs/l45UKS3ZEWA7pGVSQVnE/Screenshot_8.jpg)

All departments will be deleted along with the deletion of the company.

## Adding a department <a href="#adding-a-department" id="adding-a-department"></a>

#### Step 1 <a href="#step-1-1" id="step-1-1"></a>

Click the **Create Department** button near the corresponding company.

![](https://content.gitbook.com/content/RdTysrljwe610dPFG7tE/blobs/DZftRtTX647qpivn75Qd/Screenshot_9.jpg)

#### Step 2 <a href="#step-2-1" id="step-2-1"></a>

Enter the name of the department and click **Create**.

![](https://content.gitbook.com/content/RdTysrljwe610dPFG7tE/blobs/uYJqKjW9uLhMnIHk1F3c/Screenshot_10.jpg)

## Manage a department <a href="#manage-a-department" id="manage-a-department"></a>

You can edit and delete any department you have created in the company. Click corresponding buttons **Edit** and **Delete** near the name of the department.

![](https://content.gitbook.com/content/RdTysrljwe610dPFG7tE/blobs/FnqWpUoAR91SRRmsin8J/Screenshot_11.jpg)

Departments are sorted alphabetically. You can change the sorting from A-Z to Z-A.


# Employee management with Active Directory

Hideez Enterprise Server – Employee management with AD

{% hint style="warning" %}
We assume that **either a manual way** of managing employees will be used (manual addition to HES and subsequent management up to deletion) **or integration with AD** when the list of employees will be synchronized with a specific group in AD.
{% endhint %}

At the moment, 2 scenarios for the operation of the HES server and Active Directory have been implemented:

1. [Employee list import and synchronization](/hideez-server-integration/microsoft-entra-id/import)
2. [Import and synchronization of the list of employees with a regular automatic password change to the domain account](broken://pages/-MGw06-MyCMW2GA5VeGA)

**HES and Active Directory fields correspondence:**&#x20;

| **HES**    | **Active Directory** |
| ---------- | -------------------- |
| First name | Given name           |
| Last name  | Surname              |
| E-mail     | E-mail address       |
| Position   | Job Title            |
| Department | Department           |
| Company    | Company              |


# Workstations

Hideez Enterprise Server – Workstations


# How to add and approve Workstations?

Hideez Enterprise Server – Adding and approving workstations

{% embed url="<https://www.youtube.com/watch?v=OuuU3Twvk5M>" %}

## Adding a Workstation

Once the Hideez Client app is installed on a workstation and [HES server is specified in the corresponding field](/hideez-client-app/windows-deployment/set-up-hideez-client-app#interfeis-ustanovshika), this workstation appears in the list of workstations on HES.&#x20;

![](https://content.gitbook.com/content/RdTysrljwe610dPFG7tE/blobs/GzqjxAUqF2wIOeYqUDSM/image.png)

## Approving a Workstation

For using the Hideez key on the employee's workstation, it has to be approved by the administrator. Otherwise, the Hideez key will not be able to connect to the Hideez client.

#### Step 1

You need to click on the line with the desired workstation and click the **Approve** button.

![](https://content.gitbook.com/content/RdTysrljwe610dPFG7tE/blobs/VzmtNLsdgHV29QFuHWKJ/2.jpg)

#### Step 2

![](https://content.gitbook.com/content/RdTysrljwe610dPFG7tE/blobs/oBudMoAbSopvveW0RIic/image.png)

You may select the **Company** and **Department** or stay them empty.&#x20;

[How to add a company?](/hideez-enterprise-server/employees/how-to-add-a-company#adding-a-company)\
[How to add a Department to the Company?](/hideez-enterprise-server/employees/how-to-add-a-company#adding-a-department)


# Workstations management

Hideez Enterprise Server – Workstation management

You can Edit Workstation, See Details and Delete. Go to section **Workstations**.

![](https://content.gitbook.com/content/RdTysrljwe610dPFG7tE/blobs/08OwT1b3B139DkdUmNQT/image.png)

## Editing Workstation

You need to click on the line with the desired workstation and click **Edit**.

![](https://content.gitbook.com/content/RdTysrljwe610dPFG7tE/blobs/ibRxuGb7R1TPVlWyeOCH/4.jpg)

You can edit and save the data in the window that appears.

![](https://content.gitbook.com/content/RdTysrljwe610dPFG7tE/blobs/RSZYjlOVZL1g9YO9CrQW/image.png)

## Deleting Workstation

You need to click on the line with the desired workstation and click **Delete**.

![](https://content.gitbook.com/content/RdTysrljwe610dPFG7tE/blobs/WLj5YIJP8H4Khfpfx4uy/image.png)

Confirm your decision and click **Delete** one more time.

![](https://content.gitbook.com/content/RdTysrljwe610dPFG7tE/blobs/WYLR9UI1D7oqTmwJtEFp/7.jpg)

{% hint style="info" %}
Note! When you delete a workstation, all associated logs will be deleted.
{% endhint %}

If you delete the workstation while the user is working on it, the Hideez key will be disconnected and the Hideez Client will display an indicator that signals that the workstation not approved on the server.

![](https://content.gitbook.com/content/RdTysrljwe610dPFG7tE/blobs/2RGD1ejxeEZ4P39jETJK/image.png)

## See details

To view workstation information, you can:

1. Double-click on a line with the workstation name.
2. Click on the line with the desired workstation and click **Details** button.

![](https://content.gitbook.com/content/RdTysrljwe610dPFG7tE/blobs/3mIE7FjAUgsV3FnbhdDs/image.png)

You can see the Hideez key or list of keys that are allowed to work with this workstation via proximity.

![](https://content.gitbook.com/content/RdTysrljwe610dPFG7tE/blobs/iMpGk2W4oSDboit4nXv5/image.png)

You can read more about proximity mechanism:<br>

* [Proximity Lock](/use-cases/hideez-key/lock-pc)
* [Proximity Unlock](/use-cases/hideez-key/lock-unlock-pc-by-proximity)

## Unapproving Workstation

If you decide to prohibit a workstation from working with Hideez keys, then you can make it unapproved and it is enough.

You need to click on the line with the desired workstation and click **Unapprove**.

![](https://content.gitbook.com/content/RdTysrljwe610dPFG7tE/blobs/vu8ky7cT1DL86X74nJXE/un.jpg)

Confirm your decision and click **Unapprove** one more time.

![](https://content.gitbook.com/content/RdTysrljwe610dPFG7tE/blobs/SfMpg6xtH15rSlvtHFgL/un2.jpg)

If you unapprove the workstation while the user is working on it, the Hideez key will be disconnected and the Hideez Client will display an indicator that signals that the workstation not approved on the server.

![](https://content.gitbook.com/content/RdTysrljwe610dPFG7tE/blobs/2RGD1ejxeEZ4P39jETJK/image.png)


# Workstation Profiles

Hideez Enterprise Server – Workstation Profile.

Administrators can set the options for Locking and Unlocking Workstations directly in the web interface of Hideez Enterprise Server on the section **Workstations → Profiles.**

To set the Proximity lock and unlock settings, the Administrator has to configure those settings on the Hideez Enterprise Server. &#x20;

For that reason, there is a section **Workstation Profiles** on the Hideez Enterprise Server.

<figure><img src="https://content.gitbook.com/content/RdTysrljwe610dPFG7tE/blobs/qZ3kPAgmoHi51uCGuvs0/Screenshot_3.jpg" alt=""><figcaption></figcaption></figure>

The Admin has to create a new one with the required configuration and assign the Workstations to that profile (**1**) or edit the existing Workstation profile (**2**).&#x20;

<figure><img src="https://content.gitbook.com/content/RdTysrljwe610dPFG7tE/blobs/SpVp1YAq0qKgftiCun0m/Screenshot_1.jpg" alt=""><figcaption></figcaption></figure>

<figure><img src="https://content.gitbook.com/content/RdTysrljwe610dPFG7tE/blobs/3xdBEdD19QcaaiPUy5TT/Screenshot_2.jpg" alt="" width="563"><figcaption></figcaption></figure>

### **Enable Proximity Lock**&#x20;

If this option is enabled, the workstation will be automatically locked in case of disconnection from Hideez Key or if the signal level drops below the specified threshold.

* Proximity Lock Signal Level · X%

  This is the signal level below which the workstation will be locked. It is indicated in percentage. The recommended level is 20-30%.
* Proximity Lock Delay · X sec.

  It sets a delay before locking the computer. If during this time the signal level increases above the threshold, the locking process will not occur. The delay is specified in seconds. To reduce the number of false locking, it is recommended to set it to 5–10 seconds.

### **Enable Proximity Unlock**&#x20;

&#x20;If this option is enabled, the workstation will be automatically unlocked if the signal level from Hideez Key rises above the specified threshold. The signal level can be measured even without the actual connection of the Hideez Key.

* Proximity Unlock Signal Level · X%

  This is the signal level above which the workstation will be unlocked. It is indicated in percentage. The recommended level is 70-80%.

{% hint style="info" %}
To enable proximity to **unlock** for certain workstation Administrator have to add that workstation to the[ **Proximity Unlock Workstations.**](/hideez-enterprise-server/workstations/use-proximity-with-workstation) In case, the Administrator does not do this, automatic Proximity unlocking will not work, even if it is set in the Workstation profile.

To enable **Proximity Unlock** for the workstation two conditions must be met:

* workstation added to the [**Proximity Unlock Workstations**](/hideez-enterprise-server/workstations/use-proximity-with-workstation)
* workstation assigned with the [**Profile**](/hideez-enterprise-server/workstations/workstation-profiles) which has Enabled Proximity Unlock

&#x20;Please note that it is not recommended to simultaneously add multiple Hideez Key devices for unlocking the same computer remotely, as this may lead to false unlocks.
{% endhint %}

{% hint style="success" %}
When we add a new workstation, it has a profile “Default”, that uses the following settings for proximity:\
&#x20;\- Locking occurs when Bluetooth signal strength drops below 20-30%, \
&#x20;\- Unlocking occurs when Bluetooth signal strength exceeds 70-80%.&#x20;
{% endhint %}

Actual distances in meters can vary greatly in different rooms and depend on external factors (location of the Hideez Key, the presence of furniture and walls in the room, etc.). You need to determine optimal parameters for yourself experimentally.

Important Conditions:

{% hint style="warning" %}
The proximity mechanism is not very stable. The signal can constantly change (even when the key lies in one place). Within a few seconds, the signal level can vary by 30-40 units! It is influenced by a lot of factors: mobile networks and other Bluetooth devices. These are the properties of the technology itself.\
\
According to our observations, we recommend setting intervals between the values of at least 40. We have chosen the optimal values:\
**Enable Proximity Lock** - 20-30%;\
**Enable Proximity Unlock** - 70-80%.
{% endhint %}

### Advanced Options for Workstation Profiles

<figure><img src="https://content.gitbook.com/content/RdTysrljwe610dPFG7tE/blobs/7uKIXRKirBgBXyPsNkU2/Screenshot_17.jpg" alt=""><figcaption></figcaption></figure>

* **Handle BLE Tap –** Treat Hideez Key to Hideez Dongle tap as an action for a third-party app. E.g., if you tap Hideez Key to Dongle, this action will generate an event that could be applied in the third-party app. This option could be useful if the supervisor has to confirm the operation of the Employee on some specific workflow. Also, the event will appear in the Remote Workstation as well.
* **Allow Multiple Device Connections** - Allow simultaneous connection of multiple Hideez Keys to the computer. If you disable that option, you cannot connect more than one Hideez Key to works station. Also, that option allows generating BLE Tap events as the previous option.

{% hint style="info" %}
The next two options work **only** via **Remote Desktop Protocol** by Windows.
{% endhint %}

#### **Auto Forward Device**&#x20;

Automatically forward the device to the remote machine when an RDP connection is made. User confirmation is required. E.g., if you connect from the local workstation with a connected Hideez Key to the Remote Workstation by **Windows RDP, the** Hideez Key will appear in the Remote and Local workstations automatically in the section **Remote Vault**. That means you do not need to enter manually the serial number of the Hideez Key.

#### **Auto-Confirm Device Forwarding**&#x20;

Do not require user confirmation for establishing a connection to Hideez Key on a remote computer. That means you do not need to confirm on the local workstation the connection Hideez Key to the remote workstation. The Hideez will appear in the remote workstation automatically. That option works only with the enable option  **Auto Forward Device** (previous option).&#x20;

<br>


# Use Proximity Unlock Workstations

Hideez Enterprise Server – Proximity Unlock Workstations

{% hint style="info" %}
**Proximity** - a function allowing to lock and unlock of a computer depending on the Bluetooth signal strength without physical interaction with the computer. If the Bluetooth signal strength is lower than the given parameter, the computer will be locked automatically. \
This function saves the user from having to lock and unlock the PC manually and provides a secure PC lock when the key is distanced away from the workstation (for example, if the user with the key moves away from the workstation, the computer will automatically lock) and unlock when approaching the workstation.
{% endhint %}

### To add or edit the Workstation which could be [unlocked by Proximity](/use-cases/hideez-key/lock-unlock-pc-by-proximity) (Bluetooth signal strength) you have to:

1. Double-click on a line with the Employee who has added Hideez Key.
2. Go to the **Proximity Unlock Workstations** section and click **Add Workstation.**
3. Select the workstation that you prefer to unlock by Proximity.

{% hint style="info" %}
To enable **Proximity Unlock** for the workstation Administrator have to:

* add workstation to the **Proximity Unlock Workstations**
* assign that workstation to the [Profile](/hideez-enterprise-server/workstations/workstation-profiles) which has **Enabled Proximity Unlock**
  {% endhint %}

![](https://content.gitbook.com/content/RdTysrljwe610dPFG7tE/blobs/jRVxS6cSrIcGHQagZzXu/Screenshot_4.jpg)

![](https://content.gitbook.com/content/RdTysrljwe610dPFG7tE/blobs/y61g2FDMCaxnMmTRKlQK/Screenshot_5.jpg)

####

<figure><img src="https://content.gitbook.com/content/RdTysrljwe610dPFG7tE/blobs/8l9K1QdFZANroYZmUeBm/Screenshot_6.jpg" alt=""><figcaption></figcaption></figure>

{% hint style="info" %}
To enable proximity to **unlock** for certain workstation Administrator have to add that workstation to the[ **Proximity Unlock Workstations.**](/hideez-enterprise-server/workstations/use-proximity-with-workstation) In case, the Administrator does not do this, automatic Proximity unlocking will not work, even if it is set in the [Workstation profile.](/hideez-enterprise-server/workstations/workstation-profiles)
{% endhint %}

### Remove “**Proximity Unlock Workstations”**

Administrators can disable unlocking the workstation by Proximity. For this, remove the workstation from the "**Proximity Unlock Workstations"** section by clicking the button “Remove”.

<figure><img src="https://content.gitbook.com/content/RdTysrljwe610dPFG7tE/blobs/Fnhq15jCU5oAkGgvlR0R/Screenshot_7.jpg" alt=""><figcaption></figcaption></figure>

{% hint style="info" %}
Please see more about: &#x20;

* [Unlock PC by proximity](/use-cases/hideez-key/lock-unlock-pc-by-proximity)
  {% endhint %}


# Hardware Vaults

Hideez Enterprise Server – Hardware vaults


# How to add Hideez Key into the Server

Adding Keys into Hideez Server

Upon receiving the Hideez Key, please follow these steps to add it to your Hideez Server:

1. Open Hideez Server.
2. Navigate to **Hardware Vaults → Add Hardware Vaults**

<figure><img src="https://content.gitbook.com/content/RdTysrljwe610dPFG7tE/blobs/1xsinbCRljAjOrcuHi5q/Screenshot_8.jpg" alt="" width="563"><figcaption></figcaption></figure>

3. In the opened tab, enter the serial numbers of the hardware vaults and click **“Add.”**

{% hint style="info" %}
**You can locate the serial number on the side panel of your Hideez Key or the box containing your Key.**

**If other users also have a physical key, the admin must manually add their serial numbers on the server.**
{% endhint %}

<div><figure><img src="https://content.gitbook.com/content/RdTysrljwe610dPFG7tE/blobs/n5MF9ns3OhPqBJENf8DE/Screenshot_7.jpg" alt="" width="312"><figcaption></figcaption></figure> <figure><img src="https://content.gitbook.com/content/RdTysrljwe610dPFG7tE/blobs/k2mENzCRdMa2hTWlTq9Q/IMG_20240124_154042.jpg" alt="" width="375"><figcaption></figcaption></figure></div>

{% hint style="info" %}
Additionally, you have the option to delete a Hideez Key from the server if it is no longer in use. [**To do that, please, see our guide.** ](/hideez-enterprise-server/keys-management/delete-key-from-hideez-server)
{% endhint %}


---

[Next Page](/llms-full.txt/1)